HP LaserJet 3200 HP LaserJet 3200 Series Product - (English) User Guide - Page 101
Receiving faxes to your computer, To turn the Receive to PC setting off from the control, panel
 |
View all HP LaserJet 3200 manuals
Add to My Manuals
Save this manual to your list of manuals |
Page 101 highlights
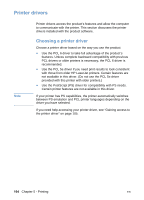
2 Add one or more recipients on the HP LaserJet Send Fax dialog box. 3 Optionally, include a cover page. 4 Click Send Now. -OrClick Send Later and select a delay date and time. For more information on sending a fax using the HP LaserJet Workplace (Mac OS), the HP LaserJet Document Manager (Windows), or the HP LaserJet Director, the software Help. Receiving faxes to your computer To receive faxes to your computer, you must enable the Receive to PC setting in the software. (See the software Help for instructions.) If you have a phone line receiving both fax and voice calls (a shared line) and an answering machine or computer voicemail on the line, you must turn off the answering machine or voicemail to receive faxes to the computer. If you do not, either the answering system answers all calls, or the PC fax program does. Because of this limitation, most users choose to receive faxes to the product. The Receive to PC setting can only be activated from the computer. If for any reason that computer is no longer available or accessible, you can use the procedure below to turn the Receive to PC setting off from the product control panel. To turn the Receive to PC setting off from the control panel 1 Press ENTER/MENU. 2 Use the < or > key to select FAX FUNCTIONS, and then press ENTER/MENU. 3 Use the < or > key to select STOP RECEIVE TO PC, and then press ENTER/MENU to confirm your selection. EN Faxing using the software 99
-
 1
1 -
2
-
3
-
4
-
5
-
6
-
7
-
8
-
9
-
10
-
11
-
12
-
13
-
14
-
15
-
16
-
17
-
18
-
19
-
20
-
21
-
22
-
23
-
24
-
25
-
26
-
27
-
28
-
29
-
30
-
31
-
32
-
33
-
34
-
35
-
36
-
37
-
38
-
39
-
40
-
41
-
42
-
43
-
44
-
45
-
46
-
47
-
48
-
49
-
50
-
51
-
52
-
53
-
54
-
55
-
56
-
57
-
58
-
59
-
60
-
61
-
62
-
63
-
64
-
65
-
66
-
67
-
68
-
69
-
70
-
71
-
72
-
73
-
74
-
75
-
76
-
77
-
78
-
79
-
80
-
81
-
82
-
83
-
84
-
85
-
86
-
87
-
88
-
89
-
90
-
91
-
92
-
93
-
94
-
95
-
 96
96 -
 97
97 -
 98
98 -
 99
99 -
 100
100 -
 101
101 -
 102
102 -
 103
103 -
 104
104 -
 105
105 -
 106
106 -
107
-
108
-
109
-
110
-
111
-
112
-
113
-
114
-
115
-
116
-
117
-
118
-
119
-
120
-
121
-
122
-
123
-
124
-
125
-
126
-
127
-
128
-
129
-
130
-
131
-
132
-
133
-
134
-
135
-
136
-
137
-
138
-
139
-
140
-
141
-
142
-
143
-
144
-
145
-
146
-
147
-
148
-
149
-
150
-
151
-
152
-
153
-
154
-
155
-
156
-
157
-
158
-
159
-
160
-
161
-
162
-
163
-
164
-
165
-
166
-
167
-
168
-
169
-
170
-
171
-
172
-
173
-
174
-
175
-
176
-
177
-
178
-
179
-
180
-
181
-
182
-
183
-
184
-
185
-
186
-
187
-
188
-
189
-
190
-
191
-
192
-
193
-
194
-
195
-
196
-
197
-
198
-
199
-
200
-
201
-
202
-
203
-
204
-
205
-
206
-
207
-
208
-
209
-
210
-
211
-
212
-
213
-
214
-
215
-
216
-
217
-
218
-
219
-
220
-
221
-
222
-
223
-
224
-
225
-
226
-
227
-
228
-
229
-
230
-
231
-
232
-
233
-
234
-
235
-
236
-
237
-
238
-
239
-
240
-
241
-
242
-
243
-
244
-
245
-
246
-
247
-
248
-
249
-
250
-
251
-
252
-
253
-
254
-
255
-
256
-
257
-
258
-
259
-
260
-
261
-
262
-
263
-
264
-
265
-
266
-
267
-
268
-
269
-
270
-
271
-
272
-
273
-
274
-
275
-
276
-
277
-
278
-
279
-
280
-
281
-
282
-
283
-
284
-
285
-
286
-
287
-
288
 |
 |