HP LaserJet 3200 HP LaserJet 3200 Series Product - (English) User Guide - Page 46
Setting the fax activity log to print automatically, To set when the fax log prints
 |
View all HP LaserJet 3200 manuals
Add to My Manuals
Save this manual to your list of manuals |
Page 46 highlights
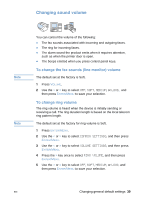
Setting the fax activity log to print automatically The fax activity log provides a chronological history of the last 40 faxes that were received, sent, or deleted, as well as any errors that occurred. You can decide whether or not you want the fax log to print automatically after every 40 entries. The factory default is On. To set when the fax log prints 1 Press ENTER/MENU. 2 Use the < or > key to select REPORTS, and then press ENTER/ MENU. 3 Use the < or > key to select FAX ACTIVITY LOG. 4 Press > once to select AUTO. LOG PRINTING, and then press ENTER/MENU. 5 Use the < or > key to select ON or OFF, and then press ENTER/ MENU to confirm your selection. 44 Chapter 3 - Managing General Default Settings, Logs, and Reports EN
-
 1
1 -
2
-
3
-
4
-
5
-
6
-
7
-
8
-
9
-
10
-
11
-
12
-
13
-
14
-
15
-
16
-
17
-
18
-
19
-
20
-
21
-
22
-
23
-
24
-
25
-
26
-
27
-
28
-
29
-
30
-
31
-
32
-
33
-
34
-
35
-
36
-
37
-
38
-
39
-
40
-
 41
41 -
 42
42 -
 43
43 -
 44
44 -
 45
45 -
 46
46 -
 47
47 -
 48
48 -
 49
49 -
 50
50 -
 51
51 -
52
-
53
-
54
-
55
-
56
-
57
-
58
-
59
-
60
-
61
-
62
-
63
-
64
-
65
-
66
-
67
-
68
-
69
-
70
-
71
-
72
-
73
-
74
-
75
-
76
-
77
-
78
-
79
-
80
-
81
-
82
-
83
-
84
-
85
-
86
-
87
-
88
-
89
-
90
-
91
-
92
-
93
-
94
-
95
-
96
-
97
-
98
-
99
-
100
-
101
-
102
-
103
-
104
-
105
-
106
-
107
-
108
-
109
-
110
-
111
-
112
-
113
-
114
-
115
-
116
-
117
-
118
-
119
-
120
-
121
-
122
-
123
-
124
-
125
-
126
-
127
-
128
-
129
-
130
-
131
-
132
-
133
-
134
-
135
-
136
-
137
-
138
-
139
-
140
-
141
-
142
-
143
-
144
-
145
-
146
-
147
-
148
-
149
-
150
-
151
-
152
-
153
-
154
-
155
-
156
-
157
-
158
-
159
-
160
-
161
-
162
-
163
-
164
-
165
-
166
-
167
-
168
-
169
-
170
-
171
-
172
-
173
-
174
-
175
-
176
-
177
-
178
-
179
-
180
-
181
-
182
-
183
-
184
-
185
-
186
-
187
-
188
-
189
-
190
-
191
-
192
-
193
-
194
-
195
-
196
-
197
-
198
-
199
-
200
-
201
-
202
-
203
-
204
-
205
-
206
-
207
-
208
-
209
-
210
-
211
-
212
-
213
-
214
-
215
-
216
-
217
-
218
-
219
-
220
-
221
-
222
-
223
-
224
-
225
-
226
-
227
-
228
-
229
-
230
-
231
-
232
-
233
-
234
-
235
-
236
-
237
-
238
-
239
-
240
-
241
-
242
-
243
-
244
-
245
-
246
-
247
-
248
-
249
-
250
-
251
-
252
-
253
-
254
-
255
-
256
-
257
-
258
-
259
-
260
-
261
-
262
-
263
-
264
-
265
-
266
-
267
-
268
-
269
-
270
-
271
-
272
-
273
-
274
-
275
-
276
-
277
-
278
-
279
-
280
-
281
-
282
-
283
-
284
-
285
-
286
-
287
-
288
 |
 |

44
Chapter 3 - Managing General Default Settings, Logs, and Reports
EN
Setting the fax activity log to print
automatically
The fax activity log provides a chronological history of the last 40
faxes that were received, sent, or deleted, as well as any errors that
occurred. You can decide whether or not you want the fax log to print
automatically after every 40 entries. The factory default is On.
To set when the fax log prints
1
Press
E
NTER
/M
ENU
.
2
Use the
<
or
>
key to select
REPORTS
, and then press
E
NTER
/
M
ENU
.
3
Use the
<
or
>
key to select
FAX ACTIVITY LOG
.
4
Press
>
once to select
AUTO. LOG PRINTING
, and then press
E
NTER
/M
ENU
.
5
Use the
<
or
>
key to select
ON
or
OFF
, and then press
E
NTER
/
M
ENU
to confirm your selection.