Apple CNETiPhone3G16GBBlack User Guide - Page 6
Upgrading from an Original iPhone, Installing the SIM Card, Registering iPhone - cases
 |
View all Apple CNETiPhone3G16GBBlack manuals
Add to My Manuals
Save this manual to your list of manuals |
Page 6 highlights
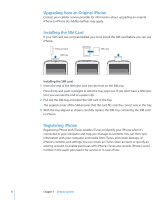
Upgrading from an Original iPhone Contact your cellular service provider for information about upgrading an original iPhone to iPhone 3G. Additional fees may apply. Installing the SIM Card If your SIM card was not preinstalled, you must install the SIM card before you can use iPhone. SIM eject tool SIM tray SIM card Installing the SIM card: 1 Insert the end of the SIM eject tool into the hole on the SIM tray. Press firmly and push it straight in until the tray pops out. If you don't have a SIM eject tool, you can use the end of a paper clip. 2 Pull out the SIM tray and place the SIM card in the tray. The angled corner of the SIM ensures that the card fits only the correct way in the tray. 3 With the tray aligned as shown, carefully replace the SIM tray containing the SIM card in iPhone. Registering iPhone Registering iPhone with iTunes enables iTunes to identify your iPhone when it's connected to your computer and help you manage its contents. You can then sync information with your computer and media from iTunes, and create backups of iPhone's contents and settings. You can create an iTunes Store account, or specify an existing account, to enable purchases with iPhone. iTunes also records iPhone's serial number in the event you need it for service or in case of loss. 6 Chapter 1 Getting Started
-
 1
1 -
 2
2 -
 3
3 -
 4
4 -
 5
5 -
 6
6 -
 7
7 -
 8
8 -
 9
9 -
 10
10 -
 11
11 -
 12
12 -
13
-
14
-
15
-
16
-
17
-
18
-
19
-
20
-
21
-
22
-
23
-
24
-
25
-
26
-
27
-
28
-
29
-
30
-
31
-
32
-
33
-
34
-
35
-
36
-
37
-
38
-
39
-
40
-
41
-
42
-
43
-
44
-
45
-
46
-
47
-
48
-
49
-
50
-
51
-
52
-
53
-
54
-
55
-
56
-
57
-
58
-
59
-
60
-
61
-
62
-
63
-
64
-
65
-
66
-
67
-
68
-
69
-
70
-
71
-
72
-
73
-
74
-
75
-
76
-
77
-
78
-
79
-
80
-
81
-
82
-
83
-
84
-
85
-
86
-
87
-
88
-
89
-
90
-
91
-
92
-
93
-
94
-
95
-
96
-
97
-
98
-
99
-
100
-
101
-
102
-
103
-
104
-
105
-
106
-
107
-
108
-
109
-
110
-
111
-
112
-
113
-
114
-
115
-
116
-
117
-
118
-
119
-
120
-
121
-
122
-
123
-
124
-
125
-
126
-
127
-
128
-
129
-
130
-
131
-
132
-
133
-
134
-
135
-
136
-
137
-
138
-
139
-
140
-
141
-
142
-
143
-
144
-
145
-
146
-
147
-
148
-
149
-
150
-
151
-
152
 |
 |
