Panasonic WJ-ND400K Operating Instructions - Page 113
HDD Unit, Install the HDD into the special canister and use the four
 |
View all Panasonic WJ-ND400K manuals
Add to My Manuals
Save this manual to your list of manuals |
Page 113 highlights
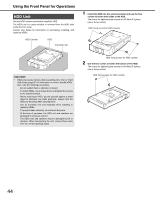
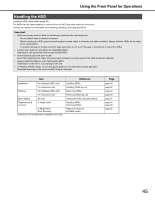
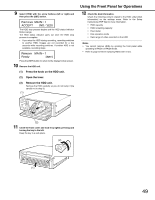
Using the Front Panel for Operations HDD Unit Use the HDD canister provided to install the HDD. The HDDs can be easily installed or removed from the HDD slots inside the front cover. Contact your dealer for information on purchasing, installing, and replacing HDDs. HDD Canister HDD Anti-static mat 1 Install the HDD into the special canister and use the four screws to fasten both sides of the HDD. The torque for tightening the screws is 0.49 N•m (5 kgf•cm) (use a torque driver) HDD fixing screws for HDD canister Important: • HDDs are precise devices. Before starting work, refer to "Hard disk drives (page 9)" for information on how to handle HDDs. Also, note the following precautions. ⋅ Do not subject them to vibration or impact. ⋅ To install HDDs, use a torque driver and tighten the screws to the specified torque. ⋅ Before touching an HDD, ground yourself against a metal object to eliminate any static electricity. Always hold the HDDs by the sides when carrying them. ⋅ Use an anti-static mat and wristband when installing or replacing HDDs. ⋅ To prevent static electricity, do not touch the parts. ⋅ At the time of purchase, the HDD unit and canisters are packaged in exclusive cushion. The HDD units and canisters may be damaged by fall or vibration. When transporting the unit, remove these parts from the unit and package again. HDD fixing screws for HDD canister 2 Use the two screws to fasten the bottom of the HDD. The torque for tightening the screws is 0.49 N•m (5 kgf•cm) (use a torque driver) HDD fixing screws for HDD canister 44
-
 1
1 -
2
-
3
-
4
-
5
-
6
-
7
-
8
-
9
-
10
-
11
-
12
-
13
-
14
-
15
-
16
-
17
-
18
-
19
-
20
-
21
-
22
-
23
-
24
-
25
-
26
-
27
-
28
-
29
-
30
-
31
-
32
-
33
-
34
-
35
-
36
-
37
-
38
-
39
-
40
-
41
-
42
-
43
-
44
-
45
-
46
-
47
-
48
-
49
-
50
-
51
-
52
-
53
-
54
-
55
-
56
-
57
-
58
-
59
-
60
-
61
-
62
-
63
-
64
-
65
-
66
-
67
-
68
-
69
-
70
-
71
-
72
-
73
-
74
-
75
-
76
-
77
-
78
-
79
-
80
-
81
-
82
-
83
-
84
-
85
-
86
-
87
-
88
-
89
-
90
-
91
-
92
-
93
-
94
-
95
-
96
-
97
-
98
-
99
-
100
-
101
-
102
-
103
-
104
-
105
-
106
-
107
-
 108
108 -
 109
109 -
 110
110 -
 111
111 -
 112
112 -
 113
113 -
 114
114 -
 115
115 -
 116
116 -
 117
117 -
 118
118 -
119
-
120
-
121
-
122
-
123
-
124
-
125
-
126
-
127
-
128
-
129
-
130
-
131
-
132
-
133
-
134
-
135
-
136
-
137
-
138
-
139
-
140
-
141
-
142
-
143
-
144
-
145
-
146
-
147
-
148
-
149
-
150
-
151
-
152
-
153
-
154
-
155
-
156
-
157
-
158
-
159
-
160
-
161
-
162
-
163
-
164
-
165
-
166
-
167
-
168
-
169
-
170
-
171
-
172
-
173
-
174
-
175
-
176
-
177
-
178
-
179
-
180
-
181
-
182
-
183
-
184
-
185
-
186
-
187
-
188
-
189
-
190
-
191
-
192
-
193
-
194
-
195
-
196
-
197
-
198
-
199
-
200
-
201
-
202
-
203
-
204
-
205
-
206
-
207
-
208
-
209
-
210
-
211
-
212
-
213
-
214
-
215
-
216
-
217
-
218
-
219
-
220
-
221
-
222
-
223
-
224
-
225
-
226
-
227
-
228
-
229
-
230
-
231
-
232
-
233
 |
 |
