Panasonic WJ-ND400K Operating Instructions - Page 114
Handlin, the HDD, Important, Reference
 |
View all Panasonic WJ-ND400K manuals
Add to My Manuals
Save this manual to your list of manuals |
Page 114 highlights
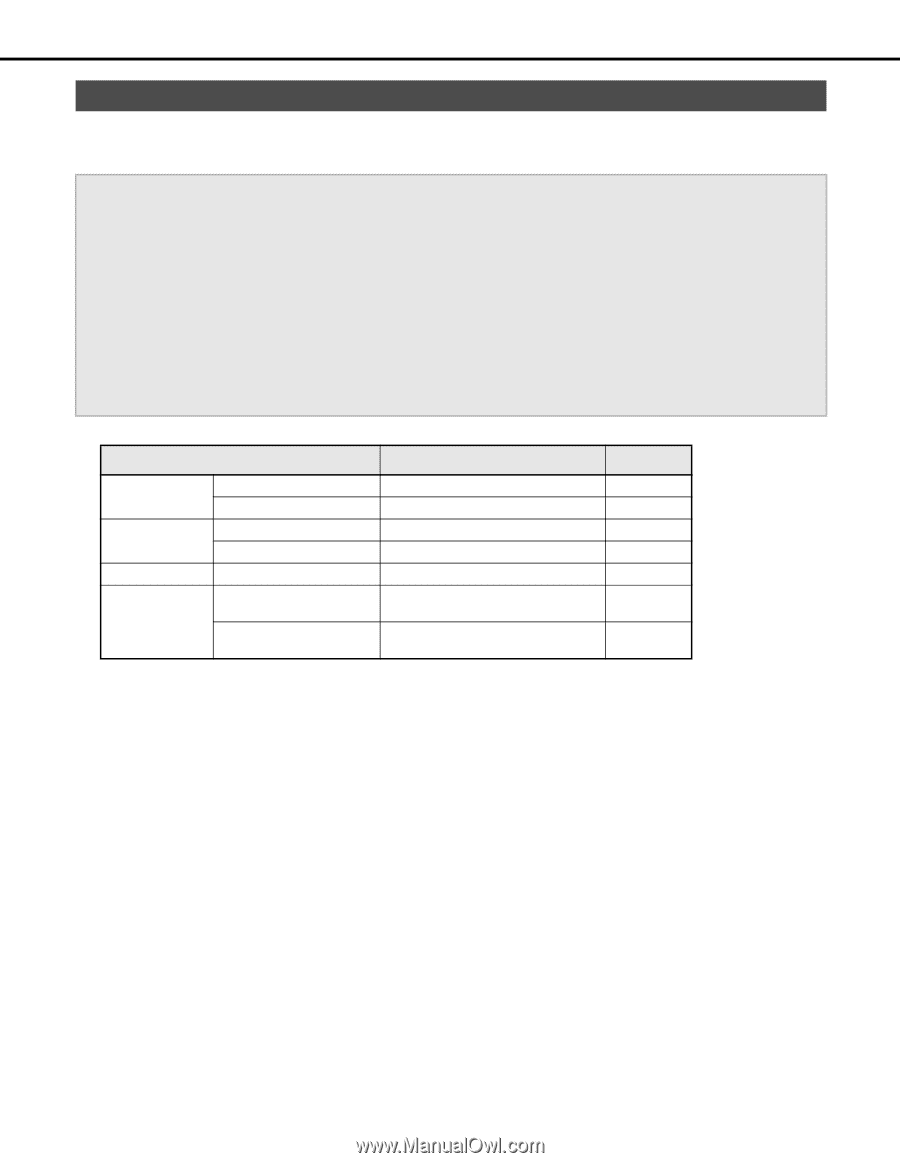
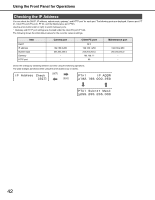
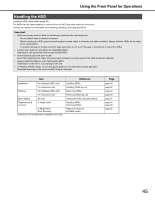
Using the Front Panel for Operations Handling the HDD Install the HDD unit provided (page 46). The HDDs can be easily installed or removed from the HDD bay slots inside the front cover. Contact your dealer for information on purchasing, installing, and replacing HDDs. Important: • HDDs are precise devices. Note the following precautions when handling them. ⋅ Do not subject them to vibration or impact. ⋅ Before touching an HDD, ground yourself against a metal object to eliminate any static electricity. Always hold the HDDs by the sides when carrying them. ⋅ To prevent damage to components from static electricity, do not touch the parts or connectors on top of the HDDs. • Contact your dealer for information on compatible HDDs. Operation is only guaranteed with recommended HDDs. • All the HDDs must be the same model. Even if the capacity is the same, the space may be smaller by a few percent if the HDD models are different. • Always install the HDDs in order starting with HDD 1. (Disk slots in order from 1 to 9, starting on the left) • In RAID5 or RAID6 modes, do not change the position of the HDD after starting operation. Recorded data may not be read correctly if they are changed. Item Installation For individual HDD units For extension units* Remove For individual HDD units For extension units* Mode setting All units Replacement & recovery In single mode In RAID mode Error Recovery *Extension unit is required for installation as a unit. Reference Installing HDDs Installing HDDs by unit Removing HDDs Removing HDDs by unit Setting the HDD's Operation Mode Installing HDDs Removing HDDs HDD error recovery (In RAID mode) Page page 46 page 47 page 48 page 50 page 51 page 46 page 48 page 52 45
-
 1
1 -
2
-
3
-
4
-
5
-
6
-
7
-
8
-
9
-
10
-
11
-
12
-
13
-
14
-
15
-
16
-
17
-
18
-
19
-
20
-
21
-
22
-
23
-
24
-
25
-
26
-
27
-
28
-
29
-
30
-
31
-
32
-
33
-
34
-
35
-
36
-
37
-
38
-
39
-
40
-
41
-
42
-
43
-
44
-
45
-
46
-
47
-
48
-
49
-
50
-
51
-
52
-
53
-
54
-
55
-
56
-
57
-
58
-
59
-
60
-
61
-
62
-
63
-
64
-
65
-
66
-
67
-
68
-
69
-
70
-
71
-
72
-
73
-
74
-
75
-
76
-
77
-
78
-
79
-
80
-
81
-
82
-
83
-
84
-
85
-
86
-
87
-
88
-
89
-
90
-
91
-
92
-
93
-
94
-
95
-
96
-
97
-
98
-
99
-
100
-
101
-
102
-
103
-
104
-
105
-
106
-
107
-
108
-
 109
109 -
 110
110 -
 111
111 -
 112
112 -
 113
113 -
 114
114 -
 115
115 -
 116
116 -
 117
117 -
 118
118 -
 119
119 -
120
-
121
-
122
-
123
-
124
-
125
-
126
-
127
-
128
-
129
-
130
-
131
-
132
-
133
-
134
-
135
-
136
-
137
-
138
-
139
-
140
-
141
-
142
-
143
-
144
-
145
-
146
-
147
-
148
-
149
-
150
-
151
-
152
-
153
-
154
-
155
-
156
-
157
-
158
-
159
-
160
-
161
-
162
-
163
-
164
-
165
-
166
-
167
-
168
-
169
-
170
-
171
-
172
-
173
-
174
-
175
-
176
-
177
-
178
-
179
-
180
-
181
-
182
-
183
-
184
-
185
-
186
-
187
-
188
-
189
-
190
-
191
-
192
-
193
-
194
-
195
-
196
-
197
-
198
-
199
-
200
-
201
-
202
-
203
-
204
-
205
-
206
-
207
-
208
-
209
-
210
-
211
-
212
-
213
-
214
-
215
-
216
-
217
-
218
-
219
-
220
-
221
-
222
-
223
-
224
-
225
-
226
-
227
-
228
-
229
-
230
-
231
-
232
-
233
 |
 |