Panasonic WJ-ND400K Operating Instructions - Page 122
Replacin, Faulty HDD durin, Operation, Remove the HDD unit.
 |
View all Panasonic WJ-ND400K manuals
Add to My Manuals
Save this manual to your list of manuals |
Page 122 highlights
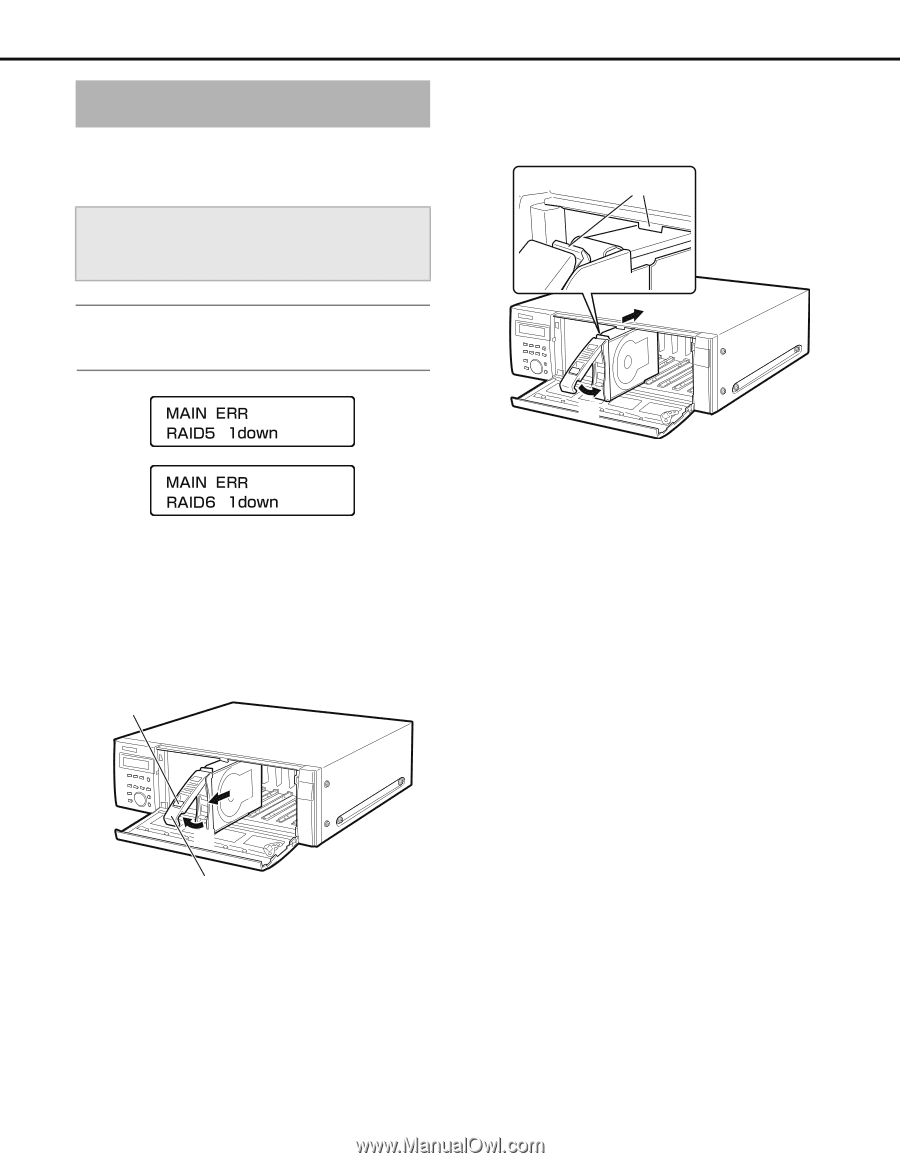
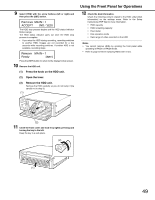
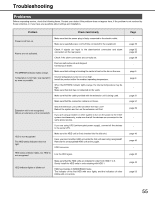
Replacing Faulty HDD during RAID Operation When one HDD errors ([1down]) in RAID5 mode, the data on the remaining HDDs can be read and recovery is possible. When two HDDs errors ([2down]) in RAID6 mode, the data on the remaining HDDs can be read and recovery is possible. Important: • Do not turn off the power until RAID is recovered. Data recovery may not be done normally when the power is turned off. Note: • When errors (1down) occur in RAID6 mode, quickly execute error recovery. Using the Front Panel for Operations (1) Hook the HDD unit's tab securely on the HDD bay slot. (2) Press the lever down and push the HDD unit until the removal knob clicks. (1) (1) 1 Replace units that have an HDD access indicator that lights or blinks red. (1) Press the knob on the HDD unit. (2) Open the lever. (3) Remove the HDD unit. Remove the HDD carefully so you do not bump it (be careful not to drop it). (1) (2) 3 The HDD is automatically recognized and recovery starts. When recovery starts, the HDD access indicator blinks orange and red. 4 When errors are recovered, the HDD access indicator goes off or lights green. When two HDDs have errors in RAID6 mode, data recovery of the second HDD starts after the first HDD. (3) (2) (2) 2 Use the HDD numbers for the HDD bay slots as a guideline when inserting the new HDD unit into the empty slot. Press the HDD unit's removal knob down and lift the lever, and then insert it all the way into the disk slot. 53
-
 1
1 -
2
-
3
-
4
-
5
-
6
-
7
-
8
-
9
-
10
-
11
-
12
-
13
-
14
-
15
-
16
-
17
-
18
-
19
-
20
-
21
-
22
-
23
-
24
-
25
-
26
-
27
-
28
-
29
-
30
-
31
-
32
-
33
-
34
-
35
-
36
-
37
-
38
-
39
-
40
-
41
-
42
-
43
-
44
-
45
-
46
-
47
-
48
-
49
-
50
-
51
-
52
-
53
-
54
-
55
-
56
-
57
-
58
-
59
-
60
-
61
-
62
-
63
-
64
-
65
-
66
-
67
-
68
-
69
-
70
-
71
-
72
-
73
-
74
-
75
-
76
-
77
-
78
-
79
-
80
-
81
-
82
-
83
-
84
-
85
-
86
-
87
-
88
-
89
-
90
-
91
-
92
-
93
-
94
-
95
-
96
-
97
-
98
-
99
-
100
-
101
-
102
-
103
-
104
-
105
-
106
-
107
-
108
-
109
-
110
-
111
-
112
-
113
-
114
-
115
-
116
-
 117
117 -
 118
118 -
 119
119 -
 120
120 -
 121
121 -
 122
122 -
 123
123 -
 124
124 -
 125
125 -
 126
126 -
 127
127 -
128
-
129
-
130
-
131
-
132
-
133
-
134
-
135
-
136
-
137
-
138
-
139
-
140
-
141
-
142
-
143
-
144
-
145
-
146
-
147
-
148
-
149
-
150
-
151
-
152
-
153
-
154
-
155
-
156
-
157
-
158
-
159
-
160
-
161
-
162
-
163
-
164
-
165
-
166
-
167
-
168
-
169
-
170
-
171
-
172
-
173
-
174
-
175
-
176
-
177
-
178
-
179
-
180
-
181
-
182
-
183
-
184
-
185
-
186
-
187
-
188
-
189
-
190
-
191
-
192
-
193
-
194
-
195
-
196
-
197
-
198
-
199
-
200
-
201
-
202
-
203
-
204
-
205
-
206
-
207
-
208
-
209
-
210
-
211
-
212
-
213
-
214
-
215
-
216
-
217
-
218
-
219
-
220
-
221
-
222
-
223
-
224
-
225
-
226
-
227
-
228
-
229
-
230
-
231
-
232
-
233
 |
 |