Panasonic WJ-ND400K Operating Instructions - Page 157
Camera registration, Use the Camera auto-registration item to specify
 |
View all Panasonic WJ-ND400K manuals
Add to My Manuals
Save this manual to your list of manuals |
Page 157 highlights
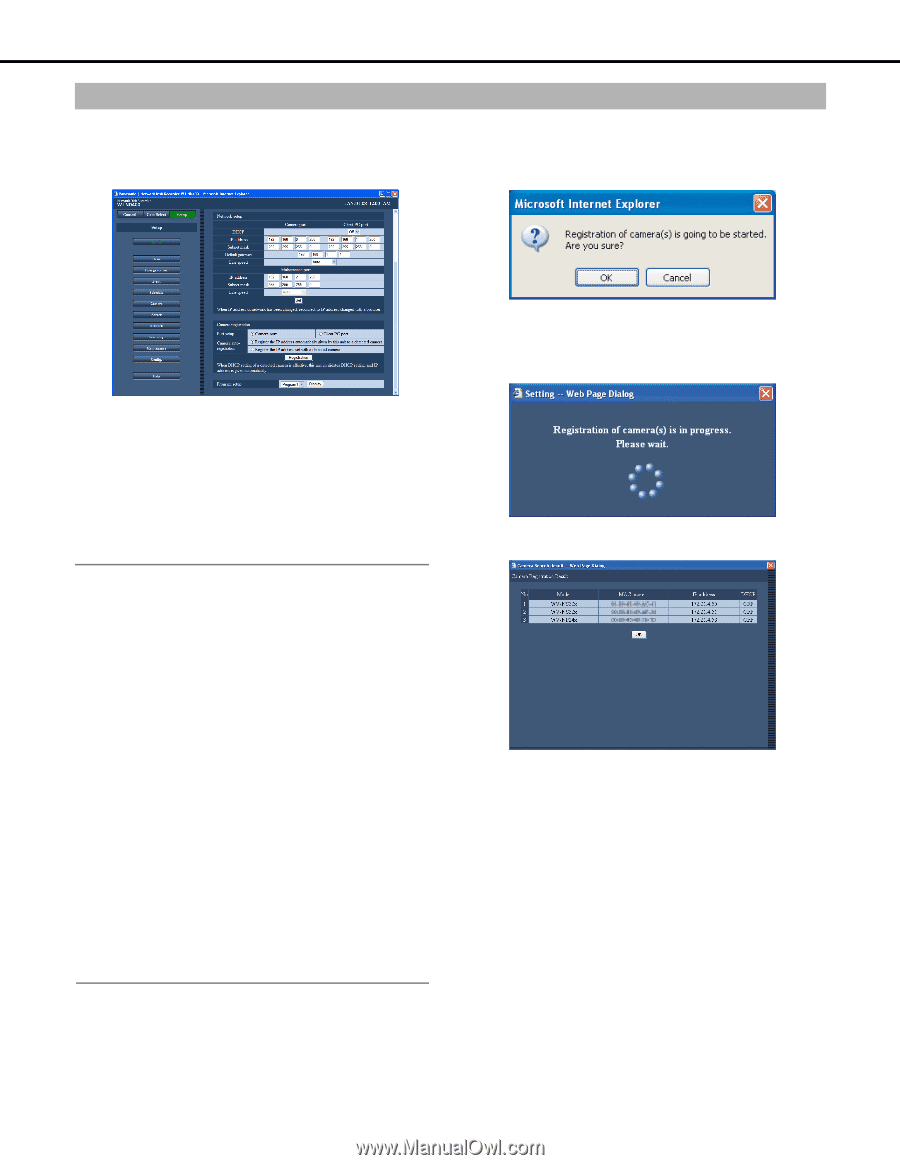
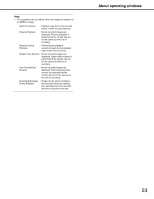
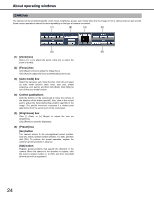
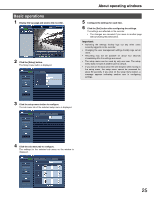
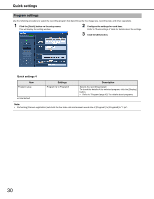
Quick settings Camera registration This section explains how to register a camera on the recorder. The recorder supports registration of up to 64 cameras. 1 Click the [Quick] button on the setup menu. This will display the setup window. 4 Click the [Registration] button. This will display a camera registration confirmation message. 2 Select the network port for detecting cameras from the following. [Camera port] / [Client PC port] 3 Use the Camera auto-registration item to specify whether to assign an IP address to the detected camera. [Register the IP address automatically given by this unit to a detected camera] [Register the IP address set with a detected camera] Note: • After executing [Register the IP address automatically given by this unit to a detected camera], the recorder will automatically detect blank IP addresses for setting, but depending on the network environment, the IP address may be already used for the other network device (when the Windows XP firewall function is being used, for example). If the same IP address is used by another device, check the IP address setting and change it manually. • When [Register the IP address automatically given by this unit to a detected camera] is executed and [On] is selected for the DHCP setting of the detected camera, the recorder will change the DHCP setting to [Off] and provide an IP address automatically. • Only when the DHCP setting of the recorder is [Off] are IP addresses automatically provided. • In the case of IP auto addressing, set the subnet mask of the network port to 255.255.255.0. • When automatically assigning IP addresses, make sure the octets of the port selected in step 2 match the gateway. Depending on the camera, IP addresses cannot be assigned if it is not set. • Registering an IP address to a camera automatically sets the camera's HTTP port number to 80. Also, the camera's subnet mask and default gateway are set to the same values as the recorder's network port subnet mask and default gateway. 5 Click the [OK] button. This will detect the camera and perform registration. The "Setting" dialog box appears while registration is in progress. A "Camera Registration Result" window will appear after registration is complete. 6 Check the registration results. • Up to 64 cameras can be registered. • Only newly registered cameras appear in the "Camera registration result" window. If there are more than 64 cameras on the same network, only 64 will be displayed. • If multiple cameras have the same IP address, the IP address and MAC address will be displayed in red. In this case, change the IP address for one of the cameras and make sure that the same IP address is not used for two cameras or more. 28
-
 1
1 -
2
-
3
-
4
-
5
-
6
-
7
-
8
-
9
-
10
-
11
-
12
-
13
-
14
-
15
-
16
-
17
-
18
-
19
-
20
-
21
-
22
-
23
-
24
-
25
-
26
-
27
-
28
-
29
-
30
-
31
-
32
-
33
-
34
-
35
-
36
-
37
-
38
-
39
-
40
-
41
-
42
-
43
-
44
-
45
-
46
-
47
-
48
-
49
-
50
-
51
-
52
-
53
-
54
-
55
-
56
-
57
-
58
-
59
-
60
-
61
-
62
-
63
-
64
-
65
-
66
-
67
-
68
-
69
-
70
-
71
-
72
-
73
-
74
-
75
-
76
-
77
-
78
-
79
-
80
-
81
-
82
-
83
-
84
-
85
-
86
-
87
-
88
-
89
-
90
-
91
-
92
-
93
-
94
-
95
-
96
-
97
-
98
-
99
-
100
-
101
-
102
-
103
-
104
-
105
-
106
-
107
-
108
-
109
-
110
-
111
-
112
-
113
-
114
-
115
-
116
-
117
-
118
-
119
-
120
-
121
-
122
-
123
-
124
-
125
-
126
-
127
-
128
-
129
-
130
-
131
-
132
-
133
-
134
-
135
-
136
-
137
-
138
-
139
-
140
-
141
-
142
-
143
-
144
-
145
-
146
-
147
-
148
-
149
-
150
-
151
-
 152
152 -
 153
153 -
 154
154 -
 155
155 -
 156
156 -
 157
157 -
 158
158 -
 159
159 -
 160
160 -
 161
161 -
 162
162 -
163
-
164
-
165
-
166
-
167
-
168
-
169
-
170
-
171
-
172
-
173
-
174
-
175
-
176
-
177
-
178
-
179
-
180
-
181
-
182
-
183
-
184
-
185
-
186
-
187
-
188
-
189
-
190
-
191
-
192
-
193
-
194
-
195
-
196
-
197
-
198
-
199
-
200
-
201
-
202
-
203
-
204
-
205
-
206
-
207
-
208
-
209
-
210
-
211
-
212
-
213
-
214
-
215
-
216
-
217
-
218
-
219
-
220
-
221
-
222
-
223
-
224
-
225
-
226
-
227
-
228
-
229
-
230
-
231
-
232
-
233
 |
 |