Panasonic WJ-ND400K Operating Instructions - Page 82
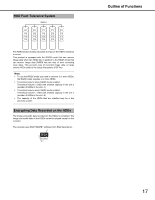
Inside the Front Cover, USE button [USE], HDD unit, HDD status indicator [STS]
 |
View all Panasonic WJ-ND400K manuals
Add to My Manuals
Save this manual to your list of manuals |
Page 82 highlights
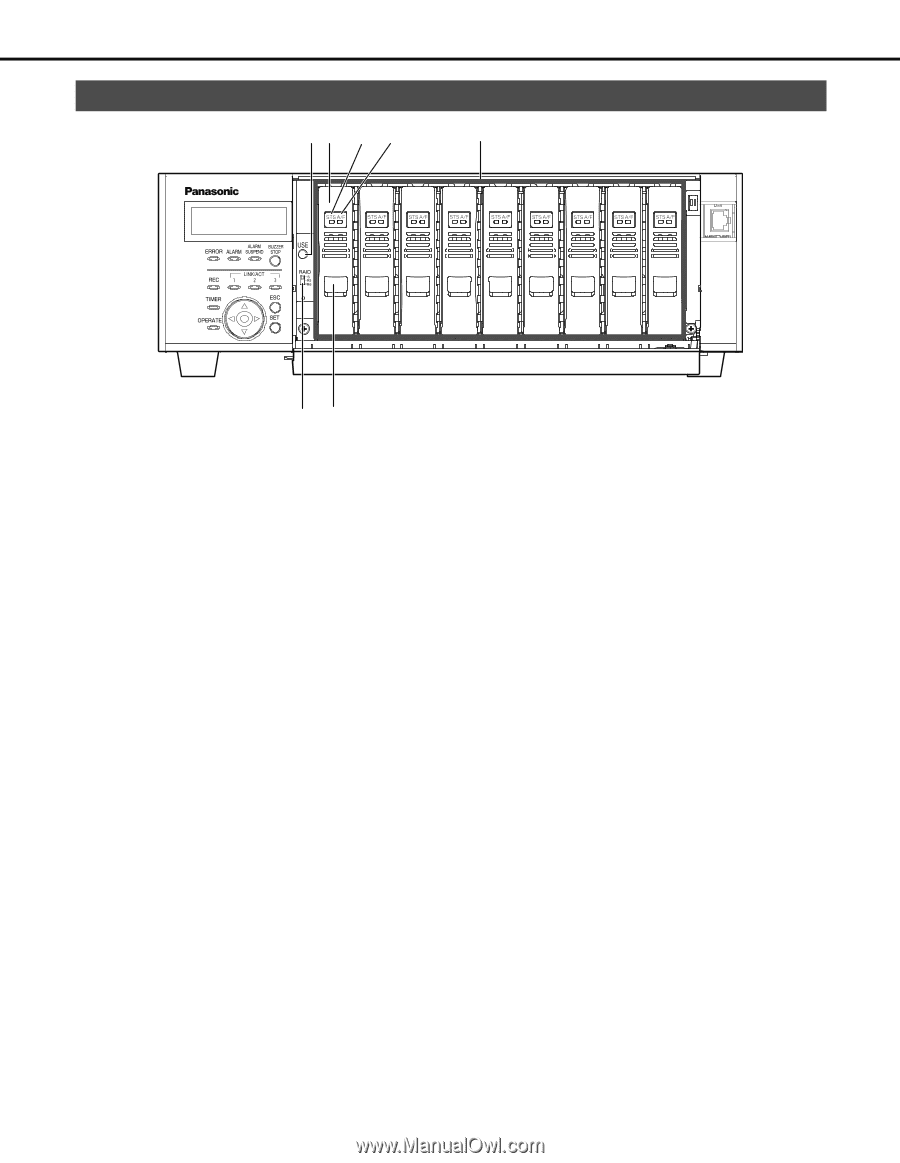
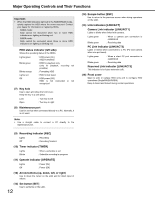
Major Operating Controls and Their Functions Inside the Front Cover (1)(2) (3) (4) (5) (6) (7) (1) USE button [USE] Used when adding or replacing an HDD or changing the operating mode of the HDD. Installing or removing an HDD HDD operation mode Change : You can install or remove the HDD by holding down the button for at least 2 seconds, waiting for the buzzer to sound, and using the front panel buttons and LCD operations. : The settings become effective after setting the [RAID] switch and turning on the Power switch while holding down the [USE] button to boot up. Remember to hold down the [USE] button until the buzzer sounds. (2) HDD unit HDD in special canister. Add and replace HDDs by using the LCD on the front panel. Refer to page 45 for details. Contact your dealer for information on purchasing and replacing HDDs. (3) HDD status indicator [STS] Shows the operating status of the HDDs. Lights green Blinks green Blinks orange Lights red Off : HDD power [On] (Formatted) : HDD for playback only (only for playback, recording not possible) : Formatting HDD : HDD format failed : HDD power [Off] HDD is not connected or not recognized. (4) HDD access indicator [A/F] Indicates the access status and problems with the HDD. When errors occur on an HDD in RAID5/RAID6 mode, the indicator lights or blinks red. Blinks green Off Lights red Blinks red Alternating colors (Orange/red) : Accessing HDD : Not accessing HDD : Errors have occurred on HDD (Data can be recovered by replacing HDD) • When in RAID5 mode, the first HDD has errors • When using RAID6, the first two HDDs have errors. : Errors have occurred on HDD (Data cannot be recovered even if HDD is replaced) • When in RAID5 mode, the second HDD has errors • When in RAID6 mode, the third HDD has errors : Recovering data from drive in RAID5/ RAID6 mode. (This indicator looks orange during high-speed processing.) 13
-
 1
1 -
2
-
3
-
4
-
5
-
6
-
7
-
8
-
9
-
10
-
11
-
12
-
13
-
14
-
15
-
16
-
17
-
18
-
19
-
20
-
21
-
22
-
23
-
24
-
25
-
26
-
27
-
28
-
29
-
30
-
31
-
32
-
33
-
34
-
35
-
36
-
37
-
38
-
39
-
40
-
41
-
42
-
43
-
44
-
45
-
46
-
47
-
48
-
49
-
50
-
51
-
52
-
53
-
54
-
55
-
56
-
57
-
58
-
59
-
60
-
61
-
62
-
63
-
64
-
65
-
66
-
67
-
68
-
69
-
70
-
71
-
72
-
73
-
74
-
75
-
76
-
 77
77 -
 78
78 -
 79
79 -
 80
80 -
 81
81 -
 82
82 -
 83
83 -
 84
84 -
 85
85 -
 86
86 -
 87
87 -
88
-
89
-
90
-
91
-
92
-
93
-
94
-
95
-
96
-
97
-
98
-
99
-
100
-
101
-
102
-
103
-
104
-
105
-
106
-
107
-
108
-
109
-
110
-
111
-
112
-
113
-
114
-
115
-
116
-
117
-
118
-
119
-
120
-
121
-
122
-
123
-
124
-
125
-
126
-
127
-
128
-
129
-
130
-
131
-
132
-
133
-
134
-
135
-
136
-
137
-
138
-
139
-
140
-
141
-
142
-
143
-
144
-
145
-
146
-
147
-
148
-
149
-
150
-
151
-
152
-
153
-
154
-
155
-
156
-
157
-
158
-
159
-
160
-
161
-
162
-
163
-
164
-
165
-
166
-
167
-
168
-
169
-
170
-
171
-
172
-
173
-
174
-
175
-
176
-
177
-
178
-
179
-
180
-
181
-
182
-
183
-
184
-
185
-
186
-
187
-
188
-
189
-
190
-
191
-
192
-
193
-
194
-
195
-
196
-
197
-
198
-
199
-
200
-
201
-
202
-
203
-
204
-
205
-
206
-
207
-
208
-
209
-
210
-
211
-
212
-
213
-
214
-
215
-
216
-
217
-
218
-
219
-
220
-
221
-
222
-
223
-
224
-
225
-
226
-
227
-
228
-
229
-
230
-
231
-
232
-
233
 |
 |