Panasonic WJ-ND400K Operating Instructions - Page 140
Network settings, Recorder network settings
 |
View all Panasonic WJ-ND400K manuals
Add to My Manuals
Save this manual to your list of manuals |
Page 140 highlights
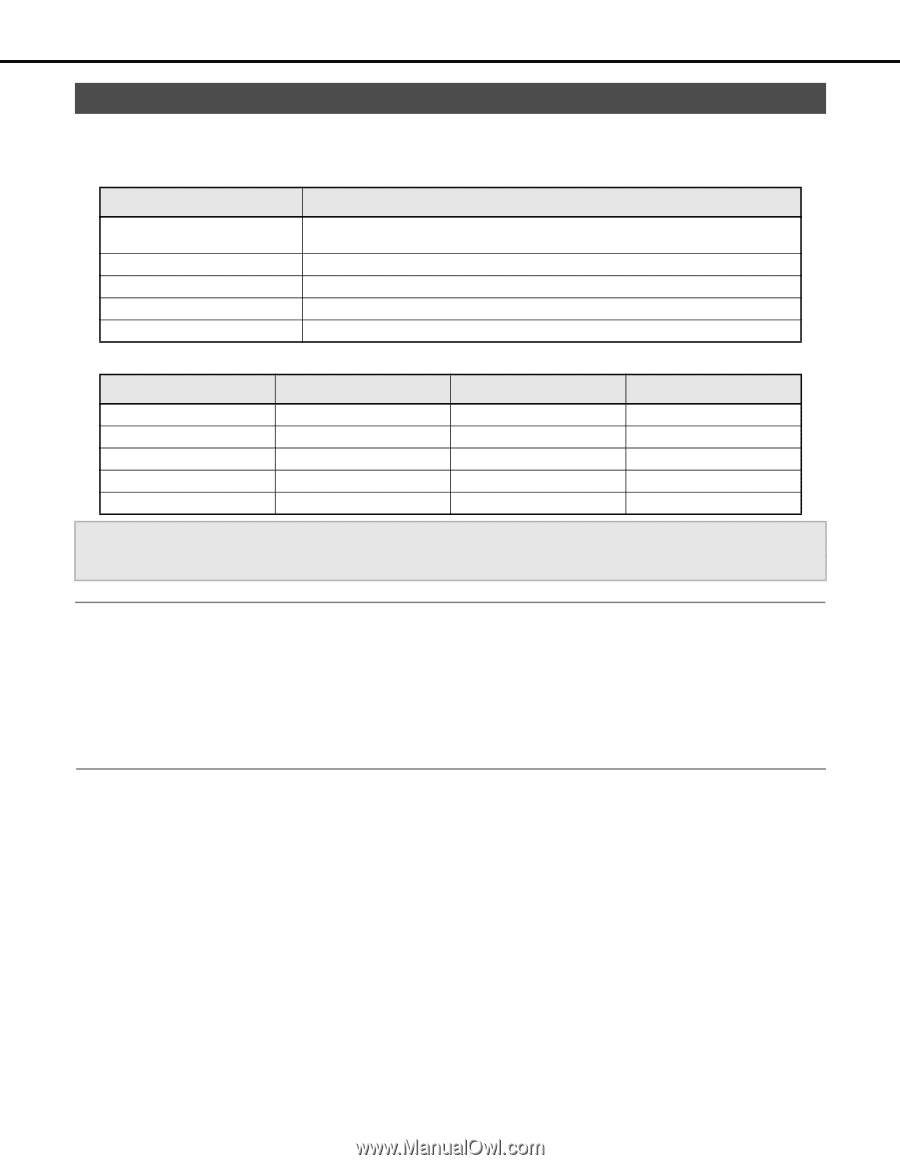
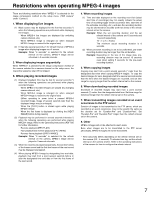
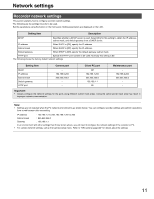
Network settings Recorder network settings This section explains how to configure recorder network settings. The following are the settings for ports to be used. Set the parameters using the button on the front panel. Setting parameters are displayed on the LCD. Setting item Description DHCP Specifies whether a DHCP server is used. Select [On] for this setting to obtain the IP address, subnet mask, and default gateway from a DHCP server. IP address When DHCP is [Off], specify the IP address. Subnet mask When DHCP is [Off], specify the IP address. Default gateway When DHCP is [Off], specify the default gateway subnet mask. HTTP port Specify the HTTP port number to be used. Normally this setting is 80. The following shows the factory default network settings. Setting item DHCP IP address Subnet mask Default gateway HTTP port Camera port − 192.168.0.250 255.255.255.0 − − Client PC port Off 192.168.1.250 255.255.255.0 192.168.1.1 80 Maintenance port − 192.168.2.250 255.255.255.0 − − Important: • Always configure the network settings for the ports using different subnet mask areas. Using the same subnet mask area may result in improper network communication. Note: • Settings are not required when the PC network environment is as shown below. You can configure recorder settings and perform operations from a web browser after connecting. IP address : 192.168.1.2 to 249, 192.168.1.251 to 254 Subnet mask : 255.255.255.0 Gateway : 192.168.1.1 In an environment with other settings than those shown above, you will need to configure the network settings of the recorder or PC. • For camera network settings, call up the Camera setup menu. Refer to "NW camera (page 48)" for details about the settings. 11
-
 1
1 -
2
-
3
-
4
-
5
-
6
-
7
-
8
-
9
-
10
-
11
-
12
-
13
-
14
-
15
-
16
-
17
-
18
-
19
-
20
-
21
-
22
-
23
-
24
-
25
-
26
-
27
-
28
-
29
-
30
-
31
-
32
-
33
-
34
-
35
-
36
-
37
-
38
-
39
-
40
-
41
-
42
-
43
-
44
-
45
-
46
-
47
-
48
-
49
-
50
-
51
-
52
-
53
-
54
-
55
-
56
-
57
-
58
-
59
-
60
-
61
-
62
-
63
-
64
-
65
-
66
-
67
-
68
-
69
-
70
-
71
-
72
-
73
-
74
-
75
-
76
-
77
-
78
-
79
-
80
-
81
-
82
-
83
-
84
-
85
-
86
-
87
-
88
-
89
-
90
-
91
-
92
-
93
-
94
-
95
-
96
-
97
-
98
-
99
-
100
-
101
-
102
-
103
-
104
-
105
-
106
-
107
-
108
-
109
-
110
-
111
-
112
-
113
-
114
-
115
-
116
-
117
-
118
-
119
-
120
-
121
-
122
-
123
-
124
-
125
-
126
-
127
-
128
-
129
-
130
-
131
-
132
-
133
-
134
-
 135
135 -
 136
136 -
 137
137 -
 138
138 -
 139
139 -
 140
140 -
 141
141 -
 142
142 -
 143
143 -
 144
144 -
 145
145 -
146
-
147
-
148
-
149
-
150
-
151
-
152
-
153
-
154
-
155
-
156
-
157
-
158
-
159
-
160
-
161
-
162
-
163
-
164
-
165
-
166
-
167
-
168
-
169
-
170
-
171
-
172
-
173
-
174
-
175
-
176
-
177
-
178
-
179
-
180
-
181
-
182
-
183
-
184
-
185
-
186
-
187
-
188
-
189
-
190
-
191
-
192
-
193
-
194
-
195
-
196
-
197
-
198
-
199
-
200
-
201
-
202
-
203
-
204
-
205
-
206
-
207
-
208
-
209
-
210
-
211
-
212
-
213
-
214
-
215
-
216
-
217
-
218
-
219
-
220
-
221
-
222
-
223
-
224
-
225
-
226
-
227
-
228
-
229
-
230
-
231
-
232
-
233
 |
 |