Panasonic WJ-ND400K Operating Instructions - Page 81
Reserved Link indicator [LINK/ACT3]
 |
View all Panasonic WJ-ND400K manuals
Add to My Manuals
Save this manual to your list of manuals |
Page 81 highlights
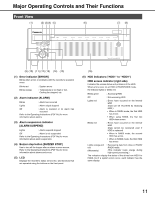
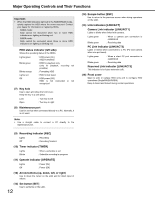
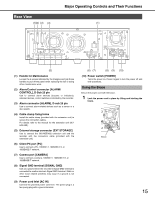
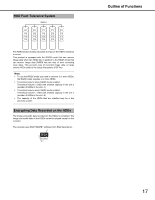
Major Operating Controls and Their Functions Important: • When the HDD indicators light red in the RAID5/RAID6 mode, quickly replace the HDD where the errors occurred. Contact your dealer for information on replacing HDDs. ⋅ RAID5 mode: Data cannot be recovered when two or more HDD indicators are lighting or blinking red. ⋅ RAID6 mode: Data cannot be recovered when three or more HDD indicators are lighting or blinking red. HDD status indicator (left side) Shows the operating status of the HDDs. Lights green Blinks green Blinks orange Lights red Off : HDD power [On] (HDD formatted) : HDD for playback only (only for playback, recording not possible) : Formatting HDD : HDD format failed : HDD power [Off] HDD is not connected or not recognized (7) Key hole Use to open and close the front cover. Keep the key in a safe place. Lock Open : Turn key to left : Turn key to right (8) Maintenance port Use for service when connected directly to a PC. Normally, it is not used. Note: • Use a straight cable to connect a PC directly to the maintenance port. (14) Escape button [ESC] Use to return to the previous screen when doing operations on the LCD. (15) Link indicators [LINK/ACT] Camera Link indicator [LINK/ACT1] Lights or blinks when linked with camera. Lights green Blinks green : When a camera port connection is established : Receiving data PC Link indicator [LINK/ACT2] Lights or blinks when connected to a PC (PC and camera when one port used). Lights green Blinks green : When a client PC port connection is established : Receiving data Reserved Link indicator [LINK/ACT3] This indicator is for future extension (off). (16) Front cover Open to add, or replace HDD units and to configure HDD operations (Single/RAID5/RAID6). Keep it closed and locked during normal operations. (9) Recording indicator [REC] Lights Off : Recording : Recording finished. (10) Timer indicator [TIMER] Lights Blinks : When a schedule is set : Schedule recording in-progress (11) Operate indicator [OPERATE] Lights Off : Power [On] : Power [Off] (12) Arrow buttons (up, down, left, or right) Use to move the cursor on the LCD and for direct input of values. (13) Set button [SET] Use to set items on the LCD. 12
-
 1
1 -
2
-
3
-
4
-
5
-
6
-
7
-
8
-
9
-
10
-
11
-
12
-
13
-
14
-
15
-
16
-
17
-
18
-
19
-
20
-
21
-
22
-
23
-
24
-
25
-
26
-
27
-
28
-
29
-
30
-
31
-
32
-
33
-
34
-
35
-
36
-
37
-
38
-
39
-
40
-
41
-
42
-
43
-
44
-
45
-
46
-
47
-
48
-
49
-
50
-
51
-
52
-
53
-
54
-
55
-
56
-
57
-
58
-
59
-
60
-
61
-
62
-
63
-
64
-
65
-
66
-
67
-
68
-
69
-
70
-
71
-
72
-
73
-
74
-
75
-
 76
76 -
 77
77 -
 78
78 -
 79
79 -
 80
80 -
 81
81 -
 82
82 -
 83
83 -
 84
84 -
 85
85 -
 86
86 -
87
-
88
-
89
-
90
-
91
-
92
-
93
-
94
-
95
-
96
-
97
-
98
-
99
-
100
-
101
-
102
-
103
-
104
-
105
-
106
-
107
-
108
-
109
-
110
-
111
-
112
-
113
-
114
-
115
-
116
-
117
-
118
-
119
-
120
-
121
-
122
-
123
-
124
-
125
-
126
-
127
-
128
-
129
-
130
-
131
-
132
-
133
-
134
-
135
-
136
-
137
-
138
-
139
-
140
-
141
-
142
-
143
-
144
-
145
-
146
-
147
-
148
-
149
-
150
-
151
-
152
-
153
-
154
-
155
-
156
-
157
-
158
-
159
-
160
-
161
-
162
-
163
-
164
-
165
-
166
-
167
-
168
-
169
-
170
-
171
-
172
-
173
-
174
-
175
-
176
-
177
-
178
-
179
-
180
-
181
-
182
-
183
-
184
-
185
-
186
-
187
-
188
-
189
-
190
-
191
-
192
-
193
-
194
-
195
-
196
-
197
-
198
-
199
-
200
-
201
-
202
-
203
-
204
-
205
-
206
-
207
-
208
-
209
-
210
-
211
-
212
-
213
-
214
-
215
-
216
-
217
-
218
-
219
-
220
-
221
-
222
-
223
-
224
-
225
-
226
-
227
-
228
-
229
-
230
-
231
-
232
-
233
 |
 |