Panasonic WJ-ND400K Operating Instructions - Page 39
Copying recorded images, Copying - user manual
 |
View all Panasonic WJ-ND400K manuals
Add to My Manuals
Save this manual to your list of manuals |
Page 39 highlights
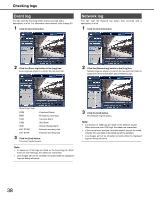
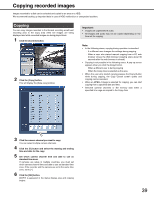
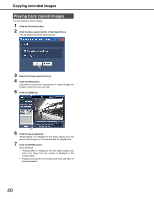
Copying recorded images Images recorded to a disk can be selected and copied to an area on a HDD. We recommend backing up important data in case of HDD malfunction or unexpected accident. Copying You can copy images recorded in the Normal recording area/Event recording area to the Copy area while live images are being displayed and while recorded images are being played back. 1 Click the [Control] button. 2 Click the [Copy] button. This will display the [Data copy] window. Important: • Images are copied before audio. • All images and audio may not be copied depending on the time set for copying. Note: • In the following cases, copying during operation is canceled. ⋅ If a different user changes the settings during copying. ⋅ When a user who started manual copying from a PC web browser closes the Web browser (copying stops about 90 seconds after the web browser is closed). • Copying is not possible in the following cases. A pop-up screen appears when you click the [Copy] button. ⋅ When a different user is during copying ⋅ When the Copy Area is selected as the area • When the user who started copying presses the [Copy] button while during copying, the Copy Cancel screen opens and copying can be canceled. • When an MPEG-4 image is selected for copying, you can start copying from a specified date and time. • Selected cameral channels or SD memory data within a specified time rage are copied to the Copy Area. 3 Click the camera channel you want to copy. You can select multiple camera channels. 4 Click the [V] button and select the starting and ending time and date for the copy. 5 Set which camera channel time and date to use as standard time zone. If cameras are setup in multiple countries, you must set which camera channel time and date to use as standard time zone. If the recorder and the camera are set in the same time zone, set to [--]. 6 Click the [OK] button. [COPY] is appeared in the status display area and copying begins. 39
-
 1
1 -
2
-
3
-
4
-
5
-
6
-
7
-
8
-
9
-
10
-
11
-
12
-
13
-
14
-
15
-
16
-
17
-
18
-
19
-
20
-
21
-
22
-
23
-
24
-
25
-
26
-
27
-
28
-
29
-
30
-
31
-
32
-
33
-
 34
34 -
 35
35 -
 36
36 -
 37
37 -
 38
38 -
 39
39 -
 40
40 -
 41
41 -
 42
42 -
 43
43 -
 44
44 -
45
-
46
-
47
-
48
-
49
-
50
-
51
-
52
-
53
-
54
-
55
-
56
-
57
-
58
-
59
-
60
-
61
-
62
-
63
-
64
-
65
-
66
-
67
-
68
-
69
-
70
-
71
-
72
-
73
-
74
-
75
-
76
-
77
-
78
-
79
-
80
-
81
-
82
-
83
-
84
-
85
-
86
-
87
-
88
-
89
-
90
-
91
-
92
-
93
-
94
-
95
-
96
-
97
-
98
-
99
-
100
-
101
-
102
-
103
-
104
-
105
-
106
-
107
-
108
-
109
-
110
-
111
-
112
-
113
-
114
-
115
-
116
-
117
-
118
-
119
-
120
-
121
-
122
-
123
-
124
-
125
-
126
-
127
-
128
-
129
-
130
-
131
-
132
-
133
-
134
-
135
-
136
-
137
-
138
-
139
-
140
-
141
-
142
-
143
-
144
-
145
-
146
-
147
-
148
-
149
-
150
-
151
-
152
-
153
-
154
-
155
-
156
-
157
-
158
-
159
-
160
-
161
-
162
-
163
-
164
-
165
-
166
-
167
-
168
-
169
-
170
-
171
-
172
-
173
-
174
-
175
-
176
-
177
-
178
-
179
-
180
-
181
-
182
-
183
-
184
-
185
-
186
-
187
-
188
-
189
-
190
-
191
-
192
-
193
-
194
-
195
-
196
-
197
-
198
-
199
-
200
-
201
-
202
-
203
-
204
-
205
-
206
-
207
-
208
-
209
-
210
-
211
-
212
-
213
-
214
-
215
-
216
-
217
-
218
-
219
-
220
-
221
-
222
-
223
-
224
-
225
-
226
-
227
-
228
-
229
-
230
-
231
-
232
-
233
 |
 |