Panasonic WJ-ND400K Operating Instructions - Page 155
Quick settings, Settings, Language, and time & date settings
 |
View all Panasonic WJ-ND400K manuals
Add to My Manuals
Save this manual to your list of manuals |
Page 155 highlights
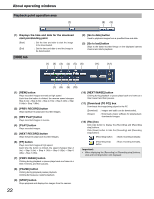
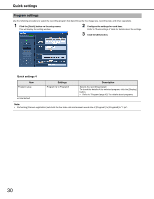
Quick Setup settings Configure the language, time & date, network setup, camera registration, and the minimum required settings to operate the recorder. Settings Language, and time & date settings This section explains how to configure settings for the display language, and the current time and date. 1 Click the [Quick] button on the setup menu. This will display the setting window. 2 Configure the settings for each item. Refer to "Quick settings 1" table for details about the settings. 3 Under [Time & date], click the [Set] button. Important: • For around 4 seconds after changing the time and date, for example, when switching to summer time or when setting the time and date, the live image display will turn black and recording may not be possible. Note: • If there is no camera set up, the [Quick] window appears. • There are one item for language and Time & date, one item for network settings, one item for Camera registration, and one item for Program setup. When you make the settings, click the [Set] button and apply the settings to the recorder. Quick settings 1 Item Language Time & date ♦Initial default Settings Description Japanese / English♦ / Français / Specifies the language used in browser screens. Español / Deutsch / Italiano / Russian / Chinese 08 to 34 (Year) / Jan to Dec For setting the current time and date. (Month) / 1 to 31 (Day) / 0 to 23 Configure the setting as year / month / day / hour / minute (hour) / 0 to 59 (minute) 26
-
 1
1 -
2
-
3
-
4
-
5
-
6
-
7
-
8
-
9
-
10
-
11
-
12
-
13
-
14
-
15
-
16
-
17
-
18
-
19
-
20
-
21
-
22
-
23
-
24
-
25
-
26
-
27
-
28
-
29
-
30
-
31
-
32
-
33
-
34
-
35
-
36
-
37
-
38
-
39
-
40
-
41
-
42
-
43
-
44
-
45
-
46
-
47
-
48
-
49
-
50
-
51
-
52
-
53
-
54
-
55
-
56
-
57
-
58
-
59
-
60
-
61
-
62
-
63
-
64
-
65
-
66
-
67
-
68
-
69
-
70
-
71
-
72
-
73
-
74
-
75
-
76
-
77
-
78
-
79
-
80
-
81
-
82
-
83
-
84
-
85
-
86
-
87
-
88
-
89
-
90
-
91
-
92
-
93
-
94
-
95
-
96
-
97
-
98
-
99
-
100
-
101
-
102
-
103
-
104
-
105
-
106
-
107
-
108
-
109
-
110
-
111
-
112
-
113
-
114
-
115
-
116
-
117
-
118
-
119
-
120
-
121
-
122
-
123
-
124
-
125
-
126
-
127
-
128
-
129
-
130
-
131
-
132
-
133
-
134
-
135
-
136
-
137
-
138
-
139
-
140
-
141
-
142
-
143
-
144
-
145
-
146
-
147
-
148
-
149
-
 150
150 -
 151
151 -
 152
152 -
 153
153 -
 154
154 -
 155
155 -
 156
156 -
 157
157 -
 158
158 -
 159
159 -
 160
160 -
161
-
162
-
163
-
164
-
165
-
166
-
167
-
168
-
169
-
170
-
171
-
172
-
173
-
174
-
175
-
176
-
177
-
178
-
179
-
180
-
181
-
182
-
183
-
184
-
185
-
186
-
187
-
188
-
189
-
190
-
191
-
192
-
193
-
194
-
195
-
196
-
197
-
198
-
199
-
200
-
201
-
202
-
203
-
204
-
205
-
206
-
207
-
208
-
209
-
210
-
211
-
212
-
213
-
214
-
215
-
216
-
217
-
218
-
219
-
220
-
221
-
222
-
223
-
224
-
225
-
226
-
227
-
228
-
229
-
230
-
231
-
232
-
233
 |
 |
