Panasonic WJ-ND400K Operating Instructions - Page 91
Gettin, Started, Setup Procedure
 |
View all Panasonic WJ-ND400K manuals
Add to My Manuals
Save this manual to your list of manuals |
Page 91 highlights
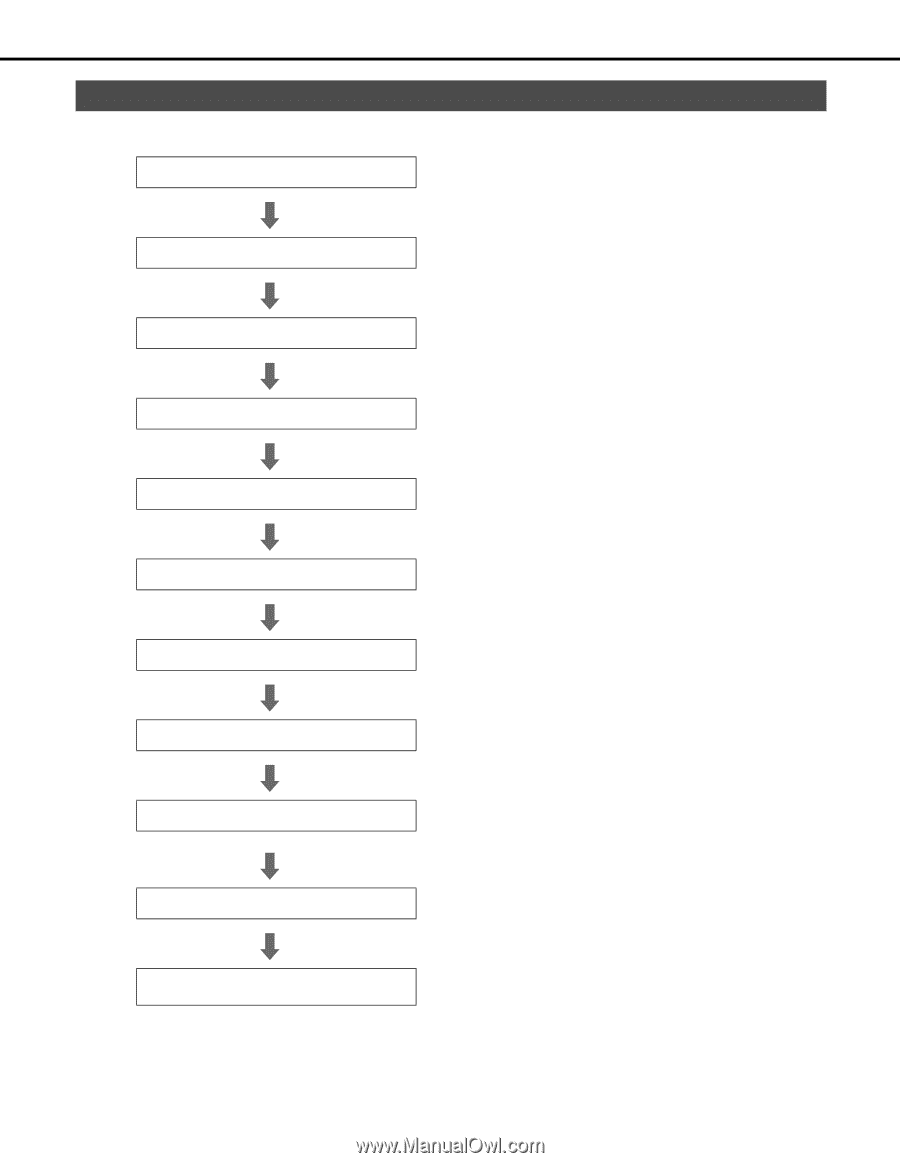
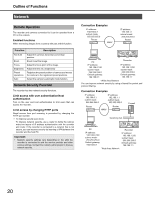
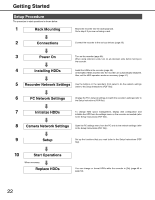
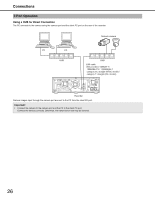
Getting Started InstallationandSetup Setup Procedure The procedure to start operations is shown below. 1 Rack Mounting 2 Connections Mount the recorder into the rack (page 23). Go to step 2 if you are not using a rack. Connect the recorder to the various devices (page 25). 3 Power On Turn on the recorder (page 39). When using extension units, turn on all extension units before turning on the recorder. 4 Installing HDDs Install the HDDs in the recorder (page 46). Unformatted HDDs inserted into the recorder are automatically initialized. Also, set the HDD operation mode as necessary (page 51). 5 Recorder Network Settings Use the buttons on the recorder's front panel to do the network settings (refer to the Setup Instructions (PDF file)). 6 PC Network Settings Change the PC's network settings to match the recorder's settings (refer to the Setup Instructions (PDF file)). 7 Initialize HDDs To change HDD space management, display disk configuration and initialize the HDD from the settings menu on the recorder as needed (refer to the Setup Instructions (PDF file)). 8 Camera Network Settings Open the PC settings menu from the PC and do the network settings (refer to the Setup Instructions (PDF file)). 9 Setup Set up the functions that you need (refer to the Setup Instructions (PDF file)). 10 Start Operations When necessary Replace HDDs You can change or format HDDs while the recorder is [On] (page 46 to page 53). 22
-
 1
1 -
2
-
3
-
4
-
5
-
6
-
7
-
8
-
9
-
10
-
11
-
12
-
13
-
14
-
15
-
16
-
17
-
18
-
19
-
20
-
21
-
22
-
23
-
24
-
25
-
26
-
27
-
28
-
29
-
30
-
31
-
32
-
33
-
34
-
35
-
36
-
37
-
38
-
39
-
40
-
41
-
42
-
43
-
44
-
45
-
46
-
47
-
48
-
49
-
50
-
51
-
52
-
53
-
54
-
55
-
56
-
57
-
58
-
59
-
60
-
61
-
62
-
63
-
64
-
65
-
66
-
67
-
68
-
69
-
70
-
71
-
72
-
73
-
74
-
75
-
76
-
77
-
78
-
79
-
80
-
81
-
82
-
83
-
84
-
85
-
 86
86 -
 87
87 -
 88
88 -
 89
89 -
 90
90 -
 91
91 -
 92
92 -
 93
93 -
 94
94 -
 95
95 -
 96
96 -
97
-
98
-
99
-
100
-
101
-
102
-
103
-
104
-
105
-
106
-
107
-
108
-
109
-
110
-
111
-
112
-
113
-
114
-
115
-
116
-
117
-
118
-
119
-
120
-
121
-
122
-
123
-
124
-
125
-
126
-
127
-
128
-
129
-
130
-
131
-
132
-
133
-
134
-
135
-
136
-
137
-
138
-
139
-
140
-
141
-
142
-
143
-
144
-
145
-
146
-
147
-
148
-
149
-
150
-
151
-
152
-
153
-
154
-
155
-
156
-
157
-
158
-
159
-
160
-
161
-
162
-
163
-
164
-
165
-
166
-
167
-
168
-
169
-
170
-
171
-
172
-
173
-
174
-
175
-
176
-
177
-
178
-
179
-
180
-
181
-
182
-
183
-
184
-
185
-
186
-
187
-
188
-
189
-
190
-
191
-
192
-
193
-
194
-
195
-
196
-
197
-
198
-
199
-
200
-
201
-
202
-
203
-
204
-
205
-
206
-
207
-
208
-
209
-
210
-
211
-
212
-
213
-
214
-
215
-
216
-
217
-
218
-
219
-
220
-
221
-
222
-
223
-
224
-
225
-
226
-
227
-
228
-
229
-
230
-
231
-
232
-
233
 |
 |