Panasonic WJ-ND400K Operating Instructions - Page 156
Network setup, Quick settings 2
 |
View all Panasonic WJ-ND400K manuals
Add to My Manuals
Save this manual to your list of manuals |
Page 156 highlights
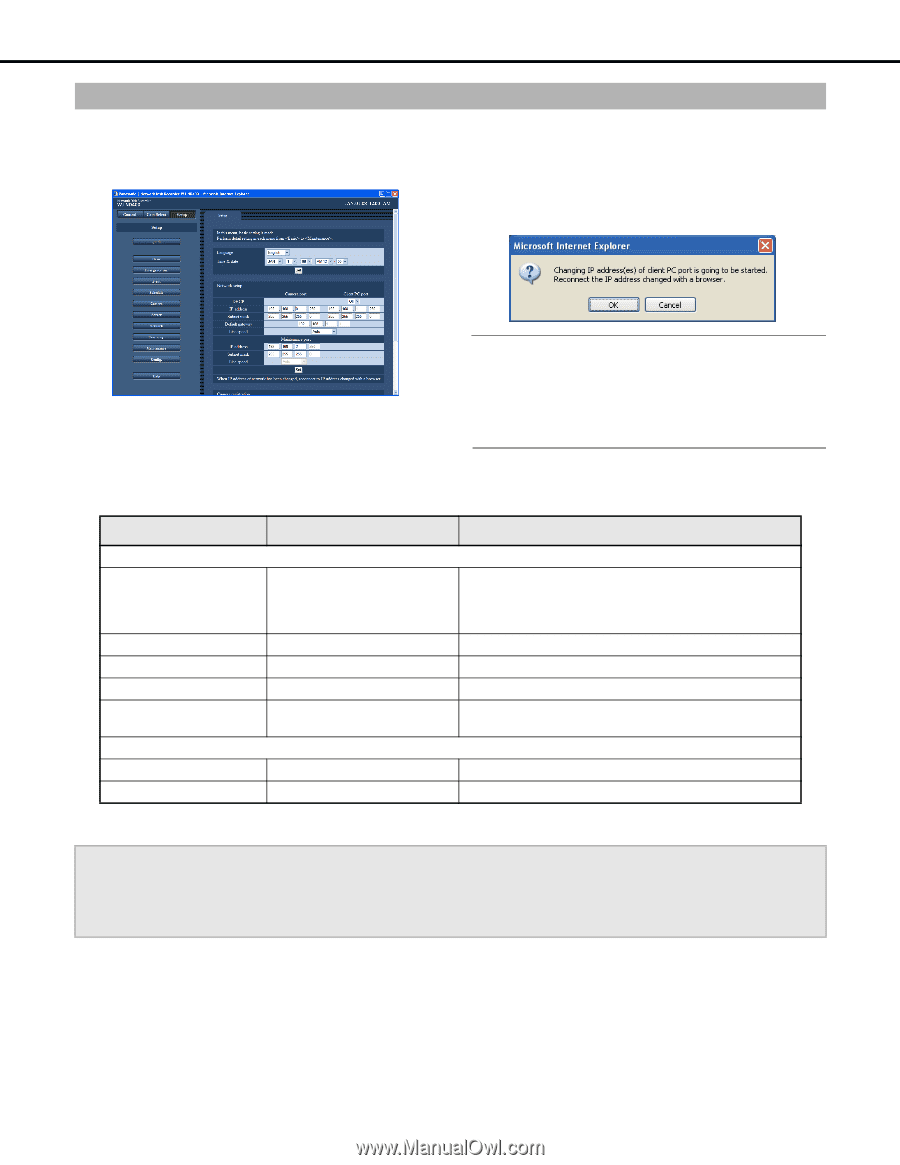
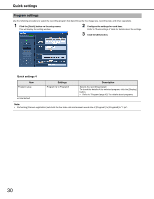
Network setup This section explains how to configure recorder network settings. 1 Click the [Quick] button on the setup menu. This will display the setting window. Quick settings 3 Under the "Network setup" item, click the [Set] button When you change the Client PC port IP address, the "Change IP Address" window will appear. Click [OK] to complete the process. 2 Configure the settings for each item. Refer to "Quick settings 2" table for details about the settings. Note: • Changing the "Client PC port" IP address causes all connected users to be forcibly logged out. Reconnect with the new IP address. • The recorder reboots after changing the line speed settings and pressing [Set]. Quick settings 2 Item Settings Description Network setup- Camera port/Client PC port DHCP Off♦ / On Specifies whether a DHCP server is used. Select [On] to obtain the IP address, subnet mask, and default gateway from a DHCP server. Select [Off] to enter these addresses manually. IP address Address input*1 When [DHCP] is [Off], specify the IP address here. Subnet mask Address input*1 When [DHCP] is [Off], specify the subnet mask here. Default gateway Address input*1 When [DHCP] is [Off], specify the default gateway here. Line speed Auto♦ / 1000M-Full / 100M-Full / Specifies the data line speed. 100M-Half / 10M-Full / 10M-Half Network setup - Maintenance port IP address Address input*1 Specifies the IP address. Subnet mask Address input*1 Specifies the subnet mask. ♦Initial default *1 Refer to "Recorder network settings (page 11)" for information on initial default settings. Important: • A different subnet should be set for each port. • When DHCP is set to [On] and "SD memory rec." is set, an error may occur in the process of startup of the unit when a request to write onto the SD memory card is made. This occurs when the response from the DHCP server is slow. Once the address has been obtained from the DHCP server, the error is resolved. 27
-
 1
1 -
2
-
3
-
4
-
5
-
6
-
7
-
8
-
9
-
10
-
11
-
12
-
13
-
14
-
15
-
16
-
17
-
18
-
19
-
20
-
21
-
22
-
23
-
24
-
25
-
26
-
27
-
28
-
29
-
30
-
31
-
32
-
33
-
34
-
35
-
36
-
37
-
38
-
39
-
40
-
41
-
42
-
43
-
44
-
45
-
46
-
47
-
48
-
49
-
50
-
51
-
52
-
53
-
54
-
55
-
56
-
57
-
58
-
59
-
60
-
61
-
62
-
63
-
64
-
65
-
66
-
67
-
68
-
69
-
70
-
71
-
72
-
73
-
74
-
75
-
76
-
77
-
78
-
79
-
80
-
81
-
82
-
83
-
84
-
85
-
86
-
87
-
88
-
89
-
90
-
91
-
92
-
93
-
94
-
95
-
96
-
97
-
98
-
99
-
100
-
101
-
102
-
103
-
104
-
105
-
106
-
107
-
108
-
109
-
110
-
111
-
112
-
113
-
114
-
115
-
116
-
117
-
118
-
119
-
120
-
121
-
122
-
123
-
124
-
125
-
126
-
127
-
128
-
129
-
130
-
131
-
132
-
133
-
134
-
135
-
136
-
137
-
138
-
139
-
140
-
141
-
142
-
143
-
144
-
145
-
146
-
147
-
148
-
149
-
150
-
 151
151 -
 152
152 -
 153
153 -
 154
154 -
 155
155 -
 156
156 -
 157
157 -
 158
158 -
 159
159 -
 160
160 -
 161
161 -
162
-
163
-
164
-
165
-
166
-
167
-
168
-
169
-
170
-
171
-
172
-
173
-
174
-
175
-
176
-
177
-
178
-
179
-
180
-
181
-
182
-
183
-
184
-
185
-
186
-
187
-
188
-
189
-
190
-
191
-
192
-
193
-
194
-
195
-
196
-
197
-
198
-
199
-
200
-
201
-
202
-
203
-
204
-
205
-
206
-
207
-
208
-
209
-
210
-
211
-
212
-
213
-
214
-
215
-
216
-
217
-
218
-
219
-
220
-
221
-
222
-
223
-
224
-
225
-
226
-
227
-
228
-
229
-
230
-
231
-
232
-
233
 |
 |