Panasonic WJ-ND400K Operating Instructions - Page 92
Settin, up the Rack, Rack Mountin
 |
View all Panasonic WJ-ND400K manuals
Add to My Manuals
Save this manual to your list of manuals |
Page 92 highlights
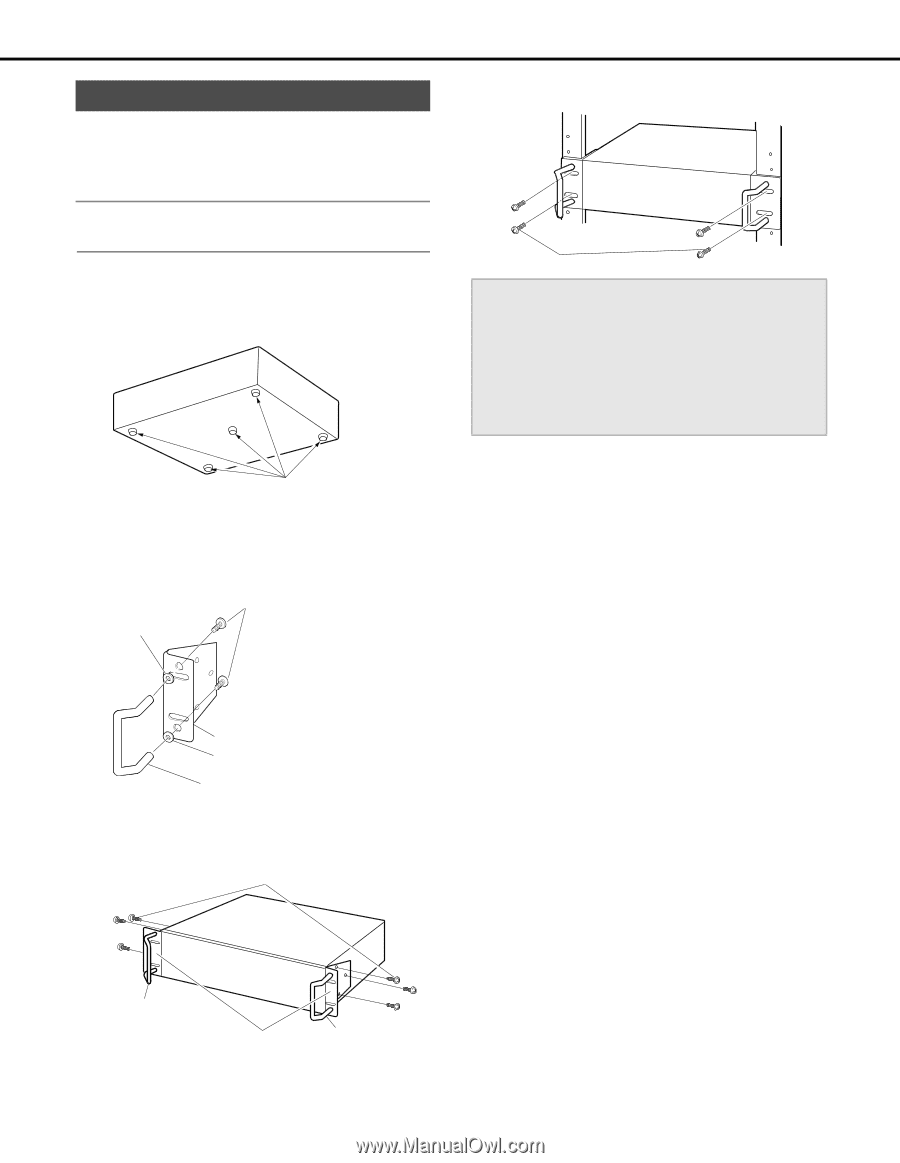
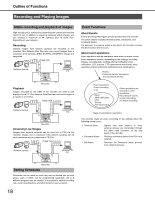
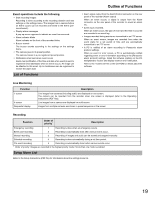
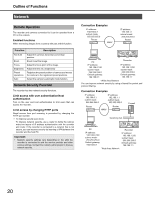
Setting up the Rack Rack Mounting Install the recorder into an EIA standard compliant rack. EIA standard compliant: an EIA-standard 19"rack, depth product 550 mm or more (locally procured) Note: • Installation in a rack requires four M5 x 12 screws. 1 Remove the 5 rubber feet from the underside of the recorder. Use a screwdriver to remove the screws holding the rubber feet. 4 Install the recorder in the rack. Secure using the rack mounting screws. Rack mounting screws (M5 x 12, locally procured) Important: • Ensure that the temperature inside the rack does not exceed 45 ºC {113 ºF}. • During installation, we recommend installing a fan to keep the temperature in the rack below 30 ºC {86 ºF}. • When installing the recorder in the rack, leave a space of 1 unit (44 mm {1.73"}) above and below each unit. • Leave space between racks and ensure proper ventilation around the racks. Remove rubber feet 2 Attach the handle for rack mounting bracket to the rack mounting brackets. Use the four handle fixing screws for rack mounting bracket and washers to secure them. Handle fixing screws for rack mounting bracket Washer Rack mounting bracket Washer Handle for rack mounting bracket 3 Attach the rack mounting bracket to both sides of the recorder. Secure them using the six rack mounting bracket fixing screws. Rack mounting bracket fixing screws (provided) Handle for rack mounting bracket Rack mounting brackets (provided) Handle for rack mounting bracket 23
-
 1
1 -
2
-
3
-
4
-
5
-
6
-
7
-
8
-
9
-
10
-
11
-
12
-
13
-
14
-
15
-
16
-
17
-
18
-
19
-
20
-
21
-
22
-
23
-
24
-
25
-
26
-
27
-
28
-
29
-
30
-
31
-
32
-
33
-
34
-
35
-
36
-
37
-
38
-
39
-
40
-
41
-
42
-
43
-
44
-
45
-
46
-
47
-
48
-
49
-
50
-
51
-
52
-
53
-
54
-
55
-
56
-
57
-
58
-
59
-
60
-
61
-
62
-
63
-
64
-
65
-
66
-
67
-
68
-
69
-
70
-
71
-
72
-
73
-
74
-
75
-
76
-
77
-
78
-
79
-
80
-
81
-
82
-
83
-
84
-
85
-
86
-
 87
87 -
 88
88 -
 89
89 -
 90
90 -
 91
91 -
 92
92 -
 93
93 -
 94
94 -
 95
95 -
 96
96 -
 97
97 -
98
-
99
-
100
-
101
-
102
-
103
-
104
-
105
-
106
-
107
-
108
-
109
-
110
-
111
-
112
-
113
-
114
-
115
-
116
-
117
-
118
-
119
-
120
-
121
-
122
-
123
-
124
-
125
-
126
-
127
-
128
-
129
-
130
-
131
-
132
-
133
-
134
-
135
-
136
-
137
-
138
-
139
-
140
-
141
-
142
-
143
-
144
-
145
-
146
-
147
-
148
-
149
-
150
-
151
-
152
-
153
-
154
-
155
-
156
-
157
-
158
-
159
-
160
-
161
-
162
-
163
-
164
-
165
-
166
-
167
-
168
-
169
-
170
-
171
-
172
-
173
-
174
-
175
-
176
-
177
-
178
-
179
-
180
-
181
-
182
-
183
-
184
-
185
-
186
-
187
-
188
-
189
-
190
-
191
-
192
-
193
-
194
-
195
-
196
-
197
-
198
-
199
-
200
-
201
-
202
-
203
-
204
-
205
-
206
-
207
-
208
-
209
-
210
-
211
-
212
-
213
-
214
-
215
-
216
-
217
-
218
-
219
-
220
-
221
-
222
-
223
-
224
-
225
-
226
-
227
-
228
-
229
-
230
-
231
-
232
-
233
 |
 |