Canon EOS C700 FF PL EOS C700 EOS C700 PL EOS C700 GS PL EOS C700 FF EOS C700 - Page 109
Connecting an External Microphone or External Audio Input Source to the Camera
 |
View all Canon EOS C700 FF PL manuals
Add to My Manuals
Save this manual to your list of manuals |
Page 109 highlights
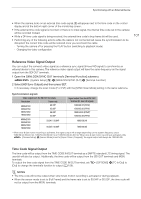
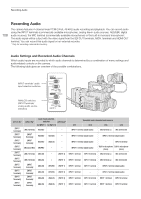
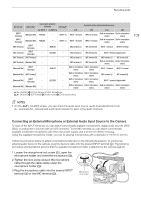
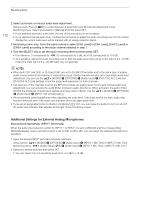
Recording Audio [CH1/2 IN]* [CH3/4 IN]* Audio input selection switches [CH2 Input]** for INPUT 1 for INPUT 2 Recorded audio channels/audio sources CH1 CH2 CH3 CH4 [INPUT Terminals] [Monaural Mic] ANALOG - [INPUT 2] INPUT 1 terminal INPUT 2 terminal Built-in microphone Built-in microphone (mono) (mono) [INPUT Terminals] [Monaural Mic] ANALOG - [INPUT 1] INPUT 1 terminal INPUT 1 terminal Built-in microphone Built-in microphone (mono) (mono) [MIC Terminal] [INPUT Terminals] - ANALOG - MIC terminal (L) MIC terminal (R) INPUT 1 terminal INPUT 2 terminal [MIC Terminal] [INPUT Terminals] - AES/EBU - MIC terminal (L) MIC terminal (R) INPUT 2 terminal (digital audio) [MIC Terminal] [MIC Terminal] - - - MIC terminal (L) MIC terminal (R) MIC terminal (L) MIC terminal (R) [MIC Terminal] [Monaural Mic] - - - MIC terminal (L) MIC terminal (R) Built-in microphone Built-in microphone (mono) (mono) [Monaural Mic] [INPUT Terminals] - ANALOG - Built-in microphone Built-in microphone (mono) (mono) INPUT 1 terminal INPUT 2 terminal [Monaural Mic] [MIC Terminal] - - - Built-in microphone Built-in microphone (mono) (mono) MIC terminal (L) MIC terminal (R) [Monaural Mic] [INPUT Terminals] - AES/EBU - Built-in microphone Built-in microphone (mono) (mono) INPUT 2 terminal (digital audio) [Monaural Mic] [Monaural Mic] - - - Built-in microphone Built-in microphone Built-in microphone Built-in microphone (mono) (mono) (mono) (mono) * [AUDIO] > [CH1/2 IN] and [CH3/4 IN] settings. ** [AUDIO] > [OPTIONS] > [Audio Input] > [CH2 Input] setting. 109 NOTES • On the [AUDIO] screen, you can check the audio input source, audio level adjustment mode (A - automatic/M - manual) and audio level indicator for each of the audio channels. Connecting an External Microphone or External Audio Input Source to the Camera To each of the INPUT terminals you can attach commercially available microphones, digital audio sources (AES/ EBU), or analog line in sources with an XLR connector. To the MIC terminal you can attach commercially available condenser microphones with their own power supply, and a ∅ 3.5 mm stereo mini plug. Using the supplied microphone holder, you can fix external microphones with a diameter of 19 mm to 24 mm. Follow the procedure below to attach a microphone (refer also to the following illustration). To connect an external audio device to the camera, plug the device's cable into the desired INPUT terminal (ብ). The following procedure and illustrations assume that the supplied microphone holder is attached to the camera (A 43). 1 Loosen the microphone lock screw (ቢ), open the microphone holder and insert the microphone (ባ). 2 Tighten the lock screw and put the microphone cable through the cable clamp under the microphone holder (ቤ). ቢ ባ 3 Plug the microphone cable into the desired INPUT terminal (ብ) or the MIC terminal (ቦ). Microphone lock screw
-
 1
1 -
2
-
3
-
4
-
5
-
6
-
7
-
8
-
9
-
10
-
11
-
12
-
13
-
14
-
15
-
16
-
17
-
18
-
19
-
20
-
21
-
22
-
23
-
24
-
25
-
26
-
27
-
28
-
29
-
30
-
31
-
32
-
33
-
34
-
35
-
36
-
37
-
38
-
39
-
40
-
41
-
42
-
43
-
44
-
45
-
46
-
47
-
48
-
49
-
50
-
51
-
52
-
53
-
54
-
55
-
56
-
57
-
58
-
59
-
60
-
61
-
62
-
63
-
64
-
65
-
66
-
67
-
68
-
69
-
70
-
71
-
72
-
73
-
74
-
75
-
76
-
77
-
78
-
79
-
80
-
81
-
82
-
83
-
84
-
85
-
86
-
87
-
88
-
89
-
90
-
91
-
92
-
93
-
94
-
95
-
96
-
97
-
98
-
99
-
100
-
101
-
102
-
103
-
 104
104 -
 105
105 -
 106
106 -
 107
107 -
 108
108 -
 109
109 -
 110
110 -
 111
111 -
 112
112 -
 113
113 -
 114
114 -
115
-
116
-
117
-
118
-
119
-
120
-
121
-
122
-
123
-
124
-
125
-
126
-
127
-
128
-
129
-
130
-
131
-
132
-
133
-
134
-
135
-
136
-
137
-
138
-
139
-
140
-
141
-
142
-
143
-
144
-
145
-
146
-
147
-
148
-
149
-
150
-
151
-
152
-
153
-
154
-
155
-
156
-
157
-
158
-
159
-
160
-
161
-
162
-
163
-
164
-
165
-
166
-
167
-
168
-
169
-
170
-
171
-
172
-
173
-
174
-
175
-
176
-
177
-
178
-
179
-
180
-
181
-
182
-
183
-
184
-
185
-
186
-
187
-
188
-
189
-
190
-
191
-
192
-
193
-
194
-
195
-
196
-
197
-
198
-
199
-
200
-
201
-
202
-
203
-
204
-
205
-
206
-
207
-
208
-
209
-
210
-
211
-
212
-
213
-
214
-
215
-
216
-
217
-
218
-
219
-
220
-
221
-
222
-
223
-
224
-
225
-
226
-
227
-
228
-
229
-
230
-
231
-
232
-
233
-
234
-
235
-
236
-
237
-
238
-
239
-
240
-
241
-
242
-
243
-
244
-
245
-
246
-
247
-
248
-
249
-
250
-
251
-
252
-
253
-
254
-
255
 |
 |