Canon EOS C700 FF PL EOS C700 EOS C700 PL EOS C700 GS PL EOS C700 FF EOS C700 - Page 75
Changing the Shutter Speed Mode and Value
 |
View all Canon EOS C700 FF PL manuals
Add to My Manuals
Save this manual to your list of manuals |
Page 75 highlights
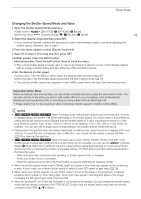
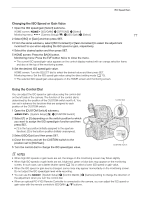
Shutter Speed Changing the Shutter Speed Mode and Value 1 Open the shutter speed [Mode] submenu. HOME screen: [SHUTTER] > [OPTIONS] > [Mode] Monitoring menu: [Camera Setup] (v) > [Shutter] > [Mode] 75 2 Select the desired mode and then press SET. • If you selected [Speed], continue the procedure to select the increment scale to use when adjusting the shutter speed; otherwise, skip to step 5. 3 From the same submenu select [Shutter Increment]. 4 Select [1/3 stop] or [1/4 stop] and then press SET. 5 HOME screen: Press the BACK button. Monitoring menu: Press the EVF button twice to close the menu. • The current shutter speed (or angle value or clear scan frequency) appears on the control display marked with an orange selection frame and also at the top of the monitoring screen. 6 Set the desired shutter speed. Camera menu: Turn the SELECT dial to select the desired value and then press SET. Monitoring menu: Set the shutter speed value using the direct setting mode (A 73). • The selected shutter speed value appears on the HOME screen and at the top of the monitoring screen. Using Slow Shutter Mode When recording in dark surroundings, you can obtain a brighter picture by using the slow shutter mode. You can also use this mode when you wish to add certain effects to your recordings, such as blurring the background during panning shots or recording a moving subject with an afterimage trail. • Image quality may not be as good as when using faster shutter speeds in brighter surroundings. NOTES • Z[qr When recording under artificial light sources such as fluorescent, mercury or halogen lamps, the screen may flicker depending on the shutter speed. You may be able to avoid flicker by setting the shutter speed mode to [Speed] and the shutter speed to a value matching the frequency of the local electrical system: 1/25, 3/100, 1/50 or 1/100 for 50 Hz systems; 1/30, 1/40, 1/60 or 1/120 for 60 Hz systems. You can also set an angle value corresponding to the shutter speeds mentioned above. • Closing down the aperture when recording under bright conditions may cause the picture to appear soft or out of focus. To avoid the loss of sharpness due to diffraction, use a faster shutter speed, a denser ND filter (A 78) or open up the aperture. • Z[qr When the frame rate is set to 59.94i, 59.94P, 50.00i or 50.00P, if the shutter speed mode is set to [Off] and slow & fast motion is not activated, you can use the [Camera Setup] > [Flash Band Corr.] setting to have the camera detect partial flash banding on consecutive frames and correct this to minimize the number of unusable frames. The flash band correction will be deactivated in the following cases. - When the frame rate, resolution/color sampling or shutter speed mode is changed. - When slow & fast motion is activated. - When the camera is turned off or the PLAY button is pressed (switching to playback mode). • When the shutter speed mode is set to [Slow], bright red, green or blue dots may appear on the monitoring screen. In such case, use a faster shutter speed or select a lower ISO speed or gain value (A 76). • When using slow shutter speeds, if a very bright subject moves in the image or the brightness increases suddenly due to a flash or other strong light, some color may appear in the brightest areas of the image. Increasing the ISO speed/gain value may solve this. • When an optional RC-V100 Remote Controller is connected to the camera, you can change the shutter speed mode with the remote controller's SHUTTER SELECT button and the shutter speed value with the remote controller's SHUTTER Í/Î buttons.
-
 1
1 -
2
-
3
-
4
-
5
-
6
-
7
-
8
-
9
-
10
-
11
-
12
-
13
-
14
-
15
-
16
-
17
-
18
-
19
-
20
-
21
-
22
-
23
-
24
-
25
-
26
-
27
-
28
-
29
-
30
-
31
-
32
-
33
-
34
-
35
-
36
-
37
-
38
-
39
-
40
-
41
-
42
-
43
-
44
-
45
-
46
-
47
-
48
-
49
-
50
-
51
-
52
-
53
-
54
-
55
-
56
-
57
-
58
-
59
-
60
-
61
-
62
-
63
-
64
-
65
-
66
-
67
-
68
-
69
-
 70
70 -
 71
71 -
 72
72 -
 73
73 -
 74
74 -
 75
75 -
 76
76 -
 77
77 -
 78
78 -
 79
79 -
 80
80 -
81
-
82
-
83
-
84
-
85
-
86
-
87
-
88
-
89
-
90
-
91
-
92
-
93
-
94
-
95
-
96
-
97
-
98
-
99
-
100
-
101
-
102
-
103
-
104
-
105
-
106
-
107
-
108
-
109
-
110
-
111
-
112
-
113
-
114
-
115
-
116
-
117
-
118
-
119
-
120
-
121
-
122
-
123
-
124
-
125
-
126
-
127
-
128
-
129
-
130
-
131
-
132
-
133
-
134
-
135
-
136
-
137
-
138
-
139
-
140
-
141
-
142
-
143
-
144
-
145
-
146
-
147
-
148
-
149
-
150
-
151
-
152
-
153
-
154
-
155
-
156
-
157
-
158
-
159
-
160
-
161
-
162
-
163
-
164
-
165
-
166
-
167
-
168
-
169
-
170
-
171
-
172
-
173
-
174
-
175
-
176
-
177
-
178
-
179
-
180
-
181
-
182
-
183
-
184
-
185
-
186
-
187
-
188
-
189
-
190
-
191
-
192
-
193
-
194
-
195
-
196
-
197
-
198
-
199
-
200
-
201
-
202
-
203
-
204
-
205
-
206
-
207
-
208
-
209
-
210
-
211
-
212
-
213
-
214
-
215
-
216
-
217
-
218
-
219
-
220
-
221
-
222
-
223
-
224
-
225
-
226
-
227
-
228
-
229
-
230
-
231
-
232
-
233
-
234
-
235
-
236
-
237
-
238
-
239
-
240
-
241
-
242
-
243
-
244
-
245
-
246
-
247
-
248
-
249
-
250
-
251
-
252
-
253
-
254
-
255
 |
 |