Canon EOS C700 FF PL EOS C700 EOS C700 PL EOS C700 GS PL EOS C700 FF EOS C700 - Page 30
Changing Camera Settings with the Screen Buttons, USER screen
 |
View all Canon EOS C700 FF PL manuals
Add to My Manuals
Save this manual to your list of manuals |
Page 30 highlights
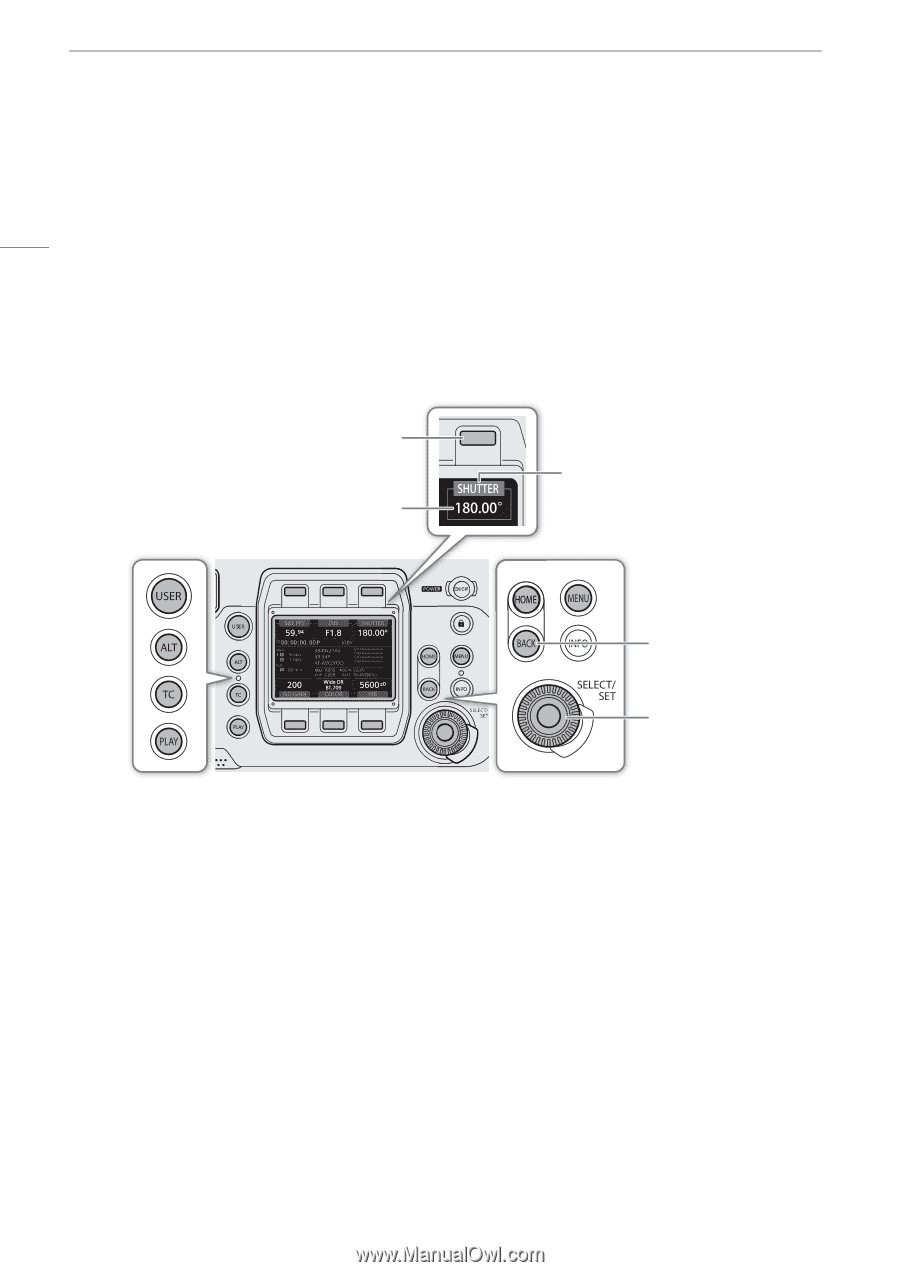
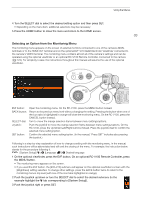
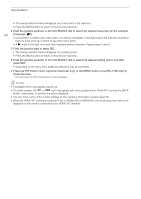
Changing Camera Settings with the Screen Buttons Changing Camera Settings with the Screen Buttons There are three basic ways to change the various camera settings: Using the screens that appear on the camera's control display and the screen buttons, using the camera menu displayed on the control display, and 30 using the monitoring menu displayed on monitoring devices along with the camera's image. The menus will be explained in the following section (A 32). This section will explain the use of the control display screens and screen buttons. When an optional OU-700 Remote Operation Unit is connected to the camera, using the OU-700 is identical to using the camera's control display and buttons. Unlike the menus, the function of the screen buttons changes dynamically depending on the button pressed on the camera and the screen currently displayed on the control display. The current function of the screen buttons is displayed in the gray area immediately above/below the screen button. If applicable, the current setting is displayed within the white enclosure connected to it. Screen button. In this example, pressing the button will open a screen where you can change the shutter speed. Current value of the shutter speed. Current function of the screen button. In the manual pressing this screen button will be referred to as "Press [SHUTTER]". BACK button: Return to the previous screen without changing the setting. SELECT dial: Turn to move between options. SET button: Confirm the selected option. The HOME, USER, ALT, TC and PLAY buttons, each opens a different setup screen where you can change settings or perform actions (A 187). Options HOME screen: This screen is displayed by default when you turn on the camera. In this screen you can change the frame rate, aperture and ND filter settings, shutter speed, ISO speed/gain, custom picture settings and white balance. You can also check the status of the camera, clip name, recording format, information about recording media and power supply. USER screen: You can customize this screen to your needs by assigning the functions you prefer to the 6 screen buttons. ALT screen: In this screen you can change settings related to autofocus (Zq) and the focus assistance functions, audio, the camera's electronic level and network functions. TC screen: In this screen you can change time code related settings. PLAY screen: In this screen you can control the playback of your recordings (playback mode).
-
 1
1 -
2
-
3
-
4
-
5
-
6
-
7
-
8
-
9
-
10
-
11
-
12
-
13
-
14
-
15
-
16
-
17
-
18
-
19
-
20
-
21
-
22
-
23
-
24
-
 25
25 -
 26
26 -
 27
27 -
 28
28 -
 29
29 -
 30
30 -
 31
31 -
 32
32 -
 33
33 -
 34
34 -
 35
35 -
36
-
37
-
38
-
39
-
40
-
41
-
42
-
43
-
44
-
45
-
46
-
47
-
48
-
49
-
50
-
51
-
52
-
53
-
54
-
55
-
56
-
57
-
58
-
59
-
60
-
61
-
62
-
63
-
64
-
65
-
66
-
67
-
68
-
69
-
70
-
71
-
72
-
73
-
74
-
75
-
76
-
77
-
78
-
79
-
80
-
81
-
82
-
83
-
84
-
85
-
86
-
87
-
88
-
89
-
90
-
91
-
92
-
93
-
94
-
95
-
96
-
97
-
98
-
99
-
100
-
101
-
102
-
103
-
104
-
105
-
106
-
107
-
108
-
109
-
110
-
111
-
112
-
113
-
114
-
115
-
116
-
117
-
118
-
119
-
120
-
121
-
122
-
123
-
124
-
125
-
126
-
127
-
128
-
129
-
130
-
131
-
132
-
133
-
134
-
135
-
136
-
137
-
138
-
139
-
140
-
141
-
142
-
143
-
144
-
145
-
146
-
147
-
148
-
149
-
150
-
151
-
152
-
153
-
154
-
155
-
156
-
157
-
158
-
159
-
160
-
161
-
162
-
163
-
164
-
165
-
166
-
167
-
168
-
169
-
170
-
171
-
172
-
173
-
174
-
175
-
176
-
177
-
178
-
179
-
180
-
181
-
182
-
183
-
184
-
185
-
186
-
187
-
188
-
189
-
190
-
191
-
192
-
193
-
194
-
195
-
196
-
197
-
198
-
199
-
200
-
201
-
202
-
203
-
204
-
205
-
206
-
207
-
208
-
209
-
210
-
211
-
212
-
213
-
214
-
215
-
216
-
217
-
218
-
219
-
220
-
221
-
222
-
223
-
224
-
225
-
226
-
227
-
228
-
229
-
230
-
231
-
232
-
233
-
234
-
235
-
236
-
237
-
238
-
239
-
240
-
241
-
242
-
243
-
244
-
245
-
246
-
247
-
248
-
249
-
250
-
251
-
252
-
253
-
254
-
255
 |
 |