Canon EOS C700 FF PL EOS C700 EOS C700 PL EOS C700 GS PL EOS C700 FF EOS C700 - Page 112
Additional Settings for External Analog Microphones, Microphone Sensitivity INPUT Terminals
 |
View all Canon EOS C700 FF PL manuals
Add to My Manuals
Save this manual to your list of manuals |
Page 112 highlights
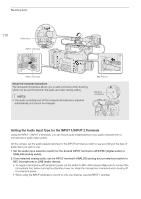
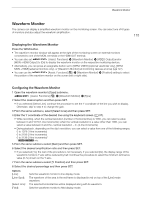
Recording Audio 112 2 Select automatic or manual audio level adjustment. Setup screen: Press [A M] to switch between A (automatic) and M (manual) adjustment mode. Monitoring menu: Select [Automatic] or [Manual] and then press SET. • If you selected automatic audio level, the rest of the procedure is not necessary. • If you selected manual audio level, continue the procedure to adjust the audio recording level. On the control display the current audio level will be marked with an orange selection frame. 3 Monitoring menu only: From the same submenu select [CH1 Level] to [CH4 Level], [CH1/2 Level] or [CH3/4 Level] according to the audio channel selected in step 1. 4 Turn the SELECT dial to set the audio recording level and then press SET. • For reference, 0 corresponds to -G, 50 corresponds to 0 dB, and 100 corresponds to +18 dB. • As a guideline, adjust the audio recording level so that the audio level meter will go to the right of the -18 dB mark (one mark right of the -20 dB mark) only occasionally. NOTES • When both CH1 and CH2, or CH3 and CH4, are set to the INPUT terminals and to the same type of analog audio source (external microphone or external line input), if both channels are also set to automatic audio level adjustment, you can use the [AUDIO] > [OPTIONS] > [Audio Input] > [CH1/CH2 ALC Link] and [CH3/CH4 ALC Link] settings to link the audio level adjustment of both channels. • If at least one of the channels is set to the INPUT terminals, an analog audio source and manual audio level adjustment, you can activate the audio limiter to prevent audio distortions. When activated, the audio limiter will limit the amplitude of audio input signals when they start to distort. Use the [AUDIO] > [OPTIONS] > [Audio Input] > [INPUT 1&2 Limiter] setting. • We recommend using headphones when adjusting the audio level. If the input level is too high, audio may become distorted even if the audio level indicator shows an appropriate level. • If you set an assignable button to [Audio Lvl Indicator] (A 127), you can press the button to turn on and off the audio level indicator that appears at the right of the monitoring screen. Additional Settings for External Analog Microphones Microphone Sensitivity (INPUT Terminals) When the audio input selection switch for INPUT 1 or INPUT 2 is set to ANALOG and the corresponding ANALOG (analog source selection) switch is set to MIC or MIC+48V, you can select the external microphone's sensitivity. 1 Open the desired INPUT terminal's sensitivity submenu. Setup screen: Monitoring menu: [AUDIO] > [OPTIONS] > [Audio Input] > [INPUT 1 Mic Trim] or [INPUT 2 Mic Trim] [Audio Setup] (¡) > [Audio Input] > [INPUT 1 Mic Trim] or [INPUT 2 Mic Trim] 2 Select the desired level and then press SET. • You can select one of 5 sensitivity levels from -12 dB to +12 dB.
-
 1
1 -
2
-
3
-
4
-
5
-
6
-
7
-
8
-
9
-
10
-
11
-
12
-
13
-
14
-
15
-
16
-
17
-
18
-
19
-
20
-
21
-
22
-
23
-
24
-
25
-
26
-
27
-
28
-
29
-
30
-
31
-
32
-
33
-
34
-
35
-
36
-
37
-
38
-
39
-
40
-
41
-
42
-
43
-
44
-
45
-
46
-
47
-
48
-
49
-
50
-
51
-
52
-
53
-
54
-
55
-
56
-
57
-
58
-
59
-
60
-
61
-
62
-
63
-
64
-
65
-
66
-
67
-
68
-
69
-
70
-
71
-
72
-
73
-
74
-
75
-
76
-
77
-
78
-
79
-
80
-
81
-
82
-
83
-
84
-
85
-
86
-
87
-
88
-
89
-
90
-
91
-
92
-
93
-
94
-
95
-
96
-
97
-
98
-
99
-
100
-
101
-
102
-
103
-
104
-
105
-
106
-
 107
107 -
 108
108 -
 109
109 -
 110
110 -
 111
111 -
 112
112 -
 113
113 -
 114
114 -
 115
115 -
 116
116 -
 117
117 -
118
-
119
-
120
-
121
-
122
-
123
-
124
-
125
-
126
-
127
-
128
-
129
-
130
-
131
-
132
-
133
-
134
-
135
-
136
-
137
-
138
-
139
-
140
-
141
-
142
-
143
-
144
-
145
-
146
-
147
-
148
-
149
-
150
-
151
-
152
-
153
-
154
-
155
-
156
-
157
-
158
-
159
-
160
-
161
-
162
-
163
-
164
-
165
-
166
-
167
-
168
-
169
-
170
-
171
-
172
-
173
-
174
-
175
-
176
-
177
-
178
-
179
-
180
-
181
-
182
-
183
-
184
-
185
-
186
-
187
-
188
-
189
-
190
-
191
-
192
-
193
-
194
-
195
-
196
-
197
-
198
-
199
-
200
-
201
-
202
-
203
-
204
-
205
-
206
-
207
-
208
-
209
-
210
-
211
-
212
-
213
-
214
-
215
-
216
-
217
-
218
-
219
-
220
-
221
-
222
-
223
-
224
-
225
-
226
-
227
-
228
-
229
-
230
-
231
-
232
-
233
-
234
-
235
-
236
-
237
-
238
-
239
-
240
-
241
-
242
-
243
-
244
-
245
-
246
-
247
-
248
-
249
-
250
-
251
-
252
-
253
-
254
-
255
 |
 |
