Canon EOS C700 FF PL EOS C700 EOS C700 PL EOS C700 GS PL EOS C700 FF EOS C700 - Page 82
Exposure Compensation - AE Shift, Light Metering Mode, Open the [AE Shift] submenu.
 |
View all Canon EOS C700 FF PL manuals
Add to My Manuals
Save this manual to your list of manuals |
Page 82 highlights
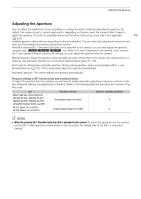
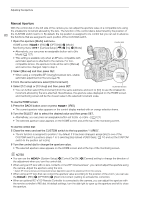
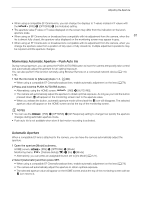
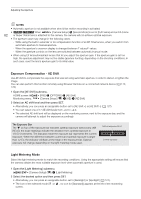
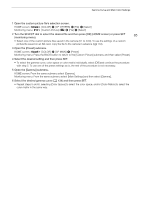
Adjusting the Aperture NOTES • Automatic aperture is not available when slow & fast motion recording is activated. • qr When [Camera Setup] > [Sensor Mode] is set to [Full Frame] and an EF-S lens 82 or Super 35mm lens is attached to the camera, the camera will not achieve optimal exposure. • The aperture value may change in the following cases. - While using the built-in extender or iris compensation function of an EF Cinema lens, when you switch from automatic aperture to manual aperture. - When the aperture's onscreen display is changed between T values/F values. - When the aperture controls on the lens are switched between automatic/manual mode. • When using EF lenses/broadcast lenses that let you adjust the aperture gain, if the aperture gain is set too high, the aperture adjustment may not be stable (aperture hunting), depending on the shooting conditions. In such case, reset the lens's aperture gain to its initial value. Exposure Compensation - AE Shift Use AE shift to compensate the exposure that was set using automatic aperture, in order to darken or lighten the image. You can also perform this function remotely using Browser Remote on a connected network device (A 170, 176). 1 Open the [AE Shift] submenu. HOME screen: Monitoring menu: [IRIS] > [OPTIONS] > [AE Shift] [Camera Setup] (v) > [AE] > [AE Shift] 2 Select an AE shift level and then press SET. • Alternatively, you can press an assignable button set to [AE Shift +] or [AE Shift -] (A 127). • You can select one of 17 AE shift levels from -2.0 to +2.0. • The selected AE shift level will be displayed on the monitoring screen, next to the exposure bar, and the camera will attempt to adjust the exposure accordingly. The Exposure Bar The Î on top of the exposure bar indicates optimal exposure without any shift (AE±0); the scale markings indicate the deviation from optimal exposure in 1/2 EV increments. The indicator inside the exposure bar represents the current exposure. When the difference between current and optimal exposure is larger than ±2 EV, the indicator will flash at the edge of the exposure bar. Optimal exposure will change depending on the light metering mode used. Optimal exposure AE±0 Current exposure Light Metering Mode Select the light metering mode to match the recording conditions. Using the appropriate setting will ensure that the camera obtains the most suitable exposure level when automatic aperture is used. 1 Open the [Light Metering] submenu. [Camera Setup] (v) > [Light Metering] 2 Select the desired option and then press SET. • Alternatively, you can press an assignable button set to [Backlight] or [Spotlight] (A 127). • The icon of the selected mode ( or , no icon for [Standard]) appears at the left of the monitoring screen.
-
 1
1 -
2
-
3
-
4
-
5
-
6
-
7
-
8
-
9
-
10
-
11
-
12
-
13
-
14
-
15
-
16
-
17
-
18
-
19
-
20
-
21
-
22
-
23
-
24
-
25
-
26
-
27
-
28
-
29
-
30
-
31
-
32
-
33
-
34
-
35
-
36
-
37
-
38
-
39
-
40
-
41
-
42
-
43
-
44
-
45
-
46
-
47
-
48
-
49
-
50
-
51
-
52
-
53
-
54
-
55
-
56
-
57
-
58
-
59
-
60
-
61
-
62
-
63
-
64
-
65
-
66
-
67
-
68
-
69
-
70
-
71
-
72
-
73
-
74
-
75
-
76
-
 77
77 -
 78
78 -
 79
79 -
 80
80 -
 81
81 -
 82
82 -
 83
83 -
 84
84 -
 85
85 -
 86
86 -
 87
87 -
88
-
89
-
90
-
91
-
92
-
93
-
94
-
95
-
96
-
97
-
98
-
99
-
100
-
101
-
102
-
103
-
104
-
105
-
106
-
107
-
108
-
109
-
110
-
111
-
112
-
113
-
114
-
115
-
116
-
117
-
118
-
119
-
120
-
121
-
122
-
123
-
124
-
125
-
126
-
127
-
128
-
129
-
130
-
131
-
132
-
133
-
134
-
135
-
136
-
137
-
138
-
139
-
140
-
141
-
142
-
143
-
144
-
145
-
146
-
147
-
148
-
149
-
150
-
151
-
152
-
153
-
154
-
155
-
156
-
157
-
158
-
159
-
160
-
161
-
162
-
163
-
164
-
165
-
166
-
167
-
168
-
169
-
170
-
171
-
172
-
173
-
174
-
175
-
176
-
177
-
178
-
179
-
180
-
181
-
182
-
183
-
184
-
185
-
186
-
187
-
188
-
189
-
190
-
191
-
192
-
193
-
194
-
195
-
196
-
197
-
198
-
199
-
200
-
201
-
202
-
203
-
204
-
205
-
206
-
207
-
208
-
209
-
210
-
211
-
212
-
213
-
214
-
215
-
216
-
217
-
218
-
219
-
220
-
221
-
222
-
223
-
224
-
225
-
226
-
227
-
228
-
229
-
230
-
231
-
232
-
233
-
234
-
235
-
236
-
237
-
238
-
239
-
240
-
241
-
242
-
243
-
244
-
245
-
246
-
247
-
248
-
249
-
250
-
251
-
252
-
253
-
254
-
255
 |
 |