Canon EOS C700 FF PL EOS C700 EOS C700 PL EOS C700 GS PL EOS C700 FF EOS C700 - Page 44
Preparing the Lens, After removing a lens/When a lens is not attached to the camera
 |
View all Canon EOS C700 FF PL manuals
Add to My Manuals
Save this manual to your list of manuals |
Page 44 highlights
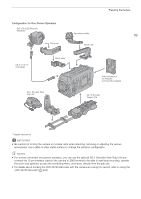
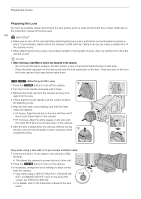
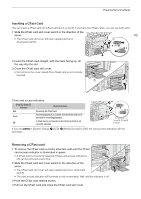
Preparing the Camera Preparing the Lens As much as possible, attach and remove the lens quickly and in a clean environment free of dust. Refer also to the instruction manual of the lens used. 44 IMPORTANT • Make sure to turn off the camera before attaching/removing a lens and before connecting/disconnecting a lens's 12-pin interface cable to/from the camera's LENS terminal. Failing to do so can cause a malfunction of the camera or lens. • When attaching/removing a lens, avoid direct sunlight or strong light sources. Also, be careful not to drop the camera or lens. NOTES • After removing a lens/When a lens is not attached to the camera: - Do not touch the lens's surfaces, the lens mount or any components inside the lens mount area. - Place the body cap back on the lens mount and the dust caps back on the lens. Clean any dust or dirt from the body cap and dust caps before using them. Zq Attaching an EF Lens ባ 1 Press the Q button to turn off the camera. 2 Turn the mount handle clockwise until it stops. 3 Remove the body cap from the camera and any dust caps from the lens. 4 Check that the mount handle is at the correct position for attaching a lens. 5 Align the lens and mount making sure that the index marks are aligned. • EF lenses: Align the red dot on the lens with the red EF lens mount index mark on the camera. • EF-S lenses: Align the white square on the lens with the white EF-S lens mount index mark on the camera. 6 After the lens is attached to the camera, without turning the lens, turn the mount handle counter-clockwise until it ቤ is tightened firmly. ብ ቦ ቧ Only when using a lens with a 12-pin camera interface cable: 7 Connect the lens's 12-pin cable to the camera's LENS terminal. • This allows the camera to power the lens's drive unit. 8 Press the Q button to turn on the camera. 9 If necessary, change the lens's settings to allow control from the camera. ቨ • Only when using a CN7x17 KAS S/E1, CN10x25 IAS S/E1 or CN20x50 IAS H/E1 lens: In the lens's Info screen, set [I/Fprior] to [Mount]. • For details, refer to the instruction manual of the lens used.
-
 1
1 -
2
-
3
-
4
-
5
-
6
-
7
-
8
-
9
-
10
-
11
-
12
-
13
-
14
-
15
-
16
-
17
-
18
-
19
-
20
-
21
-
22
-
23
-
24
-
25
-
26
-
27
-
28
-
29
-
30
-
31
-
32
-
33
-
34
-
35
-
36
-
37
-
38
-
 39
39 -
 40
40 -
 41
41 -
 42
42 -
 43
43 -
 44
44 -
 45
45 -
 46
46 -
 47
47 -
 48
48 -
 49
49 -
50
-
51
-
52
-
53
-
54
-
55
-
56
-
57
-
58
-
59
-
60
-
61
-
62
-
63
-
64
-
65
-
66
-
67
-
68
-
69
-
70
-
71
-
72
-
73
-
74
-
75
-
76
-
77
-
78
-
79
-
80
-
81
-
82
-
83
-
84
-
85
-
86
-
87
-
88
-
89
-
90
-
91
-
92
-
93
-
94
-
95
-
96
-
97
-
98
-
99
-
100
-
101
-
102
-
103
-
104
-
105
-
106
-
107
-
108
-
109
-
110
-
111
-
112
-
113
-
114
-
115
-
116
-
117
-
118
-
119
-
120
-
121
-
122
-
123
-
124
-
125
-
126
-
127
-
128
-
129
-
130
-
131
-
132
-
133
-
134
-
135
-
136
-
137
-
138
-
139
-
140
-
141
-
142
-
143
-
144
-
145
-
146
-
147
-
148
-
149
-
150
-
151
-
152
-
153
-
154
-
155
-
156
-
157
-
158
-
159
-
160
-
161
-
162
-
163
-
164
-
165
-
166
-
167
-
168
-
169
-
170
-
171
-
172
-
173
-
174
-
175
-
176
-
177
-
178
-
179
-
180
-
181
-
182
-
183
-
184
-
185
-
186
-
187
-
188
-
189
-
190
-
191
-
192
-
193
-
194
-
195
-
196
-
197
-
198
-
199
-
200
-
201
-
202
-
203
-
204
-
205
-
206
-
207
-
208
-
209
-
210
-
211
-
212
-
213
-
214
-
215
-
216
-
217
-
218
-
219
-
220
-
221
-
222
-
223
-
224
-
225
-
226
-
227
-
228
-
229
-
230
-
231
-
232
-
233
-
234
-
235
-
236
-
237
-
238
-
239
-
240
-
241
-
242
-
243
-
244
-
245
-
246
-
247
-
248
-
249
-
250
-
251
-
252
-
253
-
254
-
255
 |
 |
