Canon EOS C700 FF PL EOS C700 EOS C700 PL EOS C700 GS PL EOS C700 FF EOS C700 - Page 92
[C700][C700FF] One-Shot AF, About Peaking/Magnification
 |
View all Canon EOS C700 FF PL manuals
Add to My Manuals
Save this manual to your list of manuals |
Page 92 highlights
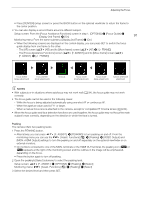
Adjusting the Focus Magnification You can select from two levels of magnification, which depend on the sensor mode. 1 Press the MAGN. button. 92 • Alternatively, you can press [F. ASSIST.] > [MAGN.] to turn the magnification on and off. From the monitoring menu you can use the [Assist. Functions] (A) > [Magnification] > [VIDEO Output] and [MON.+HDMI Output] settings to turn the magnification on and off separately on the optional viewfinder or on external monitors. • On monitors connected to one of the MON. terminals or the HDMI OUT terminal, the ^ appears at the top right of the monitoring screen and the center of the screen* is magnified approximately 2x (qr 3x, when the sensor mode is set to [Full Frame]). • The orange frame displayed on the top right of the screen (magnification frame) shows the approximate part of the image shown magnified. 2 If necessary, move the magnification frame to check other parts of the image. Setup screen: [F. ASSIST.] > [ FRAME] and then press Monitoring menu: Use the joystick or SELECT dial on the optional viewfinder. • Press [CENTER] (setup screen) or press the BACK button on the optional viewfinder to return the magnification frame to the center position. 3 Press SET (setup screen) or the joystick (monitoring menu) to change the magnification level. • Press repeatedly to switch back and forth between approx. 2x and 4x magnification (qr approx. 3x or 6x, when the sensor mode is set to [Full Frame]). 4 Press the MAGN. button again to cancel the magnification. * If one of the AF frames or a face detection frame is displayed on the screen, the area around the active frame will be magnified instead. NOTES • About Peaking/Magnification: - You can use the [F. ASSIST.] > [OPTIONS] > [Peaking] > [Peaking 1] and [Peaking 2] settings to set the color, gain and frequency of the two peaking levels independently of each other. - You can select individually through which terminals to output (on which monitoring devices to display) the assistance functions with the output settings under [F. ASSIST.] > [OPTIONS] > [Peaking] and [Magnification]. When the HDMI OUT terminal's resolution is set to 4096x2160 or 3840x2160, the assistance functions will not be displayed on the monitor connected to the HDMI OUT terminal. - You can also use the [Focus Assist. B&W] setting under [F. ASSIST.] > [OPTIONS] > [Peaking] and [Magnification] to display the camera's image in black & white while using the respective assistance function. - The assistance functions will not affect your recordings. - You can set [F. ASSIST.] > [OPTIONS] > [Magnification] > [Available While Rec] to [On] to be able to use magnification while recording a clip. However, in such case, you will not be able to use face detection and tracking, or display the camera's live view image on the Browser Remote screen. Zq One-Shot AF In this focus mode, you will focus manually in most situations but still have the option to have the camera focus automatically only once on the subject inside the AF frame that appears on the monitoring screen. You can also change the size and position of the AF frame. 1 Set the focus mode switch on the lens to AF. • On a compatible EF Cinema/broadcast lens, enable automatic adjustment on the lens (A 89). • @ will appear at the left of the monitoring screen.
-
 1
1 -
2
-
3
-
4
-
5
-
6
-
7
-
8
-
9
-
10
-
11
-
12
-
13
-
14
-
15
-
16
-
17
-
18
-
19
-
20
-
21
-
22
-
23
-
24
-
25
-
26
-
27
-
28
-
29
-
30
-
31
-
32
-
33
-
34
-
35
-
36
-
37
-
38
-
39
-
40
-
41
-
42
-
43
-
44
-
45
-
46
-
47
-
48
-
49
-
50
-
51
-
52
-
53
-
54
-
55
-
56
-
57
-
58
-
59
-
60
-
61
-
62
-
63
-
64
-
65
-
66
-
67
-
68
-
69
-
70
-
71
-
72
-
73
-
74
-
75
-
76
-
77
-
78
-
79
-
80
-
81
-
82
-
83
-
84
-
85
-
86
-
 87
87 -
 88
88 -
 89
89 -
 90
90 -
 91
91 -
 92
92 -
 93
93 -
 94
94 -
 95
95 -
 96
96 -
 97
97 -
98
-
99
-
100
-
101
-
102
-
103
-
104
-
105
-
106
-
107
-
108
-
109
-
110
-
111
-
112
-
113
-
114
-
115
-
116
-
117
-
118
-
119
-
120
-
121
-
122
-
123
-
124
-
125
-
126
-
127
-
128
-
129
-
130
-
131
-
132
-
133
-
134
-
135
-
136
-
137
-
138
-
139
-
140
-
141
-
142
-
143
-
144
-
145
-
146
-
147
-
148
-
149
-
150
-
151
-
152
-
153
-
154
-
155
-
156
-
157
-
158
-
159
-
160
-
161
-
162
-
163
-
164
-
165
-
166
-
167
-
168
-
169
-
170
-
171
-
172
-
173
-
174
-
175
-
176
-
177
-
178
-
179
-
180
-
181
-
182
-
183
-
184
-
185
-
186
-
187
-
188
-
189
-
190
-
191
-
192
-
193
-
194
-
195
-
196
-
197
-
198
-
199
-
200
-
201
-
202
-
203
-
204
-
205
-
206
-
207
-
208
-
209
-
210
-
211
-
212
-
213
-
214
-
215
-
216
-
217
-
218
-
219
-
220
-
221
-
222
-
223
-
224
-
225
-
226
-
227
-
228
-
229
-
230
-
231
-
232
-
233
-
234
-
235
-
236
-
237
-
238
-
239
-
240
-
241
-
242
-
243
-
244
-
245
-
246
-
247
-
248
-
249
-
250
-
251
-
252
-
253
-
254
-
255
 |
 |