Canon EOS C700 FF PL EOS C700 EOS C700 PL EOS C700 GS PL EOS C700 FF EOS C700 - Page 113
Monitoring the Audio with Headphones, Microphone Attenuator INPUT Terminals
 |
View all Canon EOS C700 FF PL manuals
Add to My Manuals
Save this manual to your list of manuals |
Page 113 highlights
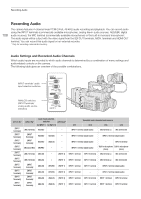
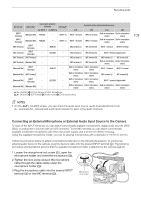
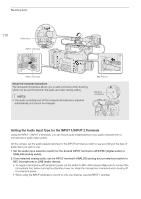
Recording Audio Microphone Attenuator (INPUT Terminals) When the audio input selection switch for INPUT 1 or INPUT 2 is set to ANALOG and the corresponding ANALOG (analog source selection) switch is set to MIC or MIC+48V, you can activate the external microphone's attenuator (20 dB). 1 Open the desired INPUT terminal's microphone attenuator submenu. Setup screen: Monitoring menu: [AUDIO] > [OPTIONS] > [Audio Input] > [INPUT 1 Mic Att.] or [INPUT 2 Mic Att.] [Audio Setup] (¡) > [Audio Input] > [INPUT 1 Mic Att.] or [INPUT 2 Mic Att.] 2 Select [On] and then press SET. 113 Low Cut Filter (MIC Terminal) When an audio channel is set to the MIC terminal, you can activate the low-cut filter, for example to reduce the sound of wind in the background when recording outdoors. 1 Open the [MIC Low Cut] submenu. Setup screen: Monitoring menu: [AUDIO] > [OPTIONS] > [Audio Input] > [MIC Low Cut] [Audio Setup] (¡) > [Audio Input] > [MIC Low Cut] 2 Select [On] and then press SET. • When you select [On], some low-frequency sounds may be suppressed along with the sound of wind. Microphone Attenuator (MIC Terminal) When an audio channel is set to the MIC terminal, if the audio level is too high and the sound sounds distorted, you can activate the microphone attenuator (20 dB). 1 Open the [MIC Att.] submenu. Setup screen: Monitoring menu: [AUDIO] > [OPTIONS] > [Audio Input] > [MIC Att.] [Audio Setup] (¡) > [Audio Input] > [MIC Att.] 2 Select [On] and then press SET. Monitoring the Audio with Headphones Connect headphones with a ∅ 3.5 mm stereo mini-plug to the × (headphone) terminal to monitor the recorded audio. NOTES • You can adjust the headphone volume using the [AUDIO] > [×] setting (in shooting mode) or > [Audio Setup] > [Headphone Volume] setting (in playback mode). • If you set an assignable button to [Headphones +] or [Headphones -] (A 127), you can press the button to adjust the headphone volume without using the menu.
-
 1
1 -
2
-
3
-
4
-
5
-
6
-
7
-
8
-
9
-
10
-
11
-
12
-
13
-
14
-
15
-
16
-
17
-
18
-
19
-
20
-
21
-
22
-
23
-
24
-
25
-
26
-
27
-
28
-
29
-
30
-
31
-
32
-
33
-
34
-
35
-
36
-
37
-
38
-
39
-
40
-
41
-
42
-
43
-
44
-
45
-
46
-
47
-
48
-
49
-
50
-
51
-
52
-
53
-
54
-
55
-
56
-
57
-
58
-
59
-
60
-
61
-
62
-
63
-
64
-
65
-
66
-
67
-
68
-
69
-
70
-
71
-
72
-
73
-
74
-
75
-
76
-
77
-
78
-
79
-
80
-
81
-
82
-
83
-
84
-
85
-
86
-
87
-
88
-
89
-
90
-
91
-
92
-
93
-
94
-
95
-
96
-
97
-
98
-
99
-
100
-
101
-
102
-
103
-
104
-
105
-
106
-
107
-
 108
108 -
 109
109 -
 110
110 -
 111
111 -
 112
112 -
 113
113 -
 114
114 -
 115
115 -
 116
116 -
 117
117 -
 118
118 -
119
-
120
-
121
-
122
-
123
-
124
-
125
-
126
-
127
-
128
-
129
-
130
-
131
-
132
-
133
-
134
-
135
-
136
-
137
-
138
-
139
-
140
-
141
-
142
-
143
-
144
-
145
-
146
-
147
-
148
-
149
-
150
-
151
-
152
-
153
-
154
-
155
-
156
-
157
-
158
-
159
-
160
-
161
-
162
-
163
-
164
-
165
-
166
-
167
-
168
-
169
-
170
-
171
-
172
-
173
-
174
-
175
-
176
-
177
-
178
-
179
-
180
-
181
-
182
-
183
-
184
-
185
-
186
-
187
-
188
-
189
-
190
-
191
-
192
-
193
-
194
-
195
-
196
-
197
-
198
-
199
-
200
-
201
-
202
-
203
-
204
-
205
-
206
-
207
-
208
-
209
-
210
-
211
-
212
-
213
-
214
-
215
-
216
-
217
-
218
-
219
-
220
-
221
-
222
-
223
-
224
-
225
-
226
-
227
-
228
-
229
-
230
-
231
-
232
-
233
-
234
-
235
-
236
-
237
-
238
-
239
-
240
-
241
-
242
-
243
-
244
-
245
-
246
-
247
-
248
-
249
-
250
-
251
-
252
-
253
-
254
-
255
 |
 |