Canon EOS C700 FF PL EOS C700 EOS C700 PL EOS C700 GS PL EOS C700 FF EOS C700 - Page 154
Using the HDMI OUT Terminal, Superimposing Onscreen Displays on Video Outputs
 |
View all Canon EOS C700 FF PL manuals
Add to My Manuals
Save this manual to your list of manuals |
Page 154 highlights
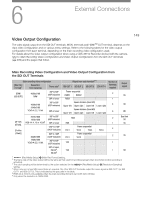
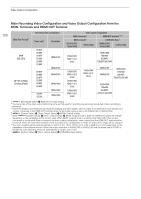
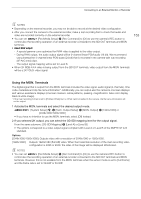
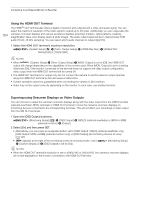
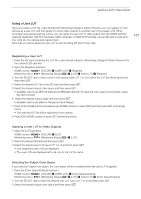
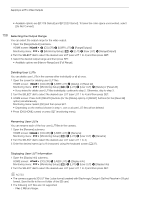
Connecting to an External Monitor or Recorder 154 Using the HDMI OUT Terminal The HDMITM OUT terminal also offers a digital connection and outputs both a video and audio signal. You can select the maximum resolution of the video signal to output up to 4K video. Additionally, you can output also the camera's onscreen displays and various assistance displays (onscreen markers, zebra patterns, peaking, magnification, false color display, black & white image). The audio output signal will be 2-channel linear PCM audio (16-bit, 48 kHz sampling). You can select which audio channels to output (A 160). 1 Select the HDMI OUT terminal's maximum resolution. [System Setup] (B) > [Term. Output Setup] > [HDMI Max Res.] > [4096x2160/ 3840x2160] or [1920x1080] NOTES • When [System Setup] > [Term. Output Setup] > [MON. Output] is set to [Off], the HDMI OUT output will change depending on the capabilities of the monitor used. When [MON. Output] is set to a setting other than [Off], if the monitor connected to the terminal does not support the video output configuration, video output from the HDMI OUT terminal will be turned off. • The HDMI OUT terminal is for output only. Do not connect the camera to another device's output terminal using the HDMI OUT terminal as this will cause a malfunction. • Correct operation cannot be guaranteed when connecting the camera to DVI monitors. • Video may not be output correctly depending on the monitor. In such case, use another terminal. Superimposing Onscreen Displays on Video Outputs You can choose to output the camera's onscreen displays along with the video output from the VIDEO terminal (optional viewfinder), MON. terminals or HDMI OUT terminal to show the camera's onscreen displays on monitoring devices connected to the corresponding terminals. This will not affect your recordings or video output from the SDI OUT terminals. 1 Open the [OSD Output] submenu. [Monitoring Setup] (¢) > [OSD Output] > [VIDEO] (optional viewfinder) or [MON.+HDMI] (external monitors) > [Output] 2 Select [On] and then press SET. • Alternatively, you can press an assignable button set to [OSD Output: VIDEO] (optional viewfinder only), [OSD Output: MON.+HDMI] (external monitors only) or [OSD Output] (all monitoring devices at once) (A 127). • T appears at the right of the monitoring screen (in shooting mode, only if > [Custom Display 2] > [OSD Output] is set to [On]). [Monitoring Setup] NOTES • When the HDMI OUT terminal's resolution is set to 4096x2160 or 3840x2160, the camera's onscreen displays will not be displayed on the monitor connected to the HDMI OUT terminal.
-
 1
1 -
2
-
3
-
4
-
5
-
6
-
7
-
8
-
9
-
10
-
11
-
12
-
13
-
14
-
15
-
16
-
17
-
18
-
19
-
20
-
21
-
22
-
23
-
24
-
25
-
26
-
27
-
28
-
29
-
30
-
31
-
32
-
33
-
34
-
35
-
36
-
37
-
38
-
39
-
40
-
41
-
42
-
43
-
44
-
45
-
46
-
47
-
48
-
49
-
50
-
51
-
52
-
53
-
54
-
55
-
56
-
57
-
58
-
59
-
60
-
61
-
62
-
63
-
64
-
65
-
66
-
67
-
68
-
69
-
70
-
71
-
72
-
73
-
74
-
75
-
76
-
77
-
78
-
79
-
80
-
81
-
82
-
83
-
84
-
85
-
86
-
87
-
88
-
89
-
90
-
91
-
92
-
93
-
94
-
95
-
96
-
97
-
98
-
99
-
100
-
101
-
102
-
103
-
104
-
105
-
106
-
107
-
108
-
109
-
110
-
111
-
112
-
113
-
114
-
115
-
116
-
117
-
118
-
119
-
120
-
121
-
122
-
123
-
124
-
125
-
126
-
127
-
128
-
129
-
130
-
131
-
132
-
133
-
134
-
135
-
136
-
137
-
138
-
139
-
140
-
141
-
142
-
143
-
144
-
145
-
146
-
147
-
148
-
 149
149 -
 150
150 -
 151
151 -
 152
152 -
 153
153 -
 154
154 -
 155
155 -
 156
156 -
 157
157 -
 158
158 -
 159
159 -
160
-
161
-
162
-
163
-
164
-
165
-
166
-
167
-
168
-
169
-
170
-
171
-
172
-
173
-
174
-
175
-
176
-
177
-
178
-
179
-
180
-
181
-
182
-
183
-
184
-
185
-
186
-
187
-
188
-
189
-
190
-
191
-
192
-
193
-
194
-
195
-
196
-
197
-
198
-
199
-
200
-
201
-
202
-
203
-
204
-
205
-
206
-
207
-
208
-
209
-
210
-
211
-
212
-
213
-
214
-
215
-
216
-
217
-
218
-
219
-
220
-
221
-
222
-
223
-
224
-
225
-
226
-
227
-
228
-
229
-
230
-
231
-
232
-
233
-
234
-
235
-
236
-
237
-
238
-
239
-
240
-
241
-
242
-
243
-
244
-
245
-
246
-
247
-
248
-
249
-
250
-
251
-
252
-
253
-
254
-
255
 |
 |