Canon EOS C700 FF PL EOS C700 EOS C700 PL EOS C700 GS PL EOS C700 FF EOS C700 - Page 165
Camera Access Point, Connecting in Infrastructure Mode
 |
View all Canon EOS C700 FF PL manuals
Add to My Manuals
Save this manual to your list of manuals |
Page 165 highlights
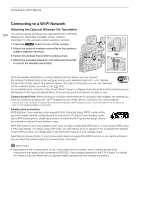
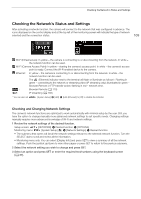
Connecting to a Wi-Fi Network Camera Access Point In this mode the camera itself serves as a wireless access point to which other Wi-Fi-enabled devices can connect. Initially, basic settings for a Camera Access Point connection are configured in the camera. Follow the procedure below to change the initial settings. 1 Open the [Browser Remote] setup screen/submenu. Setup screen: Monitoring menu: [NETWORK] > [Browser Remote] [System Setup] (B) > [Network Settings] > [Browser Remote] • The current connection configuration appears on the control display. Turn the SELECT dial to scroll through all the connection settings. 2 Change the connection method. Setup screen: [OPTIONS] > [Connection Method] Monitoring menu: From the same submenu select [Connection Method]. 3 Select [Camera Access Point] and then press SET. 4 Change the SSID (network name) the camera will use as a Wi-Fi access point. Setup screen: [SSID] > [EDIT] Monitoring menu: [SSID] > [Input] • Enter the desired network name using the keyboard screen (A 37). • The network name is needed to connect the network device to the camera. If necessary, write it down. 5 Select the frequency band for the Wi-Fi connection. [Frequency] > [5 GHz] or [2.4 GHz] > press SET 6 Select the Wi-Fi channel. [Channel] > desired channel > press SET • Available channels will be different depending on the wireless connection mode selected in the previous step and the model of wireless file transmitter used. For details, refer to the "Areas of Use and Restrictions" leaflet supplied with the optional WFT-E6 or WFT-E8 Wireless File Transmitter. 7 Select the encryption method. [Authn/Encr Method] > [WPA2-PSK/AES] or [Open/No encryption] > press SET • If you selected [Open/No encryption], the rest of the procedure is not necessary. 8 Change the default password. Setup screen: Select [Password] and press SET. Monitoring menu: [Password] > [Input] > press SET • Enter the desired text using the keyboard screen (A 37). • This password is needed to connect the network device to the camera. If necessary, write it down. 165 Connecting in Infrastructure Mode 1 Open the [IP Streaming] or [FTP Transfer] setup screen/submenu. Setup screen: Monitoring menu: [NETWORK] > [IP Streaming] or [FTP Transfer]* [System Setup] (B) > [Network Settings] > [IP Streaming] or [FTP Transfer]** * The camera will switch automatically to playback mode when you select [FTP Transfer]. ** From the playback screen only. • The current connection configuration appears on the control display. Turn the SELECT dial to scroll through all the connection settings. 2 Change the connection method. Setup screen: [OPTIONS] > [Connection Method] Monitoring menu: From the same submenu select [Connection Method].
-
 1
1 -
2
-
3
-
4
-
5
-
6
-
7
-
8
-
9
-
10
-
11
-
12
-
13
-
14
-
15
-
16
-
17
-
18
-
19
-
20
-
21
-
22
-
23
-
24
-
25
-
26
-
27
-
28
-
29
-
30
-
31
-
32
-
33
-
34
-
35
-
36
-
37
-
38
-
39
-
40
-
41
-
42
-
43
-
44
-
45
-
46
-
47
-
48
-
49
-
50
-
51
-
52
-
53
-
54
-
55
-
56
-
57
-
58
-
59
-
60
-
61
-
62
-
63
-
64
-
65
-
66
-
67
-
68
-
69
-
70
-
71
-
72
-
73
-
74
-
75
-
76
-
77
-
78
-
79
-
80
-
81
-
82
-
83
-
84
-
85
-
86
-
87
-
88
-
89
-
90
-
91
-
92
-
93
-
94
-
95
-
96
-
97
-
98
-
99
-
100
-
101
-
102
-
103
-
104
-
105
-
106
-
107
-
108
-
109
-
110
-
111
-
112
-
113
-
114
-
115
-
116
-
117
-
118
-
119
-
120
-
121
-
122
-
123
-
124
-
125
-
126
-
127
-
128
-
129
-
130
-
131
-
132
-
133
-
134
-
135
-
136
-
137
-
138
-
139
-
140
-
141
-
142
-
143
-
144
-
145
-
146
-
147
-
148
-
149
-
150
-
151
-
152
-
153
-
154
-
155
-
156
-
157
-
158
-
159
-
 160
160 -
 161
161 -
 162
162 -
 163
163 -
 164
164 -
 165
165 -
 166
166 -
 167
167 -
 168
168 -
 169
169 -
 170
170 -
171
-
172
-
173
-
174
-
175
-
176
-
177
-
178
-
179
-
180
-
181
-
182
-
183
-
184
-
185
-
186
-
187
-
188
-
189
-
190
-
191
-
192
-
193
-
194
-
195
-
196
-
197
-
198
-
199
-
200
-
201
-
202
-
203
-
204
-
205
-
206
-
207
-
208
-
209
-
210
-
211
-
212
-
213
-
214
-
215
-
216
-
217
-
218
-
219
-
220
-
221
-
222
-
223
-
224
-
225
-
226
-
227
-
228
-
229
-
230
-
231
-
232
-
233
-
234
-
235
-
236
-
237
-
238
-
239
-
240
-
241
-
242
-
243
-
244
-
245
-
246
-
247
-
248
-
249
-
250
-
251
-
252
-
253
-
254
-
255
 |
 |