Canon EOS C700 FF PL EOS C700 EOS C700 PL EOS C700 GS PL EOS C700 FF EOS C700 - Page 157
Using a User LUT, Registering a User LUT, Applying a User LUT to Video Outputs
 |
View all Canon EOS C700 FF PL manuals
Add to My Manuals
Save this manual to your list of manuals |
Page 157 highlights
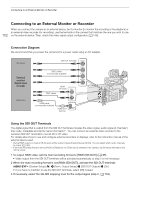
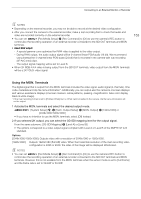
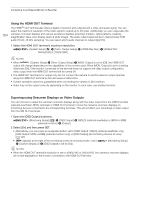
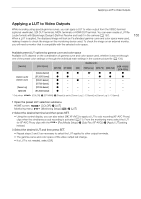
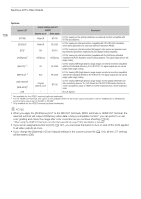
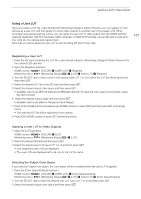
Applying a LUT to Video Outputs Using a User LUT Once you create a LUT file (.cube format) with Blackmagic Design's DaVinci Resolve, you can register it in the camera as a user LUT and then apply it to some video outputs in a similar way to the preset LUTs. When recording using special gamma curves, you can apply the user LUT to video output from the VIDEO terminal (optional viewfinder), SDI OUT terminals, MON. terminals or HDMI OUT terminal. Use an SD card to load up to four LUTs into the camera and register them. Note that you cannot apply the user LUT to sub recording (XF-AVC Proxy) clips. 157 Registering a User LUT 1 Insert the SD card containing the LUT file (.cube format) created in Blackmagic Design's DaVinci Resolve into the camera's SD card slot. 2 Open the [Register] submenu. HOME screen: Monitoring menu: [COLOR] > [USER LUT] > [Register] [Monitoring Setup] (¢) > [LUT] > [User LUT] > [Register] 3 Turn the SELECT dial to select a slot in the camera (user LUT 1 to 4) to which the LUT file will be saved and then press SET. 4 Select the desired LUT file on the SD card and then press SET. 5 Select the desired output color space and then press SET. • Available options are [BT.709 Gamut] and [BT.2020 Gamut]. To leave the color space unconverted, select [Do Not Convert]. 6 Select the desired output range and then press SET. • Available options are [Narrow Range] and [Full Range]. 7 Press both [LOAD] buttons simultaneously (HOME screen) or select [OK] and then press SET (monitoring menu). • The selected LUT file will be registered in the camera. 8 Press [OK] (HOME screen) or press SET (monitoring menu). Applying a User LUT to Video Outputs 1 Open the [LUT] submenu. HOME screen: Monitoring menu: [COLOR] > [LUT] [Monitoring Setup] (¢) > [LUT] 2 Select the desired terminal and then press SET. 3 Select the desired user LUT (user LUT 1 to 4) and then press SET. • Only registered user LUTs are displayed. • The user LUTs are displayed with a icon in front of the name. Selecting the Output Color Space If you select an output color space, the color space will be converted when the user LUT is applied. 1 Open the [Color Space(Output)] submenu. HOME screen: Monitoring menu: [COLOR] > [USER LUT] > [Color Space(Output)] [Monitoring Setup] (¢) > [LUT] > [User LUT] > [Color Space(Output)] 2 Turn the SELECT dial to select the desired user LUT (user LUT 1 to 4) and then press SET. 3 Select the desired output color space and then press SET.
-
 1
1 -
2
-
3
-
4
-
5
-
6
-
7
-
8
-
9
-
10
-
11
-
12
-
13
-
14
-
15
-
16
-
17
-
18
-
19
-
20
-
21
-
22
-
23
-
24
-
25
-
26
-
27
-
28
-
29
-
30
-
31
-
32
-
33
-
34
-
35
-
36
-
37
-
38
-
39
-
40
-
41
-
42
-
43
-
44
-
45
-
46
-
47
-
48
-
49
-
50
-
51
-
52
-
53
-
54
-
55
-
56
-
57
-
58
-
59
-
60
-
61
-
62
-
63
-
64
-
65
-
66
-
67
-
68
-
69
-
70
-
71
-
72
-
73
-
74
-
75
-
76
-
77
-
78
-
79
-
80
-
81
-
82
-
83
-
84
-
85
-
86
-
87
-
88
-
89
-
90
-
91
-
92
-
93
-
94
-
95
-
96
-
97
-
98
-
99
-
100
-
101
-
102
-
103
-
104
-
105
-
106
-
107
-
108
-
109
-
110
-
111
-
112
-
113
-
114
-
115
-
116
-
117
-
118
-
119
-
120
-
121
-
122
-
123
-
124
-
125
-
126
-
127
-
128
-
129
-
130
-
131
-
132
-
133
-
134
-
135
-
136
-
137
-
138
-
139
-
140
-
141
-
142
-
143
-
144
-
145
-
146
-
147
-
148
-
149
-
150
-
151
-
 152
152 -
 153
153 -
 154
154 -
 155
155 -
 156
156 -
 157
157 -
 158
158 -
 159
159 -
 160
160 -
 161
161 -
 162
162 -
163
-
164
-
165
-
166
-
167
-
168
-
169
-
170
-
171
-
172
-
173
-
174
-
175
-
176
-
177
-
178
-
179
-
180
-
181
-
182
-
183
-
184
-
185
-
186
-
187
-
188
-
189
-
190
-
191
-
192
-
193
-
194
-
195
-
196
-
197
-
198
-
199
-
200
-
201
-
202
-
203
-
204
-
205
-
206
-
207
-
208
-
209
-
210
-
211
-
212
-
213
-
214
-
215
-
216
-
217
-
218
-
219
-
220
-
221
-
222
-
223
-
224
-
225
-
226
-
227
-
228
-
229
-
230
-
231
-
232
-
233
-
234
-
235
-
236
-
237
-
238
-
239
-
240
-
241
-
242
-
243
-
244
-
245
-
246
-
247
-
248
-
249
-
250
-
251
-
252
-
253
-
254
-
255
 |
 |