Canon EOS C700 FF PL EOS C700 EOS C700 PL EOS C700 GS PL EOS C700 FF EOS C700 - Page 164
Connecting to a Wi-Fi Network, Attaching the Optional Wireless File Transmitter
 |
View all Canon EOS C700 FF PL manuals
Add to My Manuals
Save this manual to your list of manuals |
Page 164 highlights
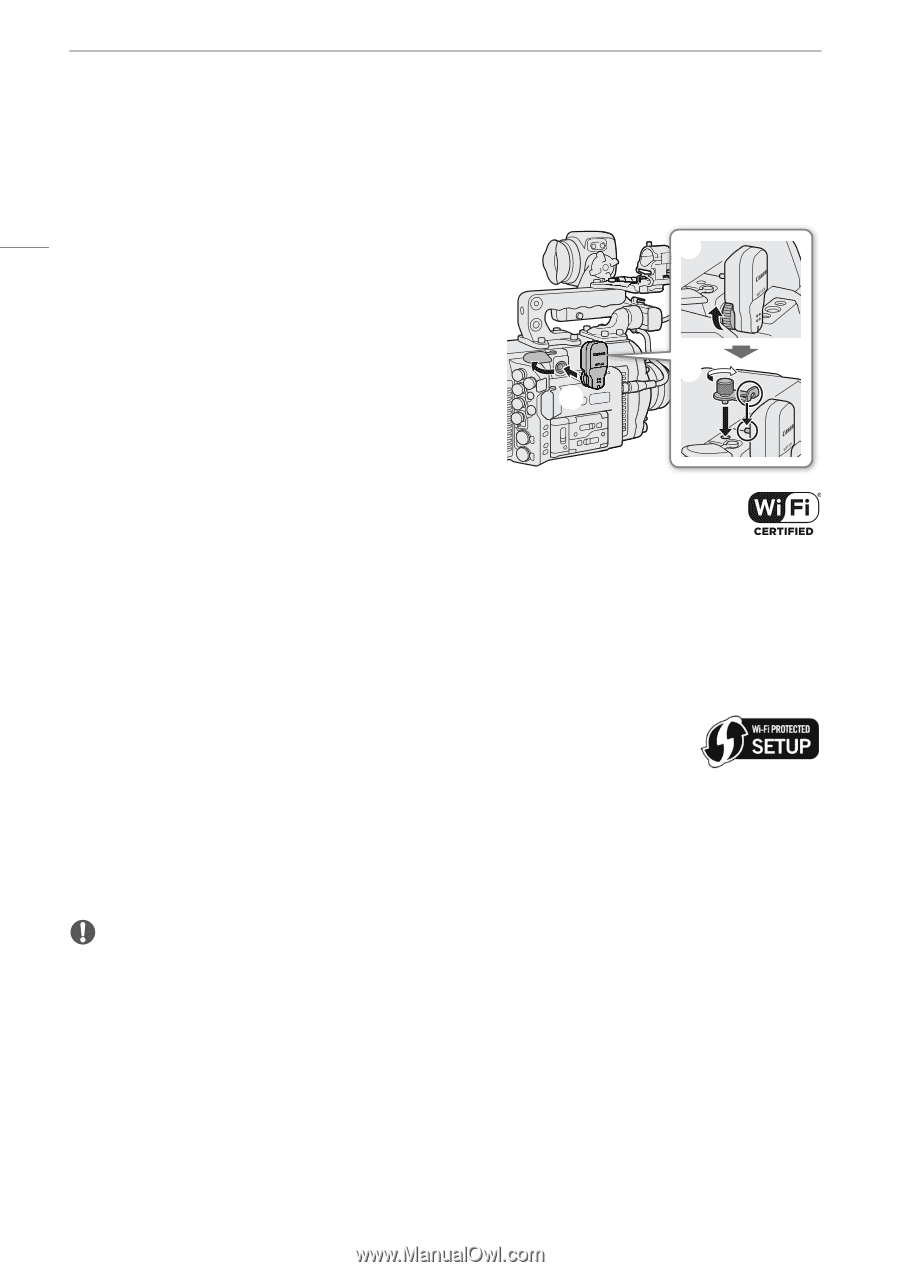
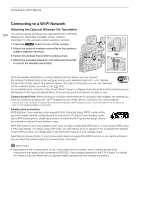
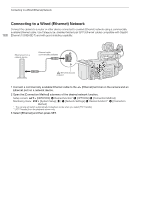
Connecting to a Wi-Fi Network Connecting to a Wi-Fi Network Attaching the Optional Wireless File Transmitter 164 Turn off the camera and attach the optional WFT-E6 or WFT-E8 Wireless File Transmitter (hereafter, simply "wireless ቤ transmitter") to the camera's system extension terminal. 1 Press the Q button to turn off the camera. 2 Attach the optional wireless transmitter to the camera's system extension terminal. 3 Fasten the wireless transmitter's locking screw. ብ 4 Attach the supplied extension unit attachment bracket to secure the wireless transmitter. ባ Once the wireless transmitter is correctly attached to the camera, you can connect the camera in Infrastructure mode, using an access point (wireless router etc.), or in Camera Access Point mode, directly to a network device. The type of connection you can use, depends on the network function you wish to use (A 163). For an Infrastructure connection, the camera offers 3 ways to configure an access point and the method you use will depend on the type and specifications of the access point and network you plan to use. Camera Access Point: When shooting in a location where there are no access points available, the camera can serve as a wireless access point*. Wi-Fi enabled devices will be able to connect to the camera directly. * Limited only to the connection between the camera and supported Wi-Fi enabled devices. The functionality is not the same as that of commercially available access points. Infrastructure connection: WPS (button): If your wireless router supports Wi-Fi Protected Setup (WPS), setup will be easy and require minimal configuring and no passwords. To check if your wireless router has a WPS button and for details about how to activate the Wi-Fi protected setup, refer to the instruction manual of your wireless router. WPS (PIN code): Even if your wireless router does not have a dedicated WPS button, it may support WPS using a PIN code instead. For setup using a PIN code, you will need to know in advance how to activate the wireless router's WPS function. For details refer to the instruction manual of your wireless router. Searching for Access Points: If your access point does not support the WPS function or you cannot activate it, you can have the camera search for access points in the area. IMPORTANT • Depending on the country/region of use, some restrictions on outdoor use or camera access point connections may apply when operating the IEEE802.11a/n wireless standard in the 5 GHz band. For details see Areas of Use and Restrictions (a separate leaflet supplied with the wireless transmitter).
-
 1
1 -
2
-
3
-
4
-
5
-
6
-
7
-
8
-
9
-
10
-
11
-
12
-
13
-
14
-
15
-
16
-
17
-
18
-
19
-
20
-
21
-
22
-
23
-
24
-
25
-
26
-
27
-
28
-
29
-
30
-
31
-
32
-
33
-
34
-
35
-
36
-
37
-
38
-
39
-
40
-
41
-
42
-
43
-
44
-
45
-
46
-
47
-
48
-
49
-
50
-
51
-
52
-
53
-
54
-
55
-
56
-
57
-
58
-
59
-
60
-
61
-
62
-
63
-
64
-
65
-
66
-
67
-
68
-
69
-
70
-
71
-
72
-
73
-
74
-
75
-
76
-
77
-
78
-
79
-
80
-
81
-
82
-
83
-
84
-
85
-
86
-
87
-
88
-
89
-
90
-
91
-
92
-
93
-
94
-
95
-
96
-
97
-
98
-
99
-
100
-
101
-
102
-
103
-
104
-
105
-
106
-
107
-
108
-
109
-
110
-
111
-
112
-
113
-
114
-
115
-
116
-
117
-
118
-
119
-
120
-
121
-
122
-
123
-
124
-
125
-
126
-
127
-
128
-
129
-
130
-
131
-
132
-
133
-
134
-
135
-
136
-
137
-
138
-
139
-
140
-
141
-
142
-
143
-
144
-
145
-
146
-
147
-
148
-
149
-
150
-
151
-
152
-
153
-
154
-
155
-
156
-
157
-
158
-
 159
159 -
 160
160 -
 161
161 -
 162
162 -
 163
163 -
 164
164 -
 165
165 -
 166
166 -
 167
167 -
 168
168 -
 169
169 -
170
-
171
-
172
-
173
-
174
-
175
-
176
-
177
-
178
-
179
-
180
-
181
-
182
-
183
-
184
-
185
-
186
-
187
-
188
-
189
-
190
-
191
-
192
-
193
-
194
-
195
-
196
-
197
-
198
-
199
-
200
-
201
-
202
-
203
-
204
-
205
-
206
-
207
-
208
-
209
-
210
-
211
-
212
-
213
-
214
-
215
-
216
-
217
-
218
-
219
-
220
-
221
-
222
-
223
-
224
-
225
-
226
-
227
-
228
-
229
-
230
-
231
-
232
-
233
-
234
-
235
-
236
-
237
-
238
-
239
-
240
-
241
-
242
-
243
-
244
-
245
-
246
-
247
-
248
-
249
-
250
-
251
-
252
-
253
-
254
-
255
 |
 |