Canon EOS C700 FF PL EOS C700 EOS C700 PL EOS C700 GS PL EOS C700 FF EOS C700 - Page 54
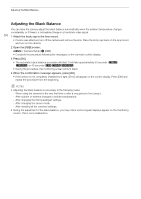
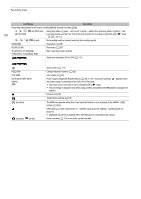
Adjusting the Black Balance, Attach the body cap to the lens mount., Open the [ABB] screen.
 |
View all Canon EOS C700 FF PL manuals
Add to My Manuals
Save this manual to your list of manuals |
Page 54 highlights
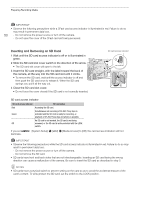
Adjusting the Black Balance Adjusting the Black Balance You can have the camera adjust the black balance automatically when the ambient temperature changes considerably or if there is a noticeable change in a true black video signal. 54 1 Attach the body cap to the lens mount. • If a lens was attached, turn off the camera and remove the lens. Place the body cap back on the lens mount and turn on the camera. 2 Open the [ABB] screen. [Camera Setup] > [ABB] • Complete the procedure following the messages on the camera's control display. 3 Press [OK]. • The automatic black balance procedure will start. It will take approximately 50 seconds (q r) or 40 seconds (Z[]). • During the procedure, the monitoring screen will turn black. 4 When the confirmation message appears, press [OK]. • If the sensor is not completely shielded from light, [Error] will appear on the control display. Press [OK] and repeat the procedure from the beginning. NOTES • Adjusting the black balance is necessary in the following cases: - When using the camera for the very first time or after a long period of not using it. - After sudden or extreme changes in ambient temperature. - After changing the ISO speed/gain settings. - After changing the sensor mode. - After resetting all the camera's settings. • During the adjustment of the black balance, you may notice some irregular displays appear on the monitoring screen. This is not a malfunction.
-
 1
1 -
2
-
3
-
4
-
5
-
6
-
7
-
8
-
9
-
10
-
11
-
12
-
13
-
14
-
15
-
16
-
17
-
18
-
19
-
20
-
21
-
22
-
23
-
24
-
25
-
26
-
27
-
28
-
29
-
30
-
31
-
32
-
33
-
34
-
35
-
36
-
37
-
38
-
39
-
40
-
41
-
42
-
43
-
44
-
45
-
46
-
47
-
48
-
 49
49 -
 50
50 -
 51
51 -
 52
52 -
 53
53 -
 54
54 -
 55
55 -
 56
56 -
 57
57 -
 58
58 -
 59
59 -
60
-
61
-
62
-
63
-
64
-
65
-
66
-
67
-
68
-
69
-
70
-
71
-
72
-
73
-
74
-
75
-
76
-
77
-
78
-
79
-
80
-
81
-
82
-
83
-
84
-
85
-
86
-
87
-
88
-
89
-
90
-
91
-
92
-
93
-
94
-
95
-
96
-
97
-
98
-
99
-
100
-
101
-
102
-
103
-
104
-
105
-
106
-
107
-
108
-
109
-
110
-
111
-
112
-
113
-
114
-
115
-
116
-
117
-
118
-
119
-
120
-
121
-
122
-
123
-
124
-
125
-
126
-
127
-
128
-
129
-
130
-
131
-
132
-
133
-
134
-
135
-
136
-
137
-
138
-
139
-
140
-
141
-
142
-
143
-
144
-
145
-
146
-
147
-
148
-
149
-
150
-
151
-
152
-
153
-
154
-
155
-
156
-
157
-
158
-
159
-
160
-
161
-
162
-
163
-
164
-
165
-
166
-
167
-
168
-
169
-
170
-
171
-
172
-
173
-
174
-
175
-
176
-
177
-
178
-
179
-
180
-
181
-
182
-
183
-
184
-
185
-
186
-
187
-
188
-
189
-
190
-
191
-
192
-
193
-
194
-
195
-
196
-
197
-
198
-
199
-
200
-
201
-
202
-
203
-
204
-
205
-
206
-
207
-
208
-
209
-
210
-
211
-
212
-
213
-
214
-
215
-
216
-
217
-
218
-
219
-
220
-
221
-
222
-
223
-
224
-
225
-
226
-
227
-
228
-
229
-
230
-
231
-
232
-
233
-
234
-
235
-
236
-
237
-
238
-
239
-
240
-
241
-
242
-
243
-
244
-
245
-
246
-
247
-
248
-
249
-
250
-
251
-
252
-
253
-
254
-
255
 |
 |