Canon EOS C700 FF PL EOS C700 EOS C700 PL EOS C700 GS PL EOS C700 FF EOS C700 - Page 181
Status indicators, Activate] button, Overwrite Previous] button/[Overwrite] button
 |
View all Canon EOS C700 FF PL manuals
Add to My Manuals
Save this manual to your list of manuals |
Page 181 highlights
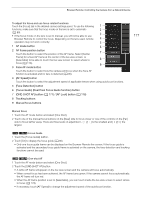
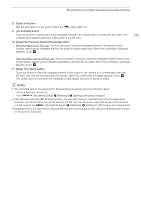
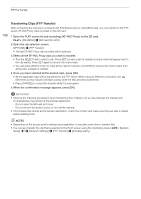
Browser Remote: Controlling the Camera from a Network Device 8 Status indicators See the descriptions in the section about the [v] screen (A 174). 9 [ Activate] button Touch the button to give priority to the metadata entered in this screen when recording XF-AVC clips. This overrides the metadata read from a file saved on the SD card. 10 [Overwrite Previous] button/[Overwrite] button While recording an XF-AVC clip: Touch [Overwrite] to send the metadata entered in this screen to the camera, replacing any metadata that the clip being recorded might have. When the confirmation message appears, touch . 181 After recording a clip an XF-AVC clip: Touch [Overwrite Previous] to send the metadata entered in this screen to the camera, replacing any metadata embedded in the last clip recorded. When the confirmation message appears, touch . 11 [Apply from Next] button Touch the button to send the metadata entered in this screen to the camera so it is embedded only with XFHAVC clips that are recorded after the transfer. When the confirmation message appears, touch . This option does not overwrite the metadata of clips already recorded or being recorded. NOTES • The metadata sent to the camera from Browser Remote will be lost in the following cases. - If the camera was turned off. - If the [Rec/Media Setup] > [Metadata] > [Setting] setting was changed. • Using Browser Remote ([ Activate] button), you can give priority to metadata sent from the application. However, you cannot return the priority back to the SD card. To use a user memo file saved on the SD card you will need to set [Rec/Media Setup] > [Metadata] > [Setting] to [SD Card] on the camera itself. • Metadata sent to the camera from Browser Remote will not be added to relay clips recorded before the switch to the current CFast card.
-
 1
1 -
2
-
3
-
4
-
5
-
6
-
7
-
8
-
9
-
10
-
11
-
12
-
13
-
14
-
15
-
16
-
17
-
18
-
19
-
20
-
21
-
22
-
23
-
24
-
25
-
26
-
27
-
28
-
29
-
30
-
31
-
32
-
33
-
34
-
35
-
36
-
37
-
38
-
39
-
40
-
41
-
42
-
43
-
44
-
45
-
46
-
47
-
48
-
49
-
50
-
51
-
52
-
53
-
54
-
55
-
56
-
57
-
58
-
59
-
60
-
61
-
62
-
63
-
64
-
65
-
66
-
67
-
68
-
69
-
70
-
71
-
72
-
73
-
74
-
75
-
76
-
77
-
78
-
79
-
80
-
81
-
82
-
83
-
84
-
85
-
86
-
87
-
88
-
89
-
90
-
91
-
92
-
93
-
94
-
95
-
96
-
97
-
98
-
99
-
100
-
101
-
102
-
103
-
104
-
105
-
106
-
107
-
108
-
109
-
110
-
111
-
112
-
113
-
114
-
115
-
116
-
117
-
118
-
119
-
120
-
121
-
122
-
123
-
124
-
125
-
126
-
127
-
128
-
129
-
130
-
131
-
132
-
133
-
134
-
135
-
136
-
137
-
138
-
139
-
140
-
141
-
142
-
143
-
144
-
145
-
146
-
147
-
148
-
149
-
150
-
151
-
152
-
153
-
154
-
155
-
156
-
157
-
158
-
159
-
160
-
161
-
162
-
163
-
164
-
165
-
166
-
167
-
168
-
169
-
170
-
171
-
172
-
173
-
174
-
175
-
 176
176 -
 177
177 -
 178
178 -
 179
179 -
 180
180 -
 181
181 -
 182
182 -
 183
183 -
 184
184 -
 185
185 -
 186
186 -
187
-
188
-
189
-
190
-
191
-
192
-
193
-
194
-
195
-
196
-
197
-
198
-
199
-
200
-
201
-
202
-
203
-
204
-
205
-
206
-
207
-
208
-
209
-
210
-
211
-
212
-
213
-
214
-
215
-
216
-
217
-
218
-
219
-
220
-
221
-
222
-
223
-
224
-
225
-
226
-
227
-
228
-
229
-
230
-
231
-
232
-
233
-
234
-
235
-
236
-
237
-
238
-
239
-
240
-
241
-
242
-
243
-
244
-
245
-
246
-
247
-
248
-
249
-
250
-
251
-
252
-
253
-
254
-
255
 |
 |