Canon EOS C700 FF PL EOS C700 EOS C700 PL EOS C700 GS PL EOS C700 FF EOS C700 - Page 152
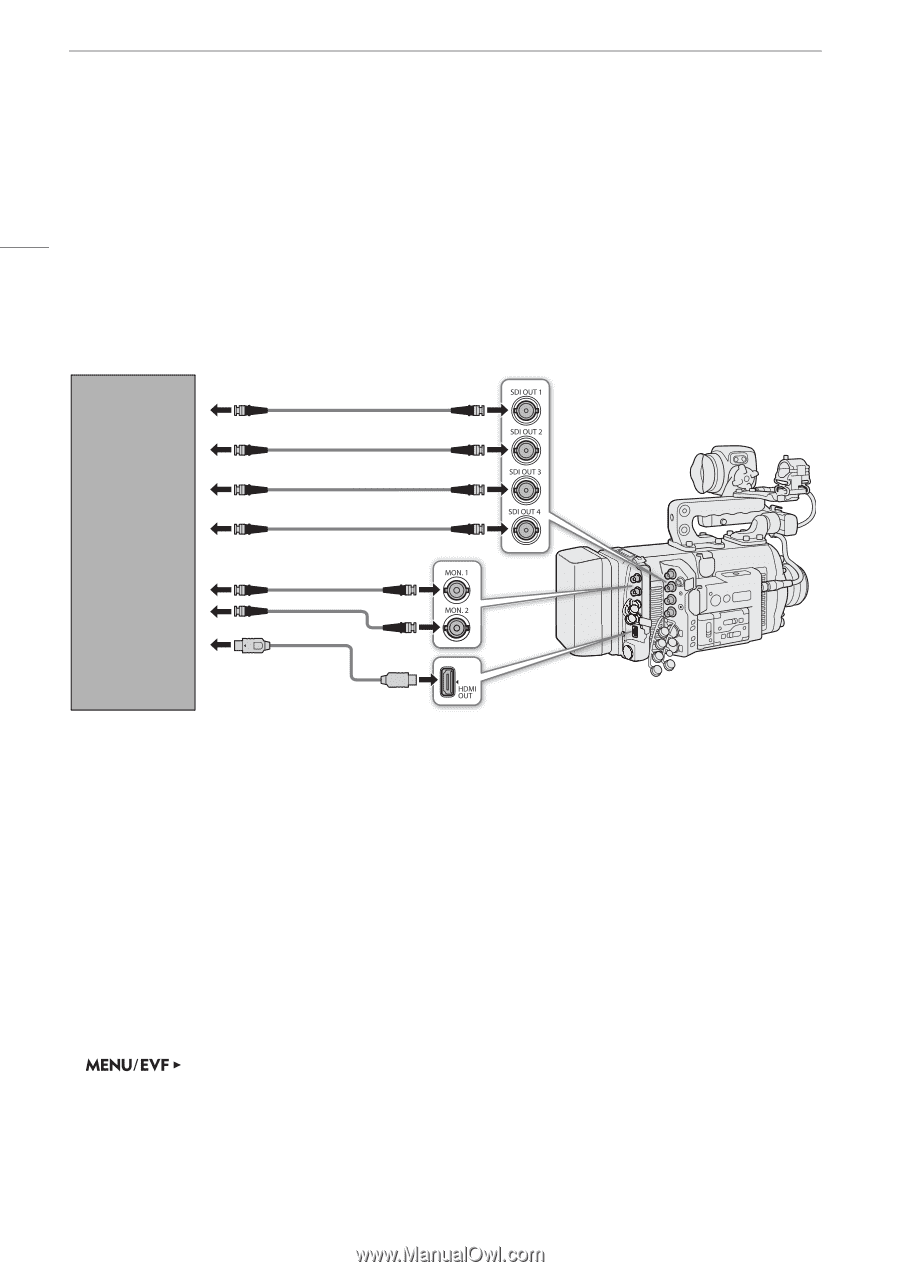
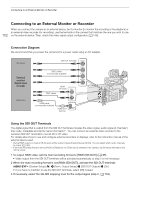
Connecting to an External Monitor or Recorder, Connection Diagram, Using the SDI OUT Terminals
 |
View all Canon EOS C700 FF PL manuals
Add to My Manuals
Save this manual to your list of manuals |
Page 152 highlights
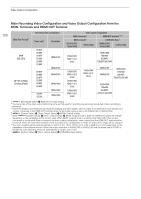
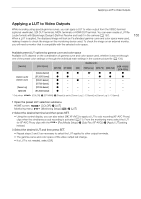
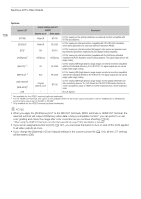
Connecting to an External Monitor or Recorder Connecting to an External Monitor or Recorder When you connect the camera to an external device, be it a monitor (to monitor the recording or for playback) or an external video recorder (for recording), use the terminal on the camera that matches the one you wish to use 152 on the external device. Then, check the video signal output configuration (A 149). Connection Diagram We recommend that you power the camera from a power outlet using an AC adapter. SDI inputs SDI OUT terminals External monitor/ digital video recorder HDMI input BNC cables (commercially available) MON. terminals BNC cables HDMI cable (commercially available) HDMI OUT terminal Using the SDI OUT Terminals The digital signal that is output from the SDI OUT terminals includes the video signal, audio signal (4 channels*), time code, metadata and clip file name information**. You can connect an external video recorder to the camera's SDI OUT terminals to record 4K or 2K video. For details about how to use and configure external recorders or displays, refer to the instruction manual of the external device used. * During RAW output, 2-channel 16-bit audio will be output instead (transmitted as 20 bits). You can select which audio channels to output (A 160). ** If the main recording format is set to [ProRes (CFast)] but no CFast card is inserted in the camera, clip file name information will not be output. 1 To output RAW video, set the main recording format to [RAW (SDI OUT)] (A 65). • Video output from the SDI OUT terminals will be activated automatically so step 2 is not necessary. 2 When the main recording format is not [RAW (SDI OUT)], activate the SDI OUT terminals. [System Setup] (B) > [Term. Output Setup] > [SDI OUT Output] > [On] • If you have no intention to use the SDI OUT terminals, select [Off] instead. 3 If necessary, select the 3G-SDI mapping level for the output signal (step 2, A 153).
-
 1
1 -
2
-
3
-
4
-
5
-
6
-
7
-
8
-
9
-
10
-
11
-
12
-
13
-
14
-
15
-
16
-
17
-
18
-
19
-
20
-
21
-
22
-
23
-
24
-
25
-
26
-
27
-
28
-
29
-
30
-
31
-
32
-
33
-
34
-
35
-
36
-
37
-
38
-
39
-
40
-
41
-
42
-
43
-
44
-
45
-
46
-
47
-
48
-
49
-
50
-
51
-
52
-
53
-
54
-
55
-
56
-
57
-
58
-
59
-
60
-
61
-
62
-
63
-
64
-
65
-
66
-
67
-
68
-
69
-
70
-
71
-
72
-
73
-
74
-
75
-
76
-
77
-
78
-
79
-
80
-
81
-
82
-
83
-
84
-
85
-
86
-
87
-
88
-
89
-
90
-
91
-
92
-
93
-
94
-
95
-
96
-
97
-
98
-
99
-
100
-
101
-
102
-
103
-
104
-
105
-
106
-
107
-
108
-
109
-
110
-
111
-
112
-
113
-
114
-
115
-
116
-
117
-
118
-
119
-
120
-
121
-
122
-
123
-
124
-
125
-
126
-
127
-
128
-
129
-
130
-
131
-
132
-
133
-
134
-
135
-
136
-
137
-
138
-
139
-
140
-
141
-
142
-
143
-
144
-
145
-
146
-
 147
147 -
 148
148 -
 149
149 -
 150
150 -
 151
151 -
 152
152 -
 153
153 -
 154
154 -
 155
155 -
 156
156 -
 157
157 -
158
-
159
-
160
-
161
-
162
-
163
-
164
-
165
-
166
-
167
-
168
-
169
-
170
-
171
-
172
-
173
-
174
-
175
-
176
-
177
-
178
-
179
-
180
-
181
-
182
-
183
-
184
-
185
-
186
-
187
-
188
-
189
-
190
-
191
-
192
-
193
-
194
-
195
-
196
-
197
-
198
-
199
-
200
-
201
-
202
-
203
-
204
-
205
-
206
-
207
-
208
-
209
-
210
-
211
-
212
-
213
-
214
-
215
-
216
-
217
-
218
-
219
-
220
-
221
-
222
-
223
-
224
-
225
-
226
-
227
-
228
-
229
-
230
-
231
-
232
-
233
-
234
-
235
-
236
-
237
-
238
-
239
-
240
-
241
-
242
-
243
-
244
-
245
-
246
-
247
-
248
-
249
-
250
-
251
-
252
-
253
-
254
-
255
 |
 |