Canon EOS C700 FF PL EOS C700 EOS C700 PL EOS C700 GS PL EOS C700 FF EOS C700 - Page 171
Starting Browser Remote
 |
View all Canon EOS C700 FF PL manuals
Add to My Manuals
Save this manual to your list of manuals |
Page 171 highlights
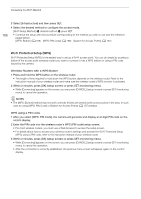
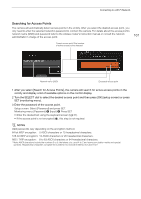
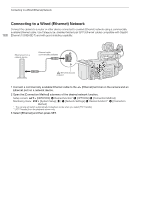
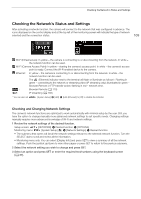
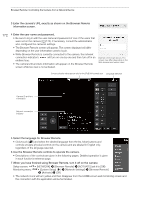
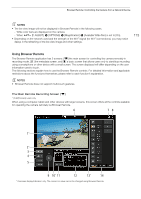
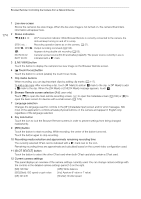
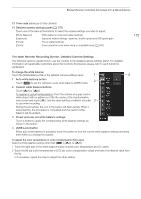
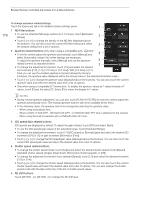
Browser Remote: Controlling the Camera from a Network Device 2 Select the number of Browser Remote users. [Users Settings] > [One User (Full Control)] or [Two Users (Camera/Meta)] > press SET • If you selected [One User (Full Control)], perform steps 3 and 4 for the [Full] user. If you selected [Two Users (Camera/Meta)], repeat steps 3 and 4 twice, once for the [Camera] user and once for the [Meta] user. 3 Change the user name. Setup screen: [Full: User Name] / [Camera: User Name] / [Meta: User Name] > [EDIT] Monitoring menu: [Full: User Name] / [Camera: User Name] / [Meta: User Name] > [Input] > Press SET • Enter the desired text using the keyboard screen (A 37). 4 Change the default password. Setup screen: Select [Full: Password] / [Camera: Password] / [Meta: Password] and press SET. Monitoring menu: [Full: Password] / [Camera: Password] / [Meta: Password] > [Input] > Press SET • Enter the desired text using the keyboard screen (A 37). 171 NOTES • The user names for the three different users cannot be the same. Starting Browser Remote After connecting the camera to the network, you can start the Browser Remote application on the Web browser* of any network device** connected to the same network. * A Web browser that supports JavaScript and is enabled to accept cookies is required. ** For details about compatible devices, operating systems, Web browsers, etc., please visit your local Canon Web site. Preparations on the camera 1 Activate Browser Remote on the camera. Setup screen: Monitoring menu: [NETWORK] > [Browser Remote] > [ACTIVATE] (set it to [On]) [System Setup] (w) > [Network Settings] > [Browser Remote] > [Activate] > [On] • With Camera Access Point connections, the camera will start functioning as a wireless access point. With Ethernet connections, connect the camera to the desired network. • and the connection type icon will appear on the HOME screen and at the top left of the monitoring screen. When the icons turn white, the camera is ready to accept commands from the Browser Remote application. 2 If necessary, you can check the network settings while Browser Remote is activated. Setup screen: [NETWORK] > [Browser Remote] Monitoring menu: [System Setup] (w) > [Network Settings] > [Browser Remote] > [Display Info] • Turn the SELECT dial to check all the settings. You will need the camera's SSID (network name) and password to connect a Wi-Fi device using a Camera Access Point connection. You will need the camera's URL and user names/passwords for the Browser Remote users to use the Browser Remote application. • Only default passwords are displayed. Passwords set by the user will not be displayed (the information screen will show only whether a password is set or not). On the connected network device 1 Connect the network device to the camera. • With Camera Access Point connections, select the camera's SSID (network name) in the Wi-Fi settings. With Ethernet connections, connect the device to the same access point as the camera. 2 Start the Web browser on the network device.
-
 1
1 -
2
-
3
-
4
-
5
-
6
-
7
-
8
-
9
-
10
-
11
-
12
-
13
-
14
-
15
-
16
-
17
-
18
-
19
-
20
-
21
-
22
-
23
-
24
-
25
-
26
-
27
-
28
-
29
-
30
-
31
-
32
-
33
-
34
-
35
-
36
-
37
-
38
-
39
-
40
-
41
-
42
-
43
-
44
-
45
-
46
-
47
-
48
-
49
-
50
-
51
-
52
-
53
-
54
-
55
-
56
-
57
-
58
-
59
-
60
-
61
-
62
-
63
-
64
-
65
-
66
-
67
-
68
-
69
-
70
-
71
-
72
-
73
-
74
-
75
-
76
-
77
-
78
-
79
-
80
-
81
-
82
-
83
-
84
-
85
-
86
-
87
-
88
-
89
-
90
-
91
-
92
-
93
-
94
-
95
-
96
-
97
-
98
-
99
-
100
-
101
-
102
-
103
-
104
-
105
-
106
-
107
-
108
-
109
-
110
-
111
-
112
-
113
-
114
-
115
-
116
-
117
-
118
-
119
-
120
-
121
-
122
-
123
-
124
-
125
-
126
-
127
-
128
-
129
-
130
-
131
-
132
-
133
-
134
-
135
-
136
-
137
-
138
-
139
-
140
-
141
-
142
-
143
-
144
-
145
-
146
-
147
-
148
-
149
-
150
-
151
-
152
-
153
-
154
-
155
-
156
-
157
-
158
-
159
-
160
-
161
-
162
-
163
-
164
-
165
-
 166
166 -
 167
167 -
 168
168 -
 169
169 -
 170
170 -
 171
171 -
 172
172 -
 173
173 -
 174
174 -
 175
175 -
 176
176 -
177
-
178
-
179
-
180
-
181
-
182
-
183
-
184
-
185
-
186
-
187
-
188
-
189
-
190
-
191
-
192
-
193
-
194
-
195
-
196
-
197
-
198
-
199
-
200
-
201
-
202
-
203
-
204
-
205
-
206
-
207
-
208
-
209
-
210
-
211
-
212
-
213
-
214
-
215
-
216
-
217
-
218
-
219
-
220
-
221
-
222
-
223
-
224
-
225
-
226
-
227
-
228
-
229
-
230
-
231
-
232
-
233
-
234
-
235
-
236
-
237
-
238
-
239
-
240
-
241
-
242
-
243
-
244
-
245
-
246
-
247
-
248
-
249
-
250
-
251
-
252
-
253
-
254
-
255
 |
 |