Canon EOS C700 FF PL EOS C700 EOS C700 PL EOS C700 GS PL EOS C700 FF EOS C700 - Page 185
FTP File Transfer, Preparations, Enter the [FTP: User Name], [FTP: Password]
 |
View all Canon EOS C700 FF PL manuals
Add to My Manuals
Save this manual to your list of manuals |
Page 185 highlights
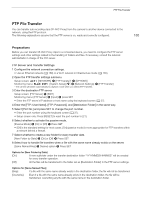
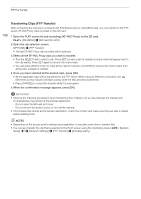
FTP File Transfer FTP File Transfer You can transfer sub recording clips (XF-AVC Proxy) from the camera to another device connected to the network, using the FTP protocol. The following explanations assume that the FTP server is on, ready and correctly configured. 185 Preparations Before you can transfer XF-AVC Proxy clips to a connected device, you need to configure the FTP server settings and other settings related to the handling of folders and files. If necessary, consult the network administrator in charge of the FTP server. FTP Server and Transfer Settings 1 Configure the network connection settings. • Use an Ethernet network (A 168) or a Wi-Fi network in Infrastructure mode (A 165). 2 Open the FTP transfer settings submenu. Setup screen: [NETWORK] > [FTP Transfer]* > [OPTIONS] Monitoring menu: [System Setup] (B) > [Network Settings] > [FTP Transfer] * The camera will switch automatically to playback mode when you select [FTP Transfer]. 3 Enter the destination FTP server. Setup screen: [FTP Server] > [EDIT] Monitoring menu: [FTP Server] > [Input] > press SET • Enter the FTP server's IP address or host name using the keyboard screen (A 37). 4 Enter the [FTP: User Name], [FTP: Password], and [Destination Folder] in the same way. 5 Select [Port No.] and press SET to change the port number. • Enter the port number using the keyboard screen (A 37). • Setup screen only: Press [RESET] to reset the port number to [21]. 6 Select whether to activate the passive mode. [Passive Mode] > [On] or [Off] > Press SET • [Off] is the standard setting for most cases. [On] (passive mode) is more appropriate for FTP transfers within a network behind a firewall. 7 Select whether to create a new folder for every transfer date. [New Folder by Date] > [On] or [Off] > Press SET 8 Select how to handle file transfers when a file with the same name already exists on the server. [Same Named Files] > Desired option > Press SET Options for [New Folder by Date] [On]: A new subfolder under the transfer destination folder "YYYYMMDD\HHMMSS" will be created for every transfer operation. [Off]: All the files will be transferred to the folder set as [Destination Folder] in the FTP server settings. Options for [Same Named Files] [Skip]: If a file with the same name already exists in the destination folder, the file will not be transferred. [Overwrite]: Even if a file with the same name already exists in the destination folder, the file will be transferred, overwriting any file with the same name in the destination folder.
-
 1
1 -
2
-
3
-
4
-
5
-
6
-
7
-
8
-
9
-
10
-
11
-
12
-
13
-
14
-
15
-
16
-
17
-
18
-
19
-
20
-
21
-
22
-
23
-
24
-
25
-
26
-
27
-
28
-
29
-
30
-
31
-
32
-
33
-
34
-
35
-
36
-
37
-
38
-
39
-
40
-
41
-
42
-
43
-
44
-
45
-
46
-
47
-
48
-
49
-
50
-
51
-
52
-
53
-
54
-
55
-
56
-
57
-
58
-
59
-
60
-
61
-
62
-
63
-
64
-
65
-
66
-
67
-
68
-
69
-
70
-
71
-
72
-
73
-
74
-
75
-
76
-
77
-
78
-
79
-
80
-
81
-
82
-
83
-
84
-
85
-
86
-
87
-
88
-
89
-
90
-
91
-
92
-
93
-
94
-
95
-
96
-
97
-
98
-
99
-
100
-
101
-
102
-
103
-
104
-
105
-
106
-
107
-
108
-
109
-
110
-
111
-
112
-
113
-
114
-
115
-
116
-
117
-
118
-
119
-
120
-
121
-
122
-
123
-
124
-
125
-
126
-
127
-
128
-
129
-
130
-
131
-
132
-
133
-
134
-
135
-
136
-
137
-
138
-
139
-
140
-
141
-
142
-
143
-
144
-
145
-
146
-
147
-
148
-
149
-
150
-
151
-
152
-
153
-
154
-
155
-
156
-
157
-
158
-
159
-
160
-
161
-
162
-
163
-
164
-
165
-
166
-
167
-
168
-
169
-
170
-
171
-
172
-
173
-
174
-
175
-
176
-
177
-
178
-
179
-
 180
180 -
 181
181 -
 182
182 -
 183
183 -
 184
184 -
 185
185 -
 186
186 -
 187
187 -
 188
188 -
 189
189 -
 190
190 -
191
-
192
-
193
-
194
-
195
-
196
-
197
-
198
-
199
-
200
-
201
-
202
-
203
-
204
-
205
-
206
-
207
-
208
-
209
-
210
-
211
-
212
-
213
-
214
-
215
-
216
-
217
-
218
-
219
-
220
-
221
-
222
-
223
-
224
-
225
-
226
-
227
-
228
-
229
-
230
-
231
-
232
-
233
-
234
-
235
-
236
-
237
-
238
-
239
-
240
-
241
-
242
-
243
-
244
-
245
-
246
-
247
-
248
-
249
-
250
-
251
-
252
-
253
-
254
-
255
 |
 |