ZyXEL NAS540 User Guide - Page 16
Hard Disks, SD Card, Power Button, COPY/SYNC Button - 4 bay nas
 |
View all ZyXEL NAS540 manuals
Add to My Manuals
Save this manual to your list of manuals |
Page 16 highlights
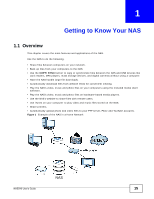
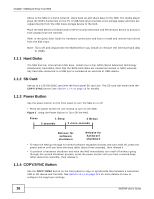
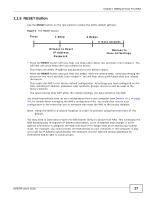
Chapter 1 Getting to Know Your NAS Above is the NAS in a home network. Users back up and share data on the NAS. The media player plays the NAS's media files on the TV. A USB hard drive provides extra storage space and files are copied directly from the USB mass storage device to the NAS. Place the NAS behind a firewall and/or IDP (Intrusion Detection and Prevention) device to protect it from attacks from the Internet. Refer to the Quick Start Guide for hardware connections and how to install and remove hard drives from the disk trays. Note: Turn off and disconnect the NAS before you install or remove the internal hard disk or disks. 1.1.1 Hard Disks The NAS has four internal hard disk bays. Install one to four SATA (Serial Advanced Technology Attachment) hard disks. Note that the SATA hard disks are treated as internal or SATA volumes. Any hard disk connected to a USB port is considered an external or USB volume. 1.1.2 SD Card Use up to a 128 GB SDXC card with the front panel SD card slot. The SD card slot works with the COPY/SYNC button (see Section 1.1.4 on page 16 for details). 1.1.3 Power Button Use the power button on the front panel to turn the NAS on or off. • Press the power button for one second to turn on the NAS. Figure 2 Using the Power Button to Turn Off the NAS Press 1 Beep 2 Beeps 3 seconds 2 more seconds Release for software shutdown Release for hardware shutdown • To have the NAS go through its normal software shutdown process and turn itself off, press the power button until you hear one beep (after about three seconds), then release it. • To perform a hardware shutdown and have the NAS immediately turn itself off without going through the normal shutdown process, press the power button until you hear a second beep (after about five seconds), then release it. 1.1.4 COPY/SYNC Button Use the COPY/SYNC button on the front panel to copy or synchronize files between a connected USB or SD device and the NAS. See Section 10.11 on page 219 for more details on how to configure the copy/sync settings. 16 NAS540 User's Guide
-
 1
1 -
2
-
3
-
4
-
5
-
6
-
7
-
8
-
9
-
10
-
 11
11 -
 12
12 -
 13
13 -
 14
14 -
 15
15 -
 16
16 -
 17
17 -
 18
18 -
 19
19 -
 20
20 -
 21
21 -
22
-
23
-
24
-
25
-
26
-
27
-
28
-
29
-
30
-
31
-
32
-
33
-
34
-
35
-
36
-
37
-
38
-
39
-
40
-
41
-
42
-
43
-
44
-
45
-
46
-
47
-
48
-
49
-
50
-
51
-
52
-
53
-
54
-
55
-
56
-
57
-
58
-
59
-
60
-
61
-
62
-
63
-
64
-
65
-
66
-
67
-
68
-
69
-
70
-
71
-
72
-
73
-
74
-
75
-
76
-
77
-
78
-
79
-
80
-
81
-
82
-
83
-
84
-
85
-
86
-
87
-
88
-
89
-
90
-
91
-
92
-
93
-
94
-
95
-
96
-
97
-
98
-
99
-
100
-
101
-
102
-
103
-
104
-
105
-
106
-
107
-
108
-
109
-
110
-
111
-
112
-
113
-
114
-
115
-
116
-
117
-
118
-
119
-
120
-
121
-
122
-
123
-
124
-
125
-
126
-
127
-
128
-
129
-
130
-
131
-
132
-
133
-
134
-
135
-
136
-
137
-
138
-
139
-
140
-
141
-
142
-
143
-
144
-
145
-
146
-
147
-
148
-
149
-
150
-
151
-
152
-
153
-
154
-
155
-
156
-
157
-
158
-
159
-
160
-
161
-
162
-
163
-
164
-
165
-
166
-
167
-
168
-
169
-
170
-
171
-
172
-
173
-
174
-
175
-
176
-
177
-
178
-
179
-
180
-
181
-
182
-
183
-
184
-
185
-
186
-
187
-
188
-
189
-
190
-
191
-
192
-
193
-
194
-
195
-
196
-
197
-
198
-
199
-
200
-
201
-
202
-
203
-
204
-
205
-
206
-
207
-
208
-
209
-
210
-
211
-
212
-
213
-
214
-
215
-
216
-
217
-
218
-
219
-
220
-
221
-
222
-
223
-
224
-
225
-
226
-
227
-
228
-
229
-
230
-
231
-
232
-
233
-
234
-
235
-
236
-
237
-
238
-
239
-
240
-
241
-
242
-
243
-
244
-
245
-
246
-
247
-
248
-
249
-
250
-
251
-
252
-
253
-
254
-
255
-
256
-
257
-
258
-
259
-
260
-
261
-
262
-
263
-
264
-
265
-
266
-
267
-
268
-
269
-
270
-
271
-
272
-
273
-
274
-
275
-
276
-
277
-
278
-
279
-
280
-
281
-
282
-
283
-
284
-
285
-
286
-
287
-
288
-
289
-
290
-
291
-
292
-
293
-
294
-
295
-
296
-
297
-
298
-
299
-
300
-
301
-
302
-
303
-
304
-
305
-
306
-
307
-
308
-
309
-
310
-
311
-
312
-
313
-
314
-
315
-
316
-
317
-
318
-
319
-
320
-
321
-
322
-
323
-
324
-
325
-
326
-
327
-
328
-
329
-
330
-
331
-
332
-
333
-
334
-
335
-
336
-
337
-
338
-
339
-
340
-
341
-
342
-
343
-
344
-
345
-
346
-
347
-
348
-
349
-
350
-
351
-
352
-
353
-
354
-
355
-
356
-
357
-
358
-
359
-
360
-
361
-
362
-
363
-
364
-
365
-
366
-
367
-
368
-
369
-
370
-
371
-
372
-
373
-
374
-
375
-
376
 |
 |