ZyXEL NAS540 User Guide - Page 39
Storage > Disk Group, Table 10, LABEL, DESCRIPTION
 |
View all ZyXEL NAS540 manuals
Add to My Manuals
Save this manual to your list of manuals |
Page 39 highlights
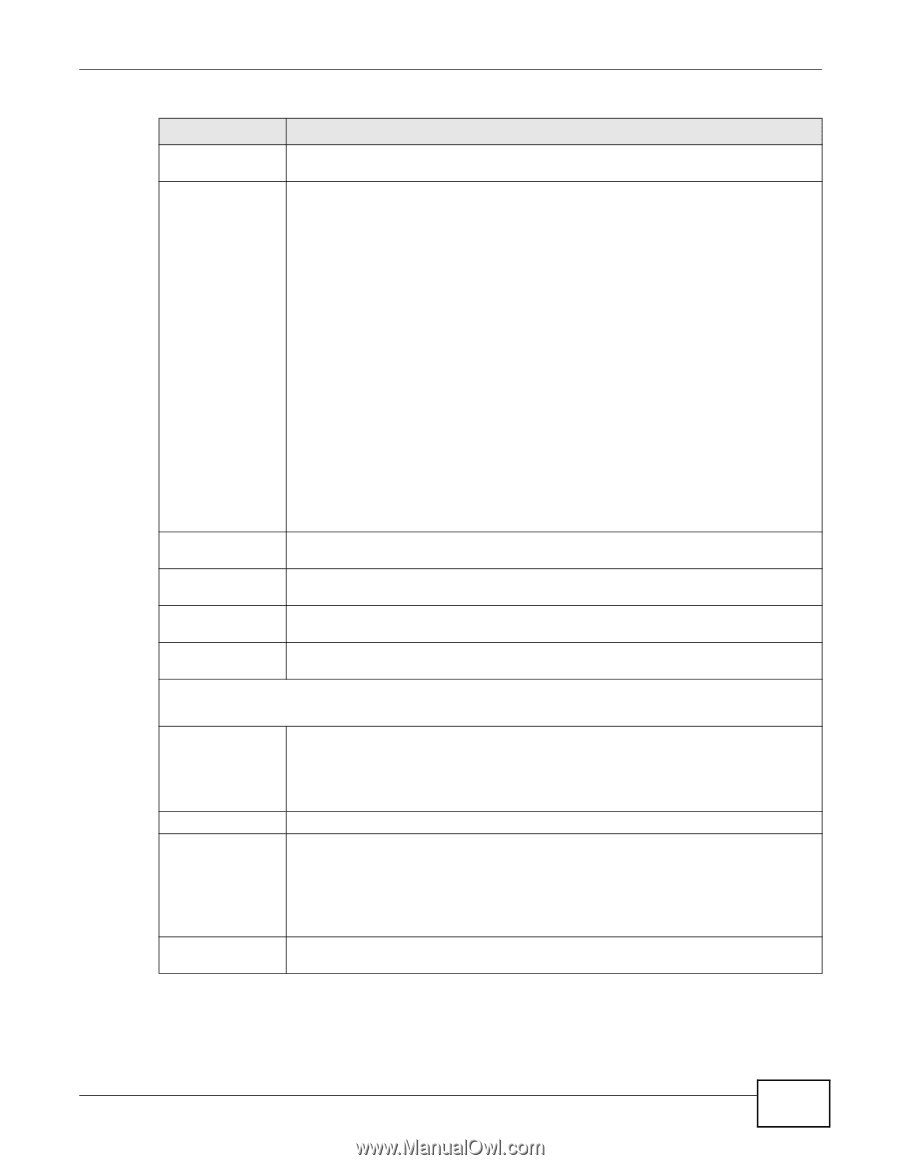
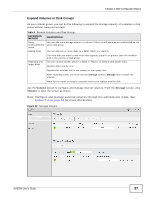
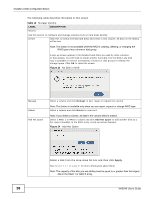
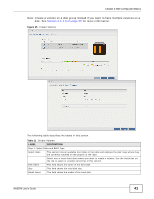
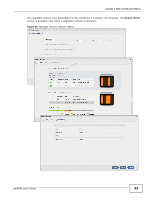
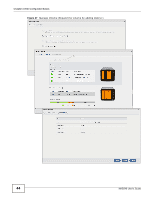
Chapter 4 Web Configurator Basics Table 10 Storage Volume (continued) LABEL Remove Hot Spare Status DESCRIPTION Select a RAID 1 or RAID 5 volume and click Remove Hot Spare to remove the standby drive from the RAID array. This field shows whether the volume is normal, degraded, crashed, Creating, Deleting, Expanding, Repairing or Changing the RAID type. Normal: A green circle represents a healthy volume. Degraded: An orange circle represents a degraded RAID 1 volume. Crashed: A red circle represents a down volume. The following status also displays the percentage of an action has been completed. Creating: The NAS's percentage progress in creating the volume. Deleting: The NAS's percentage progress in deleting the volume. Expanding: The NAS's percentage progress in expanding the volume. For a RAID 1 volume, this also displays the percentage of resynchronizing the NAS has finished and the evaluated remaining time. Repairing: The NAS's percentage progress in repairing the volume. For a RAID 1 volume, this also displays the percentage of resynchronizing the NAS has finished and the evaluated remaining time. Changing: The NAS's percentage progress in changing the volume's RAID type. For a RAID 1 volume, this also displays the percentage of resynchronizing the NAS has finished and the evaluated remaining time. Volume Name This field shows the name of the volume. Click the column's heading cell to display an arrow. Use the arrow to sort the table entries in ascending or descending order. RAID Type This field shows what type of disk storage technology (Basic, a RAID level or JBOD) a volume uses. Available Capacity This field shows the percentage of the volume being used, the percentage that is available, and the total disk size. Hot Spare This field shows the name of the standby disk if there is any for a RAID 1 or RAID 5 volume. Otherwise, it shows not supported. Volume on Disk Group Use this section to configure and manage volumes built on disk groups. Create Click this to format internal hard disks and create a new volume on a disk group. All data on the disks will be lost. Edit Delete Note: This button is unavailable when a volume or disk group is being created, deleted or changing the RAID type. Select a volume and click Edit to expand the volume's capacity. Select a volume and click Delete to remove it. Note: If you delete a volume, all data in the volume disks is erased. Disk Group X Note: Deleting a volume on a disk group here does not delete the corresponding disk group. To delete a disk group, click Storage > Disk Group. This field shows the name of the disk group, the percentage of the disk group size that is available, the disk group size being used, and the total disk group size. NAS540 User's Guide 39
-
 1
1 -
2
-
3
-
4
-
5
-
6
-
7
-
8
-
9
-
10
-
11
-
12
-
13
-
14
-
15
-
16
-
17
-
18
-
19
-
20
-
21
-
22
-
23
-
24
-
25
-
26
-
27
-
28
-
29
-
30
-
31
-
32
-
33
-
 34
34 -
 35
35 -
 36
36 -
 37
37 -
 38
38 -
 39
39 -
 40
40 -
 41
41 -
 42
42 -
 43
43 -
 44
44 -
45
-
46
-
47
-
48
-
49
-
50
-
51
-
52
-
53
-
54
-
55
-
56
-
57
-
58
-
59
-
60
-
61
-
62
-
63
-
64
-
65
-
66
-
67
-
68
-
69
-
70
-
71
-
72
-
73
-
74
-
75
-
76
-
77
-
78
-
79
-
80
-
81
-
82
-
83
-
84
-
85
-
86
-
87
-
88
-
89
-
90
-
91
-
92
-
93
-
94
-
95
-
96
-
97
-
98
-
99
-
100
-
101
-
102
-
103
-
104
-
105
-
106
-
107
-
108
-
109
-
110
-
111
-
112
-
113
-
114
-
115
-
116
-
117
-
118
-
119
-
120
-
121
-
122
-
123
-
124
-
125
-
126
-
127
-
128
-
129
-
130
-
131
-
132
-
133
-
134
-
135
-
136
-
137
-
138
-
139
-
140
-
141
-
142
-
143
-
144
-
145
-
146
-
147
-
148
-
149
-
150
-
151
-
152
-
153
-
154
-
155
-
156
-
157
-
158
-
159
-
160
-
161
-
162
-
163
-
164
-
165
-
166
-
167
-
168
-
169
-
170
-
171
-
172
-
173
-
174
-
175
-
176
-
177
-
178
-
179
-
180
-
181
-
182
-
183
-
184
-
185
-
186
-
187
-
188
-
189
-
190
-
191
-
192
-
193
-
194
-
195
-
196
-
197
-
198
-
199
-
200
-
201
-
202
-
203
-
204
-
205
-
206
-
207
-
208
-
209
-
210
-
211
-
212
-
213
-
214
-
215
-
216
-
217
-
218
-
219
-
220
-
221
-
222
-
223
-
224
-
225
-
226
-
227
-
228
-
229
-
230
-
231
-
232
-
233
-
234
-
235
-
236
-
237
-
238
-
239
-
240
-
241
-
242
-
243
-
244
-
245
-
246
-
247
-
248
-
249
-
250
-
251
-
252
-
253
-
254
-
255
-
256
-
257
-
258
-
259
-
260
-
261
-
262
-
263
-
264
-
265
-
266
-
267
-
268
-
269
-
270
-
271
-
272
-
273
-
274
-
275
-
276
-
277
-
278
-
279
-
280
-
281
-
282
-
283
-
284
-
285
-
286
-
287
-
288
-
289
-
290
-
291
-
292
-
293
-
294
-
295
-
296
-
297
-
298
-
299
-
300
-
301
-
302
-
303
-
304
-
305
-
306
-
307
-
308
-
309
-
310
-
311
-
312
-
313
-
314
-
315
-
316
-
317
-
318
-
319
-
320
-
321
-
322
-
323
-
324
-
325
-
326
-
327
-
328
-
329
-
330
-
331
-
332
-
333
-
334
-
335
-
336
-
337
-
338
-
339
-
340
-
341
-
342
-
343
-
344
-
345
-
346
-
347
-
348
-
349
-
350
-
351
-
352
-
353
-
354
-
355
-
356
-
357
-
358
-
359
-
360
-
361
-
362
-
363
-
364
-
365
-
366
-
367
-
368
-
369
-
370
-
371
-
372
-
373
-
374
-
375
-
376
 |
 |