ZyXEL NAS540 User Guide - Page 48
Manage Volume continued
 |
View all ZyXEL NAS540 manuals
Add to My Manuals
Save this manual to your list of manuals |
Page 48 highlights
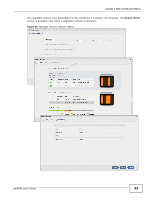
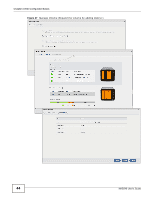
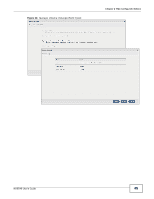
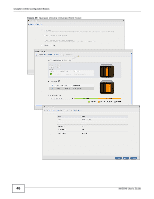
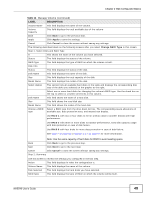
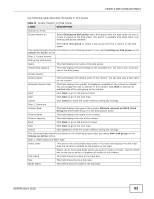
Chapter 4 Web Configurator Basics Table 12 Manage Volume (continued) LABEL DESCRIPTION Volume Capacity This field displays the total available size of the volume. Back Click Back to go to the previous step. Apply Click Apply to save the settings. Cancel Click Cancel to close the screen without saving any settings. The following describes labels on the following screens after you select Expand the volume by adding disk(s) in this screen. Step 1. Select Disks A This shows the name of the volume you have selected. Status This field displays the status of the volume. RAID Type This field displays the type of RAID on which the volume is built. Disk Info Status This field displays the status of the disk. Disk Name This field displays the name of the disk. Size This field displays the total capacity of the disk. Model Name This field displays the model of the disk. Select disk(s) to This section lists all available hard disks in the table and displays the corresponding disk add tray of the disks you selected on the graphic at the right. Select one or more hard disks for increasing the volume's capacity. Use the check box on the top to select or unselect all entries in this column. Disk Name This field shows the name of a hard disk. Size This field shows the total disk size. Model Name This field shows the model of the hard disk. Expected Capacity This field shows the corresponding space allocations of available size, data protection area, and wasted size according to your selections on hard disks above. Note: Use the same capacity of hard disks for RAID 1, 5, 6, or 10 to avoid wasting space. Back Click Back to go to the previous step. Next Click Next to go to the next step. Cancel Click Cancel to close the screen without saving any settings. Step 2. Summary Use this screen to review the settings you configured in the last step. Action This field displays for what the configuration is. Volume Name This field displays the name of the volume. Disk Selected This field displays the hard disks you have selected. Volume Capacity This field displays the total available size of the volume. Back Click Back to go to the previous step. Apply Click Apply to save the settings. Cancel Click Cancel to close the screen without saving any settings. The following describes labels on the following screens after you select Expand the volume with unallocated disk space in this screen. Summary Action This field displays for what the configuration is. 48 NAS540 User's Guide
-
 1
1 -
2
-
3
-
4
-
5
-
6
-
7
-
8
-
9
-
10
-
11
-
12
-
13
-
14
-
15
-
16
-
17
-
18
-
19
-
20
-
21
-
22
-
23
-
24
-
25
-
26
-
27
-
28
-
29
-
30
-
31
-
32
-
33
-
34
-
35
-
36
-
37
-
38
-
39
-
40
-
41
-
42
-
 43
43 -
 44
44 -
 45
45 -
 46
46 -
 47
47 -
 48
48 -
 49
49 -
 50
50 -
 51
51 -
 52
52 -
 53
53 -
54
-
55
-
56
-
57
-
58
-
59
-
60
-
61
-
62
-
63
-
64
-
65
-
66
-
67
-
68
-
69
-
70
-
71
-
72
-
73
-
74
-
75
-
76
-
77
-
78
-
79
-
80
-
81
-
82
-
83
-
84
-
85
-
86
-
87
-
88
-
89
-
90
-
91
-
92
-
93
-
94
-
95
-
96
-
97
-
98
-
99
-
100
-
101
-
102
-
103
-
104
-
105
-
106
-
107
-
108
-
109
-
110
-
111
-
112
-
113
-
114
-
115
-
116
-
117
-
118
-
119
-
120
-
121
-
122
-
123
-
124
-
125
-
126
-
127
-
128
-
129
-
130
-
131
-
132
-
133
-
134
-
135
-
136
-
137
-
138
-
139
-
140
-
141
-
142
-
143
-
144
-
145
-
146
-
147
-
148
-
149
-
150
-
151
-
152
-
153
-
154
-
155
-
156
-
157
-
158
-
159
-
160
-
161
-
162
-
163
-
164
-
165
-
166
-
167
-
168
-
169
-
170
-
171
-
172
-
173
-
174
-
175
-
176
-
177
-
178
-
179
-
180
-
181
-
182
-
183
-
184
-
185
-
186
-
187
-
188
-
189
-
190
-
191
-
192
-
193
-
194
-
195
-
196
-
197
-
198
-
199
-
200
-
201
-
202
-
203
-
204
-
205
-
206
-
207
-
208
-
209
-
210
-
211
-
212
-
213
-
214
-
215
-
216
-
217
-
218
-
219
-
220
-
221
-
222
-
223
-
224
-
225
-
226
-
227
-
228
-
229
-
230
-
231
-
232
-
233
-
234
-
235
-
236
-
237
-
238
-
239
-
240
-
241
-
242
-
243
-
244
-
245
-
246
-
247
-
248
-
249
-
250
-
251
-
252
-
253
-
254
-
255
-
256
-
257
-
258
-
259
-
260
-
261
-
262
-
263
-
264
-
265
-
266
-
267
-
268
-
269
-
270
-
271
-
272
-
273
-
274
-
275
-
276
-
277
-
278
-
279
-
280
-
281
-
282
-
283
-
284
-
285
-
286
-
287
-
288
-
289
-
290
-
291
-
292
-
293
-
294
-
295
-
296
-
297
-
298
-
299
-
300
-
301
-
302
-
303
-
304
-
305
-
306
-
307
-
308
-
309
-
310
-
311
-
312
-
313
-
314
-
315
-
316
-
317
-
318
-
319
-
320
-
321
-
322
-
323
-
324
-
325
-
326
-
327
-
328
-
329
-
330
-
331
-
332
-
333
-
334
-
335
-
336
-
337
-
338
-
339
-
340
-
341
-
342
-
343
-
344
-
345
-
346
-
347
-
348
-
349
-
350
-
351
-
352
-
353
-
354
-
355
-
356
-
357
-
358
-
359
-
360
-
361
-
362
-
363
-
364
-
365
-
366
-
367
-
368
-
369
-
370
-
371
-
372
-
373
-
374
-
375
-
376
 |
 |