ZyXEL NAS540 User Guide - Page 195
Applications > Media Server
 |
View all ZyXEL NAS540 manuals
Add to My Manuals
Save this manual to your list of manuals |
Page 195 highlights
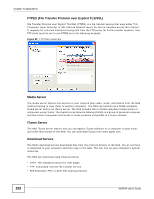
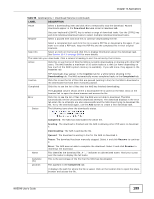
Chapter 10 Applications Table 51 Applications > FTP LABEL Customize the port range for data transfer Starting Port Ending Port Download/Upload Rate For All Users (include admin) Download/Upload Rate For Anonymous Users Character Set DESCRIPTION Select this check box to assign a port range for FTP clients to use when downloading files from the NAS using passive mode. The connection limit is restricted to half of the port numbers within the range if this value is smaller than the one configured in the Connection Limit field. For example, you specified a port range from 1024 to 1029 and configured 10 in the Connection Limit field. The FTP connection limit will only be 3 (6 ports in the range divided by 2) because it is the smaller value. Enter the first port number in the range. Choose from 1024 to 65535. Enter the last port number in the range. Choose from 1024 to 65535. Select this if you want to limit the download/upload bandwidth for all users who are logged into the NAS, including the administrator. • Max. Download Rate - Enter the download speed (in kilobytes/s) that the NAS allows for users who are logged into the NAS. • Max. Upload Rate - Enter the upload speed (in kilobytes/s) that the NAS allows for users who are logged into the NAS. Select this if you want to limit the download/upload bandwidth for users who log into the NAS using 'FTP' or 'anonymous' as a username and no password. • Max. Download Rate - Enter the download speed (in kilobytes/s) that the NAS allows for users who are logged into the NAS. • Max. Upload Rate - Enter the upload speed (in kilobytes/s) that the NAS allows for users who are logged into the NAS. The NAS uses UTF-8 (8-bit UCS/Unicode Transformation Format) format for FTP by default. If the NAS's folders, or file names do not display correctly in your FTP client, select the appropriate language encoding here. Apply Reset This setting applies to all FTP client connections to the NAS. It does not affect your Windows/CIFS connections (it will not correct the character display in Windows Explorer). Click this to save your changes. Click this to restore your previously saved settings. 10.5 Media Server Screens The media server application allows you to share media files with media clients. Click Applications > Media Server to open the following screen. Use this screen to view the media server's status and rebuild the media server database. Figure 91 Applications > Media Server > Media Server NAS540 User's Guide 195
-
 1
1 -
2
-
3
-
4
-
5
-
6
-
7
-
8
-
9
-
10
-
11
-
12
-
13
-
14
-
15
-
16
-
17
-
18
-
19
-
20
-
21
-
22
-
23
-
24
-
25
-
26
-
27
-
28
-
29
-
30
-
31
-
32
-
33
-
34
-
35
-
36
-
37
-
38
-
39
-
40
-
41
-
42
-
43
-
44
-
45
-
46
-
47
-
48
-
49
-
50
-
51
-
52
-
53
-
54
-
55
-
56
-
57
-
58
-
59
-
60
-
61
-
62
-
63
-
64
-
65
-
66
-
67
-
68
-
69
-
70
-
71
-
72
-
73
-
74
-
75
-
76
-
77
-
78
-
79
-
80
-
81
-
82
-
83
-
84
-
85
-
86
-
87
-
88
-
89
-
90
-
91
-
92
-
93
-
94
-
95
-
96
-
97
-
98
-
99
-
100
-
101
-
102
-
103
-
104
-
105
-
106
-
107
-
108
-
109
-
110
-
111
-
112
-
113
-
114
-
115
-
116
-
117
-
118
-
119
-
120
-
121
-
122
-
123
-
124
-
125
-
126
-
127
-
128
-
129
-
130
-
131
-
132
-
133
-
134
-
135
-
136
-
137
-
138
-
139
-
140
-
141
-
142
-
143
-
144
-
145
-
146
-
147
-
148
-
149
-
150
-
151
-
152
-
153
-
154
-
155
-
156
-
157
-
158
-
159
-
160
-
161
-
162
-
163
-
164
-
165
-
166
-
167
-
168
-
169
-
170
-
171
-
172
-
173
-
174
-
175
-
176
-
177
-
178
-
179
-
180
-
181
-
182
-
183
-
184
-
185
-
186
-
187
-
188
-
189
-
 190
190 -
 191
191 -
 192
192 -
 193
193 -
 194
194 -
 195
195 -
 196
196 -
 197
197 -
 198
198 -
 199
199 -
 200
200 -
201
-
202
-
203
-
204
-
205
-
206
-
207
-
208
-
209
-
210
-
211
-
212
-
213
-
214
-
215
-
216
-
217
-
218
-
219
-
220
-
221
-
222
-
223
-
224
-
225
-
226
-
227
-
228
-
229
-
230
-
231
-
232
-
233
-
234
-
235
-
236
-
237
-
238
-
239
-
240
-
241
-
242
-
243
-
244
-
245
-
246
-
247
-
248
-
249
-
250
-
251
-
252
-
253
-
254
-
255
-
256
-
257
-
258
-
259
-
260
-
261
-
262
-
263
-
264
-
265
-
266
-
267
-
268
-
269
-
270
-
271
-
272
-
273
-
274
-
275
-
276
-
277
-
278
-
279
-
280
-
281
-
282
-
283
-
284
-
285
-
286
-
287
-
288
-
289
-
290
-
291
-
292
-
293
-
294
-
295
-
296
-
297
-
298
-
299
-
300
-
301
-
302
-
303
-
304
-
305
-
306
-
307
-
308
-
309
-
310
-
311
-
312
-
313
-
314
-
315
-
316
-
317
-
318
-
319
-
320
-
321
-
322
-
323
-
324
-
325
-
326
-
327
-
328
-
329
-
330
-
331
-
332
-
333
-
334
-
335
-
336
-
337
-
338
-
339
-
340
-
341
-
342
-
343
-
344
-
345
-
346
-
347
-
348
-
349
-
350
-
351
-
352
-
353
-
354
-
355
-
356
-
357
-
358
-
359
-
360
-
361
-
362
-
363
-
364
-
365
-
366
-
367
-
368
-
369
-
370
-
371
-
372
-
373
-
374
-
375
-
376
 |
 |
