ZyXEL NAS540 User Guide - Page 42

Managing a Volume - review

Page 42 highlights

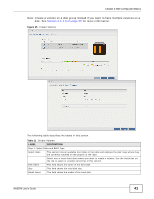
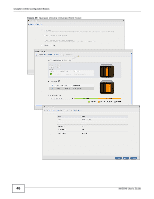
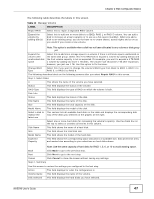
Chapter 4 Web Configurator Basics Table 11 Create Volume (continued) LABEL Choose a RAID type DESCRIPTION Select a RAID type from the drop-down list box. The corresponding space allocations of available size, data protection area, and wasted size display. Use Basic with one disk. Use JBOD with two or more disks for maximum capacity. Use RAID 0 with two or four disks for maximum speed. Use RAID 1 with two or more disks to mirror primary data to another disk(s) with high performance. Use RAID 5 with three or more disks to balance performance, hard disk capacity usage with data protection in case of disk failure. Use RAID 6 with four disks for more data protection in case of disk failure. Use RAID 10 with four disks to get better performance than RAID 6, with slightly less data protection. See Table 7 on page 36 or Section 4.4.7 on page 67 for more information. Note: Use the same capacity of hard disks for RAID 1, 5, 6, or 10 to avoid wasting space. Back This button is not available at this step. Next Click Next to go to the next step. Cancel Click Cancel to close the screen without saving any settings. Step 2. Summary Use this screen to review the settings you configured in the last step. Disk Selected This field displays the hard disks you have selected. RAID Type This field displays the type of RAID on which the volume will be built. Volume Type This field displays the type of the volume, Single volume on RAID (no disk group). Volume Name This field displays the name of the volume. Volume Capacity This field displays the size of the volume. Back Click Back to go to the previous step. Apply Click Apply to save the settings. Cancel Click Cancel to close the screen without saving any settings. 4.4.1.2 Managing a Volume Use the Manage Volume screen to repair, expand a volume or change the volume's RAID type. In the Storage > Volume screen, select a volume and then click Manage in the Volume section to open the screen as shown. 42 NAS540 User's Guide
  • 1
  • 2
  • 3
  • 4
  • 5
  • 6
  • 7
  • 8
  • 9
  • 10
  • 11
  • 12
  • 13
  • 14
  • 15
  • 16
  • 17
  • 18
  • 19
  • 20
  • 21
  • 22
  • 23
  • 24
  • 25
  • 26
  • 27
  • 28
  • 29
  • 30
  • 31
  • 32
  • 33
  • 34
  • 35
  • 36
  • 37
  • 38
  • 39
  • 40
  • 41
  • 42
  • 43
  • 44
  • 45
  • 46
  • 47
  • 48
  • 49
  • 50
  • 51
  • 52
  • 53
  • 54
  • 55
  • 56
  • 57
  • 58
  • 59
  • 60
  • 61
  • 62
  • 63
  • 64
  • 65
  • 66
  • 67
  • 68
  • 69
  • 70
  • 71
  • 72
  • 73
  • 74
  • 75
  • 76
  • 77
  • 78
  • 79
  • 80
  • 81
  • 82
  • 83
  • 84
  • 85
  • 86
  • 87
  • 88
  • 89
  • 90
  • 91
  • 92
  • 93
  • 94
  • 95
  • 96
  • 97
  • 98
  • 99
  • 100
  • 101
  • 102
  • 103
  • 104
  • 105
  • 106
  • 107
  • 108
  • 109
  • 110
  • 111
  • 112
  • 113
  • 114
  • 115
  • 116
  • 117
  • 118
  • 119
  • 120
  • 121
  • 122
  • 123
  • 124
  • 125
  • 126
  • 127
  • 128
  • 129
  • 130
  • 131
  • 132
  • 133
  • 134
  • 135
  • 136
  • 137
  • 138
  • 139
  • 140
  • 141
  • 142
  • 143
  • 144
  • 145
  • 146
  • 147
  • 148
  • 149
  • 150
  • 151
  • 152
  • 153
  • 154
  • 155
  • 156
  • 157
  • 158
  • 159
  • 160
  • 161
  • 162
  • 163
  • 164
  • 165
  • 166
  • 167
  • 168
  • 169
  • 170
  • 171
  • 172
  • 173
  • 174
  • 175
  • 176
  • 177
  • 178
  • 179
  • 180
  • 181
  • 182
  • 183
  • 184
  • 185
  • 186
  • 187
  • 188
  • 189
  • 190
  • 191
  • 192
  • 193
  • 194
  • 195
  • 196
  • 197
  • 198
  • 199
  • 200
  • 201
  • 202
  • 203
  • 204
  • 205
  • 206
  • 207
  • 208
  • 209
  • 210
  • 211
  • 212
  • 213
  • 214
  • 215
  • 216
  • 217
  • 218
  • 219
  • 220
  • 221
  • 222
  • 223
  • 224
  • 225
  • 226
  • 227
  • 228
  • 229
  • 230
  • 231
  • 232
  • 233
  • 234
  • 235
  • 236
  • 237
  • 238
  • 239
  • 240
  • 241
  • 242
  • 243
  • 244
  • 245
  • 246
  • 247
  • 248
  • 249
  • 250
  • 251
  • 252
  • 253
  • 254
  • 255
  • 256
  • 257
  • 258
  • 259
  • 260
  • 261
  • 262
  • 263
  • 264
  • 265
  • 266
  • 267
  • 268
  • 269
  • 270
  • 271
  • 272
  • 273
  • 274
  • 275
  • 276
  • 277
  • 278
  • 279
  • 280
  • 281
  • 282
  • 283
  • 284
  • 285
  • 286
  • 287
  • 288
  • 289
  • 290
  • 291
  • 292
  • 293
  • 294
  • 295
  • 296
  • 297
  • 298
  • 299
  • 300
  • 301
  • 302
  • 303
  • 304
  • 305
  • 306
  • 307
  • 308
  • 309
  • 310
  • 311
  • 312
  • 313
  • 314
  • 315
  • 316
  • 317
  • 318
  • 319
  • 320
  • 321
  • 322
  • 323
  • 324
  • 325
  • 326
  • 327
  • 328
  • 329
  • 330
  • 331
  • 332
  • 333
  • 334
  • 335
  • 336
  • 337
  • 338
  • 339
  • 340
  • 341
  • 342
  • 343
  • 344
  • 345
  • 346
  • 347
  • 348
  • 349
  • 350
  • 351
  • 352
  • 353
  • 354
  • 355
  • 356
  • 357
  • 358
  • 359
  • 360
  • 361
  • 362
  • 363
  • 364
  • 365
  • 366
  • 367
  • 368
  • 369
  • 370
  • 371
  • 372
  • 373
  • 374
  • 375
  • 376

Chapter 4 Web Configurator Basics
NAS540 User’s Guide
42
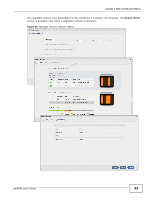
4.4.1.2
Managing a Volume
Use the
Manage Volume
screen to repair, expand a volume or change the volume’s RAID type.
In
the
Storage > Volume
screen, select a volume and then click
Manage
in the
Volume
section to
open the screen as shown.
Choose a RAID
type
Select a RAID type from the drop-down list box. The corresponding space allocations of
available size, data protection area, and wasted size display.
Use
Basic
with one disk.
Use
JBOD
with two or more disks for maximum capacity.
Use
RAID 0
with two or four disks for maximum speed.
Use
RAID 1
with two or more disks to mirror primary data to another disk(s) with high
performance.
Use
RAID 5
with three or more disks to balance performance, hard disk capacity usage
with data protection in case of disk failure.
Use
RAID 6
with four disks for more data protection in case of disk failure.
Use
RAID 10
with four disks to get better performance than RAID 6, with slightly less data
protection.
See
Table 7 on page 36
or
Section 4.4.7 on page 67
for more information.
Note: Use the same capacity of hard disks for RAID 1, 5, 6, or 10 to avoid wasting space.
Back
This button is not available at this step.
Next
Click
Next
to go to the next step.
Cancel
Click
Cancel
to close the screen without saving any settings.
Step 2. Summary
Use this screen to review the settings you configured in the last step.
Disk Selected
This field displays the hard disks you have selected.
RAID Type
This field displays the type of RAID on which the volume will be built.
Volume Type
This field displays the type of the volume,
Single volume on RAID (no disk group)
.
Volume Name
This field displays the name of the volume.
Volume
Capacity
This field displays the size of the volume.
Back
Click
Back
to go to the previous step.
Apply
Click
Apply
to save the settings.
Cancel
Click
Cancel
to close the screen without saving any settings.
Table 11
Create Volume (continued)
LABEL
DESCRIPTION