HP Officejet 7200 User Guide - Page 116
Enter text using the keypad on the control panel, Print reports, Print fax error reports
 |
View all HP Officejet 7200 manuals
Add to My Manuals
Save this manual to your list of manuals |
Page 116 highlights
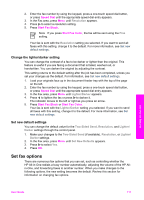
accordingly. For example, if you enter a dash in the fax number, the HP All-in-One will pause before dialing the remainder of the number. A pause is useful if you need to access an outside line before dialing the fax number. Enter text using the keypad on the control panel You can enter text or symbols by using the keypad on the control panel. ● Press the keypad numbers that correspond to the letters of a name. For example, the letters a, b, and c correspond to the number 2, as shown on the button below. Use the fax features ● Press a button multiple times to see the available characters. Note Depending on your language and country/region setting, additional characters might be available. ● After the correct letter appears, wait for the cursor to advance automatically to the right, or press . Press the number that corresponds to the next letter in the name. Press the button multiple times until the correct letter appears. The first letter of a word is automatically set to uppercase. ● To insert a space, press Space (#). ● To enter a pause, press Redial/Pause. A dash appears in the number sequence. ● To enter a symbol, such as @, press the Symbols (*) button repeatedly to scroll through the list of available symbols: asterisk (*), dash (-), ampersand (&), period (.), slash (/), parentheses ( ), apostrophe ('), equal (=), number (#), at (@), underscore (_), plus (+), exclamation (!), semicolon (;), question (?), comma (,), colon (:), percent (%), and approximation (~). ● If you make a mistake, press to erase the character. ● When you are finished entering text, numbers, or symbols, press OK. Print reports You can set up your HP All-in-One to print error reports and confirmation reports automatically for each fax you send and receive. You can also manually print system reports as you need them; these reports provide useful system information about your HP All-in-One. By default, your HP All-in-One is set to print a report only if there is a problem with sending or receiving a fax. A confirmation message that indicates whether a fax was successfully sent appears briefly on the control panel display after each transaction. Tip You can also print fax confirmation reports. For more information see Print fax confirmation reports. Print fax error reports You can configure your HP All-in-One so that it automatically prints a report when there is an error during fax transmission. The default is On. 1. Press Setup. User Guide 113
-
 1
1 -
2
-
3
-
4
-
5
-
6
-
7
-
8
-
9
-
10
-
11
-
12
-
13
-
14
-
15
-
16
-
17
-
18
-
19
-
20
-
21
-
22
-
23
-
24
-
25
-
26
-
27
-
28
-
29
-
30
-
31
-
32
-
33
-
34
-
35
-
36
-
37
-
38
-
39
-
40
-
41
-
42
-
43
-
44
-
45
-
46
-
47
-
48
-
49
-
50
-
51
-
52
-
53
-
54
-
55
-
56
-
57
-
58
-
59
-
60
-
61
-
62
-
63
-
64
-
65
-
66
-
67
-
68
-
69
-
70
-
71
-
72
-
73
-
74
-
75
-
76
-
77
-
78
-
79
-
80
-
81
-
82
-
83
-
84
-
85
-
86
-
87
-
88
-
89
-
90
-
91
-
92
-
93
-
94
-
95
-
96
-
97
-
98
-
99
-
100
-
101
-
102
-
103
-
104
-
105
-
106
-
107
-
108
-
109
-
110
-
 111
111 -
 112
112 -
 113
113 -
 114
114 -
 115
115 -
 116
116 -
 117
117 -
 118
118 -
 119
119 -
 120
120 -
 121
121 -
122
-
123
-
124
-
125
-
126
-
127
-
128
-
129
-
130
-
131
-
132
-
133
-
134
-
135
-
136
-
137
-
138
-
139
-
140
-
141
-
142
-
143
-
144
-
145
-
146
-
147
-
148
-
149
-
150
-
151
-
152
-
153
-
154
-
155
-
156
-
157
-
158
-
159
-
160
-
161
-
162
-
163
-
164
-
165
-
166
-
167
-
168
-
169
-
170
-
171
-
172
-
173
-
174
-
175
-
176
-
177
-
178
-
179
-
180
-
181
-
182
-
183
-
184
-
185
-
186
-
187
-
188
-
189
-
190
-
191
-
192
-
193
-
194
-
195
-
196
-
197
-
198
-
199
-
200
-
201
-
202
-
203
-
204
-
205
-
206
-
207
-
208
-
209
-
210
-
211
-
212
-
213
-
214
-
215
-
216
-
217
-
218
-
219
-
220
-
221
-
222
-
223
-
224
-
225
-
226
-
227
-
228
-
229
-
230
-
231
-
232
-
233
-
234
-
235
-
236
-
237
-
238
-
239
-
240
 |
 |
