HP Officejet 7200 User Guide - Page 169
Change the device settings, Set the scroll speed, Set the power save time - series scanner
 |
View all HP Officejet 7200 manuals
Add to My Manuals
Save this manual to your list of manuals |
Page 169 highlights
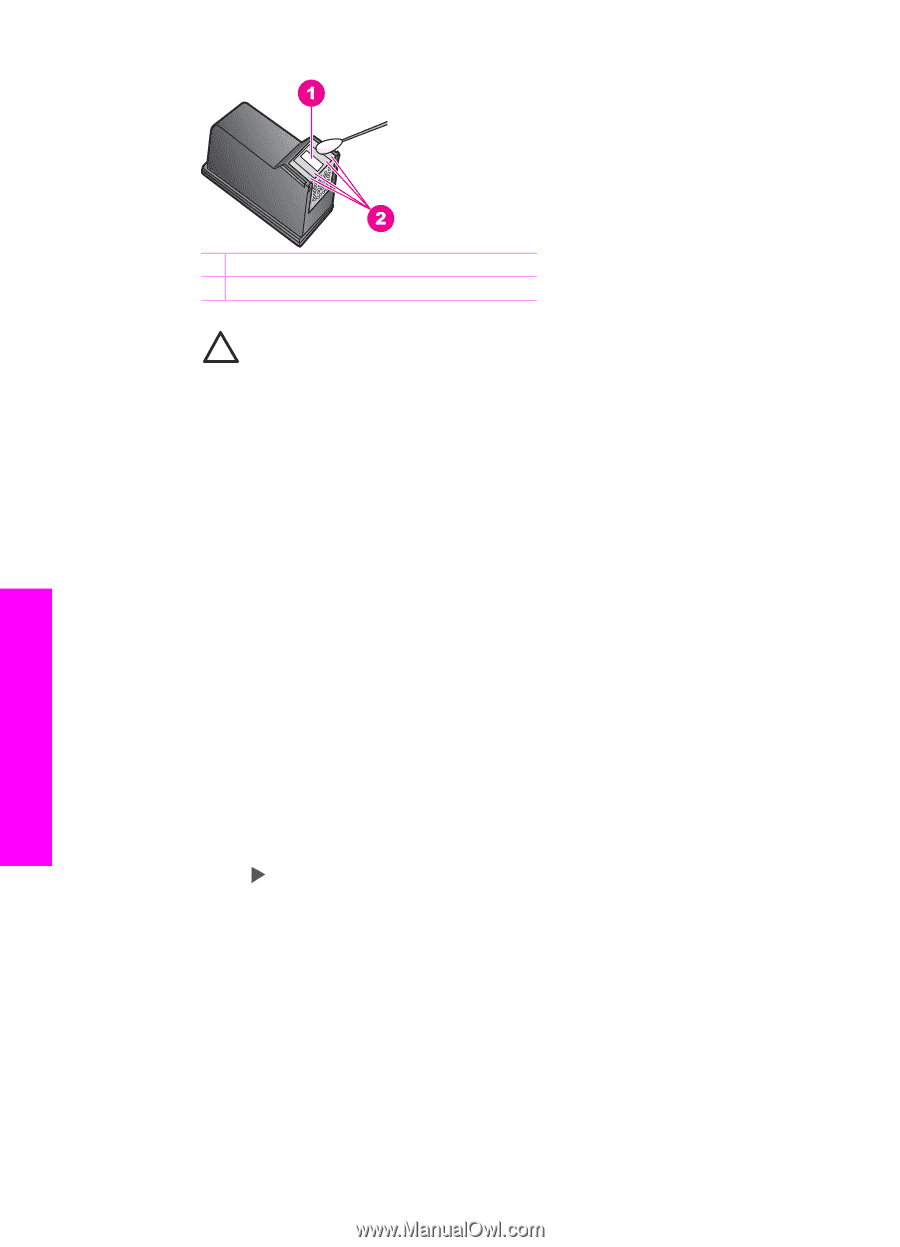
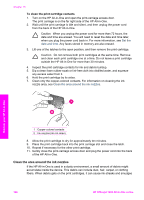
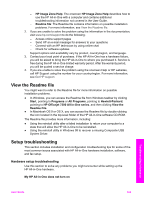
Chapter 15 Maintain your HP All-in-One 1 Nozzle plate (do not clean) 2 Face and edges around the ink nozzle area Caution Do not clean the nozzle plate. 7. Allow the ink nozzle area to dry for approximately ten minutes. 8. Place the print cartridge back into the print carriage slot and close the latch. 9. Repeat if necessary for the other print cartridge. 10. Gently close the print-carriage access door and plug the power cord into the back of the HP All-in-One. Change the device settings You can change the power save time and prompt delay time settings on your HP Allin-One so that it behaves according to your preference. You can also restore the device settings to what they were when you purchased your device. This will erase any new defaults you have set. Set the scroll speed The Scroll Speed option lets you control the rate that text messages scroll in the control panel display. For example, if the message is "Load paper, then press OK.", it will not completely fit in the control panel display and will need to scroll. This is so that you can read the entire message. You can choose the rate at which it will scroll: Normal, Fast, or Slow. The default is Normal. 1. Press Setup. 2. Press 7, and then press 2. This selects the Preferences menu and then selects Set Scroll Speed. 3. Press to select a scroll speed, then press OK. Set the power save time The light bulb in the scanner of your HP All-in-One remains on for a specified period so that the HP All-in-One is immediately ready to respond to your request. When the HP All-in-One has not been used within that specified period, it turns the light bulb off to preserve power. You can exit this mode by pressing any button on the control panel. Your HP All-in-One is automatically set to enter power save mode after 12 hours. Follow these steps if you want the HP All-in-One to enter this mode earlier. 1. Press Setup. 166 HP Officejet 7200 All-in-One series
-
 1
1 -
2
-
3
-
4
-
5
-
6
-
7
-
8
-
9
-
10
-
11
-
12
-
13
-
14
-
15
-
16
-
17
-
18
-
19
-
20
-
21
-
22
-
23
-
24
-
25
-
26
-
27
-
28
-
29
-
30
-
31
-
32
-
33
-
34
-
35
-
36
-
37
-
38
-
39
-
40
-
41
-
42
-
43
-
44
-
45
-
46
-
47
-
48
-
49
-
50
-
51
-
52
-
53
-
54
-
55
-
56
-
57
-
58
-
59
-
60
-
61
-
62
-
63
-
64
-
65
-
66
-
67
-
68
-
69
-
70
-
71
-
72
-
73
-
74
-
75
-
76
-
77
-
78
-
79
-
80
-
81
-
82
-
83
-
84
-
85
-
86
-
87
-
88
-
89
-
90
-
91
-
92
-
93
-
94
-
95
-
96
-
97
-
98
-
99
-
100
-
101
-
102
-
103
-
104
-
105
-
106
-
107
-
108
-
109
-
110
-
111
-
112
-
113
-
114
-
115
-
116
-
117
-
118
-
119
-
120
-
121
-
122
-
123
-
124
-
125
-
126
-
127
-
128
-
129
-
130
-
131
-
132
-
133
-
134
-
135
-
136
-
137
-
138
-
139
-
140
-
141
-
142
-
143
-
144
-
145
-
146
-
147
-
148
-
149
-
150
-
151
-
152
-
153
-
154
-
155
-
156
-
157
-
158
-
159
-
160
-
161
-
162
-
163
-
 164
164 -
 165
165 -
 166
166 -
 167
167 -
 168
168 -
 169
169 -
 170
170 -
 171
171 -
 172
172 -
 173
173 -
 174
174 -
175
-
176
-
177
-
178
-
179
-
180
-
181
-
182
-
183
-
184
-
185
-
186
-
187
-
188
-
189
-
190
-
191
-
192
-
193
-
194
-
195
-
196
-
197
-
198
-
199
-
200
-
201
-
202
-
203
-
204
-
205
-
206
-
207
-
208
-
209
-
210
-
211
-
212
-
213
-
214
-
215
-
216
-
217
-
218
-
219
-
220
-
221
-
222
-
223
-
224
-
225
-
226
-
227
-
228
-
229
-
230
-
231
-
232
-
233
-
234
-
235
-
236
-
237
-
238
-
239
-
240
 |
 |