HP Officejet 7200 User Guide - Page 85
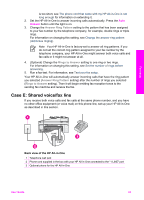
Case D: Fax with a distinctive ring service on the same line, Back view of the HP All-in-One
 |
View all HP Officejet 7200 manuals
Add to My Manuals
Save this manual to your list of manuals |
Page 85 highlights
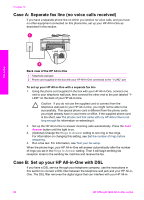
Chapter 10 converter, try using the port designated for multiple purposes; it might be labeled "multi-combi" or something similar. ● If you are using a PBX phone system, set the call waiting tone to "off." Caution Many digital PBX systems include a call-waiting tone that is factory-set to "on." The call waiting tone will interfere with any fax transmission, and you will not be able to send or receive faxes with your HP All-in-One. Refer to the documentation that came with your PBX phone system for instructions on how to turn off the call-waiting tone. ● If you are using a PBX phone system, dial the number for an outside line before dialing the fax number. ● Make sure you use the supplied cord to connect from the telephone wall jack to your HP All-in-One, you might not be able to fax successfully. This special phone cord is different from the phone cords you might already have in your home or office. If the supplied phone cord is too short, see The phone cord that came with my HP All-in-One is not long enough for information on extending it. Case D: Fax with a distinctive ring service on the same line If you subscribe to a distinctive ring service (through your telephone company) that allows you to have multiple phone numbers on one phone line, each with a different ring pattern, set up your HP All-in-One as described in this section. Fax setup Back view of the HP All-in-One 1 Telephone wall jack 2 Phone cord supplied in the box with your HP All-in-One connected to the "1-LINE" port To set up your HP All-in-One with a distinctive ring service 1. Using the phone cord supplied in the box with your HP All-in-One, connect one end to your telephone wall jack, then connect the other end to the port labeled "1LINE" on the back of your HP All-in-One. Caution If you do not use the supplied cord to connect from the telephone wall jack to your HP All-in-One, you might not be able to fax successfully. This special phone cord is different from the phone cords you might already have in your home or office. If the supplied phone cord 82 HP Officejet 7200 All-in-One series
-
 1
1 -
2
-
3
-
4
-
5
-
6
-
7
-
8
-
9
-
10
-
11
-
12
-
13
-
14
-
15
-
16
-
17
-
18
-
19
-
20
-
21
-
22
-
23
-
24
-
25
-
26
-
27
-
28
-
29
-
30
-
31
-
32
-
33
-
34
-
35
-
36
-
37
-
38
-
39
-
40
-
41
-
42
-
43
-
44
-
45
-
46
-
47
-
48
-
49
-
50
-
51
-
52
-
53
-
54
-
55
-
56
-
57
-
58
-
59
-
60
-
61
-
62
-
63
-
64
-
65
-
66
-
67
-
68
-
69
-
70
-
71
-
72
-
73
-
74
-
75
-
76
-
77
-
78
-
79
-
 80
80 -
 81
81 -
 82
82 -
 83
83 -
 84
84 -
 85
85 -
 86
86 -
 87
87 -
 88
88 -
 89
89 -
 90
90 -
91
-
92
-
93
-
94
-
95
-
96
-
97
-
98
-
99
-
100
-
101
-
102
-
103
-
104
-
105
-
106
-
107
-
108
-
109
-
110
-
111
-
112
-
113
-
114
-
115
-
116
-
117
-
118
-
119
-
120
-
121
-
122
-
123
-
124
-
125
-
126
-
127
-
128
-
129
-
130
-
131
-
132
-
133
-
134
-
135
-
136
-
137
-
138
-
139
-
140
-
141
-
142
-
143
-
144
-
145
-
146
-
147
-
148
-
149
-
150
-
151
-
152
-
153
-
154
-
155
-
156
-
157
-
158
-
159
-
160
-
161
-
162
-
163
-
164
-
165
-
166
-
167
-
168
-
169
-
170
-
171
-
172
-
173
-
174
-
175
-
176
-
177
-
178
-
179
-
180
-
181
-
182
-
183
-
184
-
185
-
186
-
187
-
188
-
189
-
190
-
191
-
192
-
193
-
194
-
195
-
196
-
197
-
198
-
199
-
200
-
201
-
202
-
203
-
204
-
205
-
206
-
207
-
208
-
209
-
210
-
211
-
212
-
213
-
214
-
215
-
216
-
217
-
218
-
219
-
220
-
221
-
222
-
223
-
224
-
225
-
226
-
227
-
228
-
229
-
230
-
231
-
232
-
233
-
234
-
235
-
236
-
237
-
238
-
239
-
240
 |
 |
