HP Officejet 7200 User Guide - Page 128
Get started, Send images using your HP All-in-One, Send photos from a memory card
 |
View all HP Officejet 7200 manuals
Add to My Manuals
Save this manual to your list of manuals |
Page 128 highlights
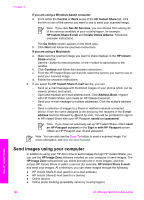
recipient assigned to the receiving device. Further instructions are provided in step 7 in Send images using your HP All-in-One. Get started You must have the following to use HP Instant Share with your HP All-in-One: ● An HP All-in-One connected to a computer (either with a USB cable or through a LAN) ● Broadband Internet access ● Based on your operating system: - Windows: HP Image Zone software installed on your computer - Macintosh: HP Image Zone software installed on your computer, including the HP Instant Share client application software Once you have set up your HP All-in-One and installed the HP Image Zone software, you are ready to start sharing photos using HP Instant Share. For more information on setting up your HP All-in-One, see the Setup Guide that came with your device. Send images using your HP All-in-One Images can be photos or scanned documents. Either can be shared with friends and relatives using your HP All-in-One and HP Instant Share. Simply transfer photos to your computer from a memory card or scan an image, select one or more images to share, and send your images to the destination of your choice. Send photos from a memory card You can use your HP All-in-One to share photos from a memory card. Transfer your photos to your computer, select the photos you want to send, and share them using HP Instant Share E-mail. Note For more information on using a memory card, see Use a memory card or PictBridge camera. 1. Make sure the memory card is inserted into the appropriate card slot on your HP All-in-One. - If you are connected using a USB cable, skip to step 5. - If you are connected through an Ethernet network, continue with step 2. 2. The Photo menu displays on the control panel display with Photo Transfer selected. Press to select Yes, and then press OK. The transfer process is started. Note Movie file types might not be supported by the HP Instant Share service. 3. When the Transfer To menu appears, press you want to transfer the photos. 4. Press OK. to select the computer to which Use HP Instant Share User Guide 125
-
 1
1 -
2
-
3
-
4
-
5
-
6
-
7
-
8
-
9
-
10
-
11
-
12
-
13
-
14
-
15
-
16
-
17
-
18
-
19
-
20
-
21
-
22
-
23
-
24
-
25
-
26
-
27
-
28
-
29
-
30
-
31
-
32
-
33
-
34
-
35
-
36
-
37
-
38
-
39
-
40
-
41
-
42
-
43
-
44
-
45
-
46
-
47
-
48
-
49
-
50
-
51
-
52
-
53
-
54
-
55
-
56
-
57
-
58
-
59
-
60
-
61
-
62
-
63
-
64
-
65
-
66
-
67
-
68
-
69
-
70
-
71
-
72
-
73
-
74
-
75
-
76
-
77
-
78
-
79
-
80
-
81
-
82
-
83
-
84
-
85
-
86
-
87
-
88
-
89
-
90
-
91
-
92
-
93
-
94
-
95
-
96
-
97
-
98
-
99
-
100
-
101
-
102
-
103
-
104
-
105
-
106
-
107
-
108
-
109
-
110
-
111
-
112
-
113
-
114
-
115
-
116
-
117
-
118
-
119
-
120
-
121
-
122
-
 123
123 -
 124
124 -
 125
125 -
 126
126 -
 127
127 -
 128
128 -
 129
129 -
 130
130 -
 131
131 -
 132
132 -
 133
133 -
134
-
135
-
136
-
137
-
138
-
139
-
140
-
141
-
142
-
143
-
144
-
145
-
146
-
147
-
148
-
149
-
150
-
151
-
152
-
153
-
154
-
155
-
156
-
157
-
158
-
159
-
160
-
161
-
162
-
163
-
164
-
165
-
166
-
167
-
168
-
169
-
170
-
171
-
172
-
173
-
174
-
175
-
176
-
177
-
178
-
179
-
180
-
181
-
182
-
183
-
184
-
185
-
186
-
187
-
188
-
189
-
190
-
191
-
192
-
193
-
194
-
195
-
196
-
197
-
198
-
199
-
200
-
201
-
202
-
203
-
204
-
205
-
206
-
207
-
208
-
209
-
210
-
211
-
212
-
213
-
214
-
215
-
216
-
217
-
218
-
219
-
220
-
221
-
222
-
223
-
224
-
225
-
226
-
227
-
228
-
229
-
230
-
231
-
232
-
233
-
234
-
235
-
236
-
237
-
238
-
239
-
240
 |
 |