HP Officejet 7200 User Guide - Page 158
Print a self-test report, To check the ink levels from the HP Image Zone software Macintosh - all in one printer ink
 |
View all HP Officejet 7200 manuals
Add to My Manuals
Save this manual to your list of manuals |
Page 158 highlights
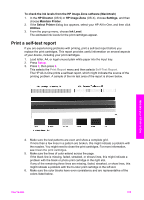
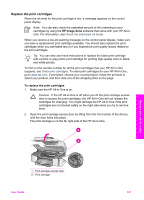
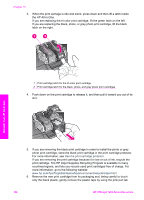
To check the ink levels from the HP Image Zone software (Macintosh) 1. In the HP Director (OS 9) or HP Image Zone (OS X), choose Settings, and then choose Maintain Printer. 2. If the Select Printer dialog box appears, select your HP All-in-One, and then click Utilities. 3. From the pop-up menu, choose Ink Level. The estimated ink levels for the print cartridges appear. Print a self-test report If you are experiencing problems with printing, print a self-test report before you replace the print cartridges. This report provides useful information on several aspects of your device, including your print cartridges. 1. Load letter, A4, or legal unused plain white paper into the input tray. 2. Press Setup. 3. Press 2, then press 6. This selects the Print Report menu and then selects Self-Test Report. The HP All-in-One prints a self-test report, which might indicate the source of the printing problem. A sample of the ink test area of the report is shown below. Maintain your HP All-in-One 4. Make sure the test patterns are even and show a complete grid. If more than a few lines in a pattern are broken, this might indicate a problem with the nozzles. You might need to clean the print cartridges. For more information, see Clean the print cartridges. 5. Make sure the lines of color extend across the page. If the black line is missing, faded, streaked, or shows lines, this might indicate a problem with the black or photo print cartridge in the right slot. If any of the remaining three lines are missing, faded, streaked, or show lines, this might indicate a problem with the tri-color print cartridge in the left slot. 6. Make sure the color blocks have even consistency and are representative of the colors listed below. User Guide 155
-
 1
1 -
2
-
3
-
4
-
5
-
6
-
7
-
8
-
9
-
10
-
11
-
12
-
13
-
14
-
15
-
16
-
17
-
18
-
19
-
20
-
21
-
22
-
23
-
24
-
25
-
26
-
27
-
28
-
29
-
30
-
31
-
32
-
33
-
34
-
35
-
36
-
37
-
38
-
39
-
40
-
41
-
42
-
43
-
44
-
45
-
46
-
47
-
48
-
49
-
50
-
51
-
52
-
53
-
54
-
55
-
56
-
57
-
58
-
59
-
60
-
61
-
62
-
63
-
64
-
65
-
66
-
67
-
68
-
69
-
70
-
71
-
72
-
73
-
74
-
75
-
76
-
77
-
78
-
79
-
80
-
81
-
82
-
83
-
84
-
85
-
86
-
87
-
88
-
89
-
90
-
91
-
92
-
93
-
94
-
95
-
96
-
97
-
98
-
99
-
100
-
101
-
102
-
103
-
104
-
105
-
106
-
107
-
108
-
109
-
110
-
111
-
112
-
113
-
114
-
115
-
116
-
117
-
118
-
119
-
120
-
121
-
122
-
123
-
124
-
125
-
126
-
127
-
128
-
129
-
130
-
131
-
132
-
133
-
134
-
135
-
136
-
137
-
138
-
139
-
140
-
141
-
142
-
143
-
144
-
145
-
146
-
147
-
148
-
149
-
150
-
151
-
152
-
 153
153 -
 154
154 -
 155
155 -
 156
156 -
 157
157 -
 158
158 -
 159
159 -
 160
160 -
 161
161 -
 162
162 -
 163
163 -
164
-
165
-
166
-
167
-
168
-
169
-
170
-
171
-
172
-
173
-
174
-
175
-
176
-
177
-
178
-
179
-
180
-
181
-
182
-
183
-
184
-
185
-
186
-
187
-
188
-
189
-
190
-
191
-
192
-
193
-
194
-
195
-
196
-
197
-
198
-
199
-
200
-
201
-
202
-
203
-
204
-
205
-
206
-
207
-
208
-
209
-
210
-
211
-
212
-
213
-
214
-
215
-
216
-
217
-
218
-
219
-
220
-
221
-
222
-
223
-
224
-
225
-
226
-
227
-
228
-
229
-
230
-
231
-
232
-
233
-
234
-
235
-
236
-
237
-
238
-
239
-
240
 |
 |