HP Officejet 7200 User Guide - Page 50
Scan a proof sheet, Set photo print options
 |
View all HP Officejet 7200 manuals
Add to My Manuals
Save this manual to your list of manuals |
Page 50 highlights
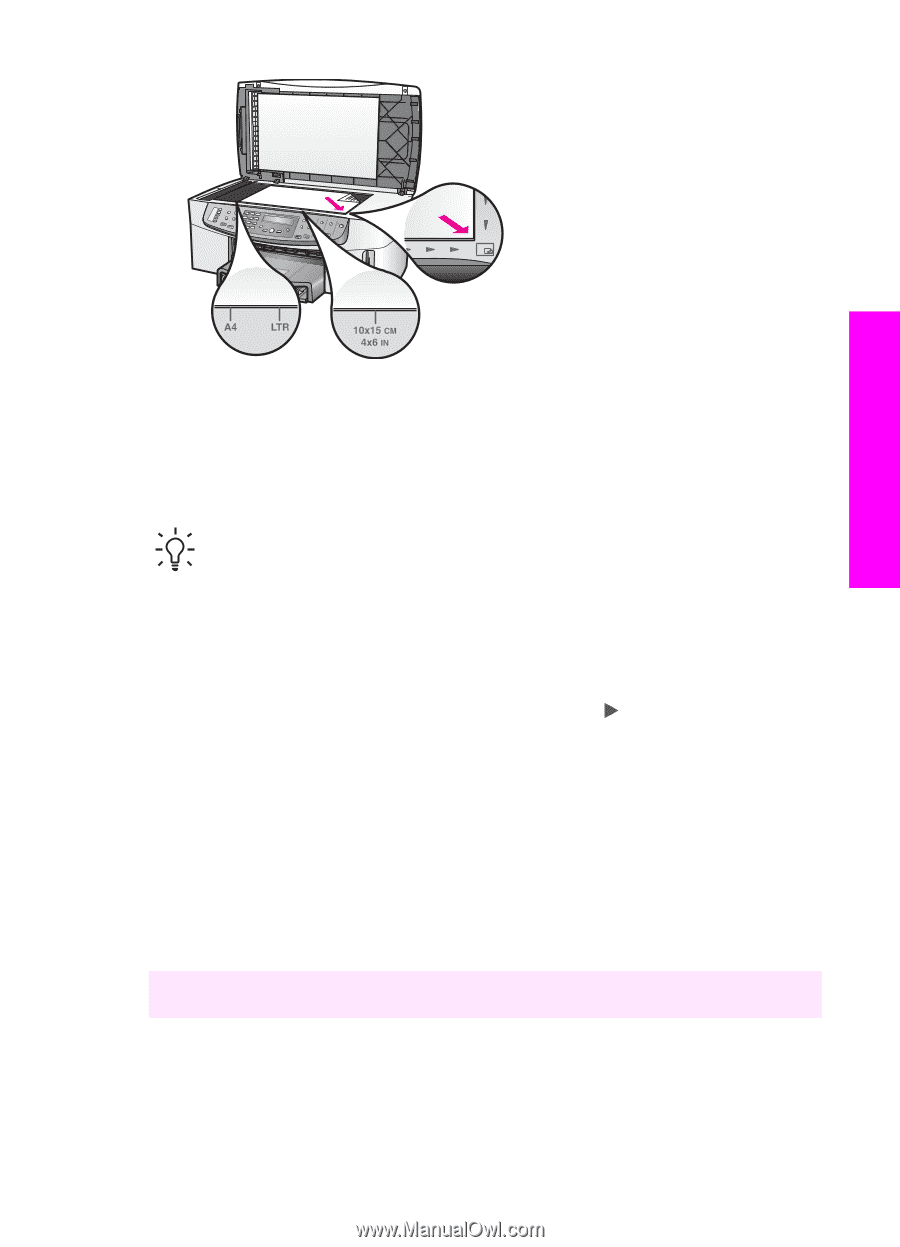
Memory Card and PictBridge Continue to the Scan a proof sheet section. Scan a proof sheet The final step in using a proof sheet is to scan the completed sheet you have placed on the glass. Tip Make sure the glass of the HP All-in-One is completely clean or the proof sheet might not scan properly. For more information, see Clean the glass. 1. Load the proof sheet face down on the right front corner of the glass. Make sure the sides of the proof sheet touch the right and front edges. Close the lid. 2. Make sure you have photo paper loaded in the input tray. Make sure the same memory card you used to print the proof sheet is still in the slot when you scan that proof sheet. 3. In the Photo area, press Proof Sheet, and then press to select Scan. 4. Press OK. The HP All-in-One scans the proof sheet and prints the selected photos. Set photo print options From the control panel, you can control how your HP All-in-One prints photos, including paper type and size, layout, and more. This section contains information on the following topics: setting photo print options, changing print options, and setting new photo print option defaults. You access and set photo print options from the Photo menu available through the control panel. You can also use the HP Image Zone software to set photo print options. For more information, see the HP Image Zone Help. User Guide 47
-
 1
1 -
2
-
3
-
4
-
5
-
6
-
7
-
8
-
9
-
10
-
11
-
12
-
13
-
14
-
15
-
16
-
17
-
18
-
19
-
20
-
21
-
22
-
23
-
24
-
25
-
26
-
27
-
28
-
29
-
30
-
31
-
32
-
33
-
34
-
35
-
36
-
37
-
38
-
39
-
40
-
41
-
42
-
43
-
44
-
 45
45 -
 46
46 -
 47
47 -
 48
48 -
 49
49 -
 50
50 -
 51
51 -
 52
52 -
 53
53 -
 54
54 -
 55
55 -
56
-
57
-
58
-
59
-
60
-
61
-
62
-
63
-
64
-
65
-
66
-
67
-
68
-
69
-
70
-
71
-
72
-
73
-
74
-
75
-
76
-
77
-
78
-
79
-
80
-
81
-
82
-
83
-
84
-
85
-
86
-
87
-
88
-
89
-
90
-
91
-
92
-
93
-
94
-
95
-
96
-
97
-
98
-
99
-
100
-
101
-
102
-
103
-
104
-
105
-
106
-
107
-
108
-
109
-
110
-
111
-
112
-
113
-
114
-
115
-
116
-
117
-
118
-
119
-
120
-
121
-
122
-
123
-
124
-
125
-
126
-
127
-
128
-
129
-
130
-
131
-
132
-
133
-
134
-
135
-
136
-
137
-
138
-
139
-
140
-
141
-
142
-
143
-
144
-
145
-
146
-
147
-
148
-
149
-
150
-
151
-
152
-
153
-
154
-
155
-
156
-
157
-
158
-
159
-
160
-
161
-
162
-
163
-
164
-
165
-
166
-
167
-
168
-
169
-
170
-
171
-
172
-
173
-
174
-
175
-
176
-
177
-
178
-
179
-
180
-
181
-
182
-
183
-
184
-
185
-
186
-
187
-
188
-
189
-
190
-
191
-
192
-
193
-
194
-
195
-
196
-
197
-
198
-
199
-
200
-
201
-
202
-
203
-
204
-
205
-
206
-
207
-
208
-
209
-
210
-
211
-
212
-
213
-
214
-
215
-
216
-
217
-
218
-
219
-
220
-
221
-
222
-
223
-
224
-
225
-
226
-
227
-
228
-
229
-
230
-
231
-
232
-
233
-
234
-
235
-
236
-
237
-
238
-
239
-
240
 |
 |