HP Officejet 7200 User Guide - Page 47
C:\Documents and Settings\username\My Documents\My Pictures, Drive:Users:User Name:Pictures:HP Photos
 |
View all HP Officejet 7200 manuals
Add to My Manuals
Save this manual to your list of manuals |
Page 47 highlights
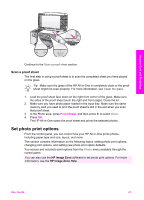
Memory Card and PictBridge Chapter 6 remove the memory card from the camera and insert it in the appropriate memory card slot on the HP All-in-One. Note You can only use one memory card in your HP All-in-One at a time. 1. Insert the memory card into the appropriate slot on your HP All-in-One. When the memory card is inserted correctly, the status light next to the memory card slots begins to blink. Reading photos... appears on the control panel display. The status light next to the memory card slots blinks green when the card is being accessed. If you insert a memory card incorrectly, the status light next to the memory card slots blinks amber and the control panel display shows an error message such as Card is in backwards or Card is not fully inserted. Caution Never attempt to remove a memory card while it is being accessed. Doing so can damage photo files on the card. You can safely remove a card only when the status light next to the memory card slots is not blinking. 2. If there are photo files on the memory card that have never been transferred before, a dialog box on your computer asks whether you want to save the photo files to your computer. If the HP All-in-One is on a network, the Photo menu appears with Photo Transfer selected. Press to select Yes, and then press OK. The transfer process is launched. When the Transfer To menu appears, press to select the computer where you want to transfer the photos. Press OK. The HP Photo Transfer software dialog box appears on your computer screen. 3. Click the option to save. This saves all the new photo files from the memory card to your computer. For Windows: by default, photo files are saved in month and year folders from when you extracted the files from your camera. The folders are created under the C:\Documents and Settings\username\My Documents\My Pictures folder in Windows XP and Windows 2000. For Macintosh: by default, photo files are saved to the computer at Hard Drive: Documents:HP All-in-One Data:Photos folder (OS 9) or Hard Drive:Users:User Name:Pictures:HP Photos folder (OS X). Tip You can also use the control panel to transfer photo files to an attached computer. In the Photo area, press Menu, and then press to select Transfer to computer, and then press OK. Follow the prompts on the computer. In addition, the memory card appears as a drive on your computer. You can move the photo files from the memory card to the desktop. When the HP All-in-One finishes reading the memory card, the status light next to the memory card slots stops blinking and stays lit. The first photo on the memory card appears on the control panel display. To navigate through the photo files on the memory card, press or to move backward or forward through the photo files, one photo file at a time. Press and hold or to move rapidly backward or forward through the photo files. 44 HP Officejet 7200 All-in-One series
-
 1
1 -
2
-
3
-
4
-
5
-
6
-
7
-
8
-
9
-
10
-
11
-
12
-
13
-
14
-
15
-
16
-
17
-
18
-
19
-
20
-
21
-
22
-
23
-
24
-
25
-
26
-
27
-
28
-
29
-
30
-
31
-
32
-
33
-
34
-
35
-
36
-
37
-
38
-
39
-
40
-
41
-
 42
42 -
 43
43 -
 44
44 -
 45
45 -
 46
46 -
 47
47 -
 48
48 -
 49
49 -
 50
50 -
 51
51 -
 52
52 -
53
-
54
-
55
-
56
-
57
-
58
-
59
-
60
-
61
-
62
-
63
-
64
-
65
-
66
-
67
-
68
-
69
-
70
-
71
-
72
-
73
-
74
-
75
-
76
-
77
-
78
-
79
-
80
-
81
-
82
-
83
-
84
-
85
-
86
-
87
-
88
-
89
-
90
-
91
-
92
-
93
-
94
-
95
-
96
-
97
-
98
-
99
-
100
-
101
-
102
-
103
-
104
-
105
-
106
-
107
-
108
-
109
-
110
-
111
-
112
-
113
-
114
-
115
-
116
-
117
-
118
-
119
-
120
-
121
-
122
-
123
-
124
-
125
-
126
-
127
-
128
-
129
-
130
-
131
-
132
-
133
-
134
-
135
-
136
-
137
-
138
-
139
-
140
-
141
-
142
-
143
-
144
-
145
-
146
-
147
-
148
-
149
-
150
-
151
-
152
-
153
-
154
-
155
-
156
-
157
-
158
-
159
-
160
-
161
-
162
-
163
-
164
-
165
-
166
-
167
-
168
-
169
-
170
-
171
-
172
-
173
-
174
-
175
-
176
-
177
-
178
-
179
-
180
-
181
-
182
-
183
-
184
-
185
-
186
-
187
-
188
-
189
-
190
-
191
-
192
-
193
-
194
-
195
-
196
-
197
-
198
-
199
-
200
-
201
-
202
-
203
-
204
-
205
-
206
-
207
-
208
-
209
-
210
-
211
-
212
-
213
-
214
-
215
-
216
-
217
-
218
-
219
-
220
-
221
-
222
-
223
-
224
-
225
-
226
-
227
-
228
-
229
-
230
-
231
-
232
-
233
-
234
-
235
-
236
-
237
-
238
-
239
-
240
 |
 |