HP Officejet 7200 User Guide - Page 213
Remove print cartridges from a functional HP All-in-One, Remove print cartridges from - scanner failure
 |
View all HP Officejet 7200 manuals
Add to My Manuals
Save this manual to your list of manuals |
Page 213 highlights
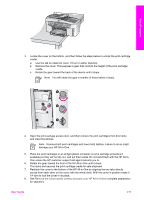
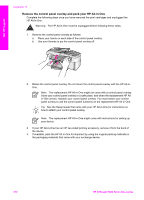
Get HP support Appendix 17 Note This information does not apply to customers in Japan. For information on service options in Japan, see HP Quick Exchange Service (Japan). Remove print cartridges from a functional HP All-in-One 1. Turn on the HP All-in-One. See Remove print cartridges from a nonfunctional HP All-in-One if your device will not turn on. 2. Open the print-carriage access door. 3. Wait until the print carriage is idle and silent, and then remove the print cartridges from their slots and lower the latches. For information on removing the print cartridges, see Replace the print cartridges. Note Remove both print cartridges and lower both latches. Failure to do so might damage your HP All-in-One. 4. Place the print cartridges in an airtight plastic container (or print cartridge protectors if available) so they will not dry out, and put them aside. Do not send them with the HP All-inOne unless the HP customer support call agent instructs you to. 5. Close the print-carriage access door and wait a few minutes for the print carriage to move back to its home position (on the right side). Note Make sure the scanner has returned to its parked position before turning off the HP All-in-One. 6. Press the On button to turn off the HP All-in-One. 7. Unplug the power cord, and then disconnect it from the HP All-in-One. Note Do not return the power cord and power supply with the HP All-in-One. The replacement HP All-in-One will not be shipped with these items. Store the power cord and power supply in a safe place until the replacement HP All-in-One arrives. 8. See Remove the control panel overlay and pack your HP All-in-One to complete preparation for shipment. Remove print cartridges from a nonfunctional HP All-in-One Follow these steps if you need to remove print cartridges for shipment and your HP All-in-One will not turn on. See Remove print cartridges from a functional HP All-in-One if your device is turning on. Follow the steps below to unlock the print cartridge cradle, remove the print cartridges, and then lock the print cartridge cradle. 1. Unplug the power cord, and then disconnect it from the HP All-in-One. Note Do not return the power cord and power supply with the HP All-in-One. The replacement HP All-in-One will not be shipped with these items. Store the power cord and power supply in a safe place until the replacement HP All-in-One arrives. 2. Facing the front of the HP All-in-One, turn the right-hand side toward you until approximately 12.5 cm (5 inches) of the bottom right side hangs over the edge of a flat surface (such as a desk or table). This exposes a round purple cover on the bottom. Warning Do not tilt the HP All-in-One on its side; this might damage the device. 210 HP Officejet 7200 All-in-One series
-
 1
1 -
2
-
3
-
4
-
5
-
6
-
7
-
8
-
9
-
10
-
11
-
12
-
13
-
14
-
15
-
16
-
17
-
18
-
19
-
20
-
21
-
22
-
23
-
24
-
25
-
26
-
27
-
28
-
29
-
30
-
31
-
32
-
33
-
34
-
35
-
36
-
37
-
38
-
39
-
40
-
41
-
42
-
43
-
44
-
45
-
46
-
47
-
48
-
49
-
50
-
51
-
52
-
53
-
54
-
55
-
56
-
57
-
58
-
59
-
60
-
61
-
62
-
63
-
64
-
65
-
66
-
67
-
68
-
69
-
70
-
71
-
72
-
73
-
74
-
75
-
76
-
77
-
78
-
79
-
80
-
81
-
82
-
83
-
84
-
85
-
86
-
87
-
88
-
89
-
90
-
91
-
92
-
93
-
94
-
95
-
96
-
97
-
98
-
99
-
100
-
101
-
102
-
103
-
104
-
105
-
106
-
107
-
108
-
109
-
110
-
111
-
112
-
113
-
114
-
115
-
116
-
117
-
118
-
119
-
120
-
121
-
122
-
123
-
124
-
125
-
126
-
127
-
128
-
129
-
130
-
131
-
132
-
133
-
134
-
135
-
136
-
137
-
138
-
139
-
140
-
141
-
142
-
143
-
144
-
145
-
146
-
147
-
148
-
149
-
150
-
151
-
152
-
153
-
154
-
155
-
156
-
157
-
158
-
159
-
160
-
161
-
162
-
163
-
164
-
165
-
166
-
167
-
168
-
169
-
170
-
171
-
172
-
173
-
174
-
175
-
176
-
177
-
178
-
179
-
180
-
181
-
182
-
183
-
184
-
185
-
186
-
187
-
188
-
189
-
190
-
191
-
192
-
193
-
194
-
195
-
196
-
197
-
198
-
199
-
200
-
201
-
202
-
203
-
204
-
205
-
206
-
207
-
 208
208 -
 209
209 -
 210
210 -
 211
211 -
 212
212 -
 213
213 -
 214
214 -
 215
215 -
 216
216 -
 217
217 -
 218
218 -
219
-
220
-
221
-
222
-
223
-
224
-
225
-
226
-
227
-
228
-
229
-
230
-
231
-
232
-
233
-
234
-
235
-
236
-
237
-
238
-
239
-
240
 |
 |