HP StorageWorks 2/16V Brocade Web Tools Administrator's Guide (53-0000194-01, - Page 101
Enabling and Disabling a Port
 |
View all HP StorageWorks 2/16V manuals
Add to My Manuals
Save this manual to your list of manuals |
Page 101 highlights
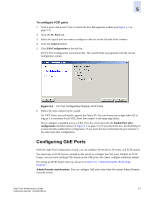
5 To rename a port 1. Click a port in the Switch View to launch the Port Management module (see Figure 5-1 on page 5-2). 2. Click the FC Ports tab. 3. Click the switch or slot that contains the port you want to rename in the tree on the left side of the window. 4. Select the port in the table on the right side of the window. 5. Click Rename in the task bar. 6. Type a name for the port and click Ok. To delete the existing port name, type spaces or leave a blank string and click Ok. Enabling and Disabling a Port On FC4-18i and FC4-16IP port blades, all ports are disabled by default. You can disable and reenable them as needed. Note If FC Routing is disabled, then all of the EX_Ports are automatically disabled and you cannot enable them until FC Routing is enabled. If a port is not licensed you cannot enable it until you install the appropriate license, such as a Ports on Demand or N-Port ID Virtualization license (see "Activating Ports" on page 5-12 for more information). The Licensed field located in the General tab in the Port Management module indicates whether a port is licensed. Note If you disable a principal ISL port (an ISL port that has been designated by the fabric to be a part of the path to communicate with the principal switch), the fabric reconfigures. If you disable a port that was connected to a device, that device is no longer accessible from the fabric. For more information, see the Fabric OS Administrator's Guide. To enable or disable a port 1. Click a port in the Switch View to launch the Port Management module (see Figure 5-1 on page 5-2). 2. Click the FC Ports or GigE Ports tab. 3. Click the switch or slot that contains the port you want to enable or disable in the tree on the left side of the window. 4. Select the port in the table on the right side of the window. Use Shift-click and Ctrl-click to select multiple ports. You can select multiple ports from the table, but not from the tree. Web Tools Administrator's Guide 5-9 Publication Number: 53-0000194-01
-
 1
1 -
2
-
3
-
4
-
5
-
6
-
7
-
8
-
9
-
10
-
11
-
12
-
13
-
14
-
15
-
16
-
17
-
18
-
19
-
20
-
21
-
22
-
23
-
24
-
25
-
26
-
27
-
28
-
29
-
30
-
31
-
32
-
33
-
34
-
35
-
36
-
37
-
38
-
39
-
40
-
41
-
42
-
43
-
44
-
45
-
46
-
47
-
48
-
49
-
50
-
51
-
52
-
53
-
54
-
55
-
56
-
57
-
58
-
59
-
60
-
61
-
62
-
63
-
64
-
65
-
66
-
67
-
68
-
69
-
70
-
71
-
72
-
73
-
74
-
75
-
76
-
77
-
78
-
79
-
80
-
81
-
82
-
83
-
84
-
85
-
86
-
87
-
88
-
89
-
90
-
91
-
92
-
93
-
94
-
95
-
 96
96 -
 97
97 -
 98
98 -
 99
99 -
 100
100 -
 101
101 -
 102
102 -
 103
103 -
 104
104 -
 105
105 -
 106
106 -
107
-
108
-
109
-
110
-
111
-
112
-
113
-
114
-
115
-
116
-
117
-
118
-
119
-
120
-
121
-
122
-
123
-
124
-
125
-
126
-
127
-
128
-
129
-
130
-
131
-
132
-
133
-
134
-
135
-
136
-
137
-
138
-
139
-
140
-
141
-
142
-
143
-
144
-
145
-
146
-
147
-
148
-
149
-
150
-
151
-
152
-
153
-
154
-
155
-
156
-
157
-
158
-
159
-
160
-
161
-
162
-
163
-
164
-
165
-
166
-
167
-
168
-
169
-
170
-
171
-
172
-
173
-
174
-
175
-
176
-
177
-
178
-
179
-
180
-
181
-
182
-
183
-
184
-
185
-
186
-
187
-
188
-
189
-
190
-
191
-
192
-
193
-
194
-
195
-
196
-
197
-
198
-
199
-
200
-
201
-
202
-
203
-
204
-
205
-
206
-
207
-
208
-
209
-
210
-
211
-
212
-
213
-
214
-
215
-
216
-
217
-
218
-
219
-
220
-
221
-
222
-
223
-
224
-
225
-
226
-
227
-
228
-
229
-
230
-
231
-
232
-
233
-
234
-
235
-
236
-
237
-
238
-
239
-
240
-
241
-
242
-
243
-
244
-
245
-
246
-
247
-
248
-
249
-
250
-
251
-
252
-
253
-
254
-
255
-
256
-
257
-
258
-
259
-
260
-
261
-
262
-
263
-
264
-
265
-
266
-
267
-
268
-
269
-
270
-
271
-
272
-
273
-
274
-
275
-
276
-
277
-
278
-
279
-
280
-
281
-
282
-
283
-
284
-
285
-
286
-
287
-
288
-
289
-
290
-
291
-
292
-
293
-
294
-
295
-
296
-
297
-
298
-
299
-
300
-
301
-
302
-
303
-
304
-
305
-
306
-
307
-
308
 |
 |
