HP StorageWorks 2/16V Brocade Web Tools Administrator's Guide (53-0000194-01, - Page 239
Activating the iSCSI Feature, Configuring the IP Interface
 |
View all HP StorageWorks 2/16V manuals
Add to My Manuals
Save this manual to your list of manuals |
Page 239 highlights
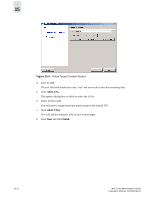
15 Generally, the default user Admin Domain is AD0. The recommended practice is to perform all iSCSI management from AD0; you can make changes from AD255 but you will not be able to make any zoning changes. 3. Click the iSCSI button on the Switch View. The iSCSI target gateway services module is displayed. Note If the iSCSI target gateway services is disabled, a message to that effect is displayed and a message to activate the iSCSI feature is also displayed. Activating the iSCSI Feature A director by default has iSCSI disabled. If a switch has iSCSI disabled or there is no iSCSI virtual target created yet, WebTools assumes that iSCSI has not been activated. When you click the iSCSI button from Switch View to launch the iSCSI Target Gateway Admin module, all features are disabled or grayed out except the Enable iSCSI button located in the menu bar and the iSCSI Ports tab. In some instances, the iSCSI feature is not activated but the configuration exists. If this is the case, the entire iSCSI tab will be disabled (grayed out) except the Enable iSCSI button located in the menu bar. To activate the iSCSI Feature 1. Ensure that the blade is inserted in the director and powered on. 2. Launch the iSCSI Target Gateway Admin module as described on page 15-6. 3. Click Enable iSCSI. 4. Click Apply. Configuring the IP Interface This step configures iSCSI ports (GbE Ports) found on the FC4-16IP. At least one iSCSI port needs to be configured in order to progress with the rest of the iSCSI operations. There are two steps in this process: • Configure the IP interface for iSCSI port. • Configure the IP route for the iSCSI port. The iSCSI Port Group tab allows you to configure iSCSI ports, displays session details on a port, and shows the port statistics. It also allows you to view and configure the IP interface and routes that are located on the IP Interface tab. You can edit or delete the IP address, but you cannot add any additional IP addresses to this interface. When you select the switch in the left pane, the right pane lists the tasks you can perform on that switch in relation to one of the GbE ports. Web Tools Administrator's Guide Publication Number: 53-0000194-01 15-7
-
 1
1 -
2
-
3
-
4
-
5
-
6
-
7
-
8
-
9
-
10
-
11
-
12
-
13
-
14
-
15
-
16
-
17
-
18
-
19
-
20
-
21
-
22
-
23
-
24
-
25
-
26
-
27
-
28
-
29
-
30
-
31
-
32
-
33
-
34
-
35
-
36
-
37
-
38
-
39
-
40
-
41
-
42
-
43
-
44
-
45
-
46
-
47
-
48
-
49
-
50
-
51
-
52
-
53
-
54
-
55
-
56
-
57
-
58
-
59
-
60
-
61
-
62
-
63
-
64
-
65
-
66
-
67
-
68
-
69
-
70
-
71
-
72
-
73
-
74
-
75
-
76
-
77
-
78
-
79
-
80
-
81
-
82
-
83
-
84
-
85
-
86
-
87
-
88
-
89
-
90
-
91
-
92
-
93
-
94
-
95
-
96
-
97
-
98
-
99
-
100
-
101
-
102
-
103
-
104
-
105
-
106
-
107
-
108
-
109
-
110
-
111
-
112
-
113
-
114
-
115
-
116
-
117
-
118
-
119
-
120
-
121
-
122
-
123
-
124
-
125
-
126
-
127
-
128
-
129
-
130
-
131
-
132
-
133
-
134
-
135
-
136
-
137
-
138
-
139
-
140
-
141
-
142
-
143
-
144
-
145
-
146
-
147
-
148
-
149
-
150
-
151
-
152
-
153
-
154
-
155
-
156
-
157
-
158
-
159
-
160
-
161
-
162
-
163
-
164
-
165
-
166
-
167
-
168
-
169
-
170
-
171
-
172
-
173
-
174
-
175
-
176
-
177
-
178
-
179
-
180
-
181
-
182
-
183
-
184
-
185
-
186
-
187
-
188
-
189
-
190
-
191
-
192
-
193
-
194
-
195
-
196
-
197
-
198
-
199
-
200
-
201
-
202
-
203
-
204
-
205
-
206
-
207
-
208
-
209
-
210
-
211
-
212
-
213
-
214
-
215
-
216
-
217
-
218
-
219
-
220
-
221
-
222
-
223
-
224
-
225
-
226
-
227
-
228
-
229
-
230
-
231
-
232
-
233
-
 234
234 -
 235
235 -
 236
236 -
 237
237 -
 238
238 -
 239
239 -
 240
240 -
 241
241 -
 242
242 -
 243
243 -
 244
244 -
245
-
246
-
247
-
248
-
249
-
250
-
251
-
252
-
253
-
254
-
255
-
256
-
257
-
258
-
259
-
260
-
261
-
262
-
263
-
264
-
265
-
266
-
267
-
268
-
269
-
270
-
271
-
272
-
273
-
274
-
275
-
276
-
277
-
278
-
279
-
280
-
281
-
282
-
283
-
284
-
285
-
286
-
287
-
288
-
289
-
290
-
291
-
292
-
293
-
294
-
295
-
296
-
297
-
298
-
299
-
300
-
301
-
302
-
303
-
304
-
305
-
306
-
307
-
308
 |
 |
