HP Visualize J5000 hp Visualize J5000, J7000 workstations service handbook (a4 - Page 110
Memory DIMMs, Removing a Memory DIMM, DIMM Extractor Handles
 |
View all HP Visualize J5000 manuals
Add to My Manuals
Save this manual to your list of manuals |
Page 110 highlights
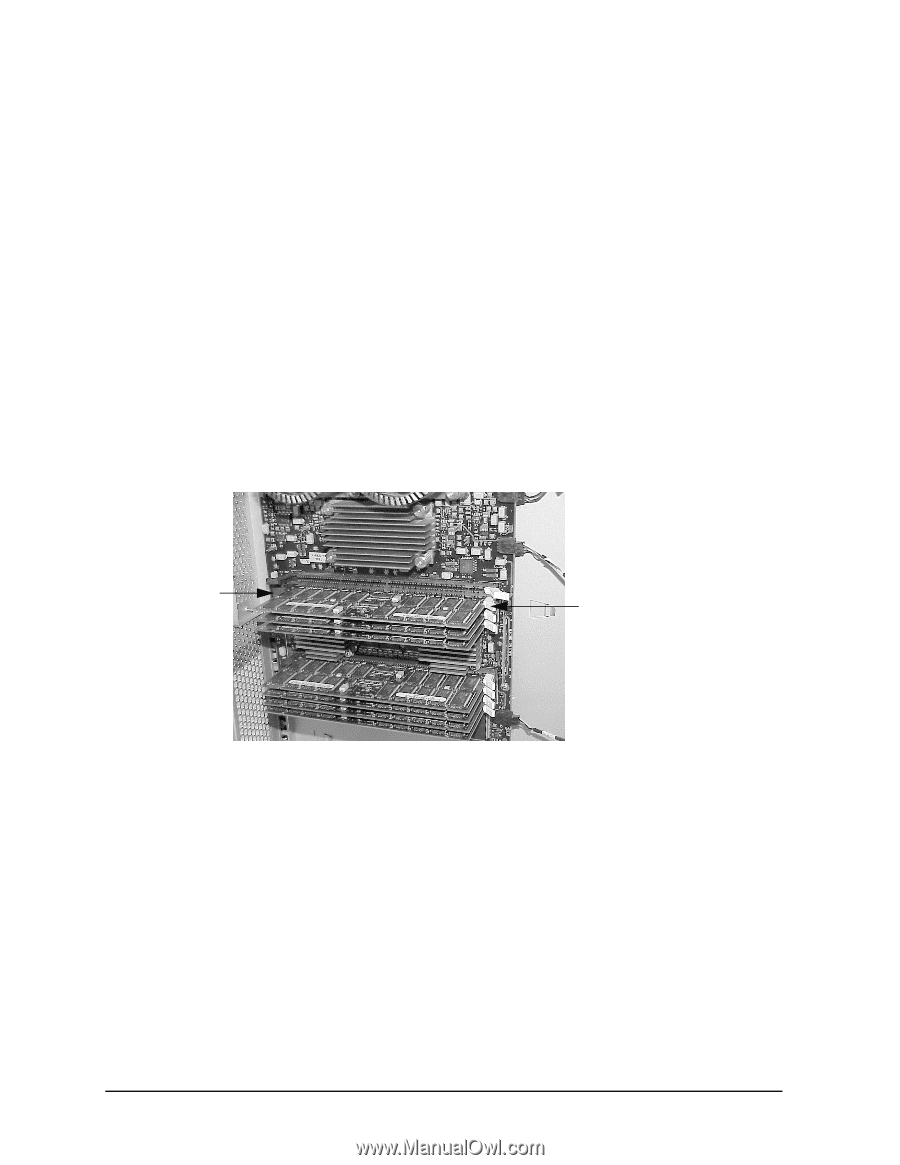
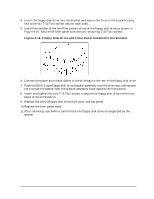
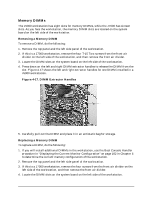
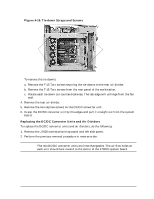
Field Replaceable Units (FRUs) FRU Removal and Replacement Memory DIMMs The J5000 workstation has eight slots for memory DIMMs, while the J7000 has sixteen slots. As you face the workstation, the memory DIMM slots are located on the system board on the left side of the workstation. Removing a Memory DIMM To remove a DIMM, do the following: 1. Remove the top panel and the left side panel of the workstation. 2. If this is a J7000 workstation, remove the four T-15 Torx screws from the front air divider on the left side of the workstation, and then remove the front air divider. 3. Locate the DIMM slots on the system board on the left side of the workstation. 4. Press down on the left and right DIMM extractor handles to release the DIMM from the slot. Figure 4-17 shows the left and right extractor handles for one DIMM installed in a J5000 workstation. Figure 4-17. DIMM Extractor Handles Left extractor handle Right extractor handle 5. Carefully pull out the DIMM and place it in an antistatic bag for storage. Replacing a Memory DIMM To replace a DIMM, do the following: 1. If you will install additional DIMMs in the workstation, use the Boot Console Handler procedure in "Displaying the Current Monitor Configuration" on page 162 in Chapter 5 to determine the current memory configuration of the workstation. 2. Remove the top panel and the left side panel of the workstation. 3. If this is a J7000 workstation, remove the four screws from the front air divider on the left side of the workstation, and then remove the front air divider. 4. Locate the DIMM slots on the system board on the left side of the workstation. 106 Chapter 4
-
 1
1 -
2
-
3
-
4
-
5
-
6
-
7
-
8
-
9
-
10
-
11
-
12
-
13
-
14
-
15
-
16
-
17
-
18
-
19
-
20
-
21
-
22
-
23
-
24
-
25
-
26
-
27
-
28
-
29
-
30
-
31
-
32
-
33
-
34
-
35
-
36
-
37
-
38
-
39
-
40
-
41
-
42
-
43
-
44
-
45
-
46
-
47
-
48
-
49
-
50
-
51
-
52
-
53
-
54
-
55
-
56
-
57
-
58
-
59
-
60
-
61
-
62
-
63
-
64
-
65
-
66
-
67
-
68
-
69
-
70
-
71
-
72
-
73
-
74
-
75
-
76
-
77
-
78
-
79
-
80
-
81
-
82
-
83
-
84
-
85
-
86
-
87
-
88
-
89
-
90
-
91
-
92
-
93
-
94
-
95
-
96
-
97
-
98
-
99
-
100
-
101
-
102
-
103
-
104
-
 105
105 -
 106
106 -
 107
107 -
 108
108 -
 109
109 -
 110
110 -
 111
111 -
 112
112 -
 113
113 -
 114
114 -
 115
115 -
116
-
117
-
118
-
119
-
120
-
121
-
122
-
123
-
124
-
125
-
126
-
127
-
128
-
129
-
130
-
131
-
132
-
133
-
134
-
135
-
136
-
137
-
138
-
139
-
140
-
141
-
142
-
143
-
144
-
145
-
146
-
147
-
148
-
149
-
150
-
151
-
152
-
153
-
154
-
155
-
156
-
157
-
158
-
159
-
160
-
161
-
162
-
163
-
164
-
165
-
166
-
167
-
168
-
169
-
170
-
171
-
172
-
173
-
174
-
175
-
176
-
177
-
178
-
179
-
180
-
181
-
182
-
183
-
184
-
185
-
186
-
187
-
188
-
189
-
190
-
191
-
192
-
193
-
194
-
195
-
196
-
197
-
198
-
199
-
200
-
201
-
202
-
203
-
204
-
205
-
206
-
207
-
208
-
209
-
210
-
211
-
212
 |
 |