HP Visualize J5000 hp Visualize J5000, J7000 workstations service handbook (a4 - Page 44
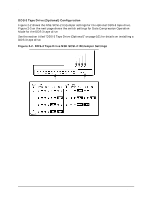
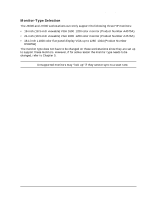
Memory Loading Order in the J5000, J7000 Memory Configuration
 |
View all HP Visualize J5000 manuals
Add to My Manuals
Save this manual to your list of manuals |
Page 44 highlights
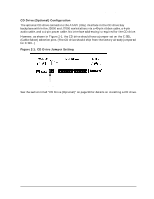
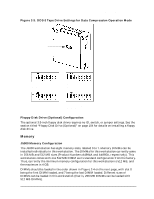
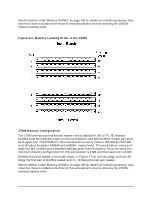
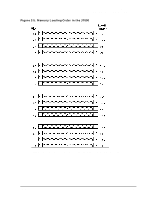
Configuration Field Replaceable Unit (FRU) Configurations See the section titled "Memory DIMMs" on page 106 for details on installing memory. Also note that there is a label on the floor of the workstation's interior showing the J5000's memory loading order. Figure 2-4. Memory Loading Order in the J5000 J7000 Memory Configuration The J7000 workstation has sixteen memory slots, labeled 0A, 0B to 7A, 7B. Memory DIMMs must be installed in pairs in this workstation, and both DIMMs in each pair must be of equal size. The DIMMs for this workstation currently come in 256 MB and 512 MB sizes (Product Numbers A4994A and A4995A, respectively). This workstation comes with eight 512 MB DIMMs as its standard configuration from the factory. Thus, currently the minimum memory configuration for this workstation is 4 GB, and the maximum is 8 GB. DIMMs should be loaded in the order shown in Figure 2-5 on the next page, with 0A, 0B being the first pair of DIMMs loaded, and 7A, 7B being the last pair loaded. See the section titled "Memory DIMMs" on page 106 for details on installing memory. Also note that there is a label on the floor of the workstation's interior showing the J7000's memory loading order. 40 Chapter 2
-
 1
1 -
2
-
3
-
4
-
5
-
6
-
7
-
8
-
9
-
10
-
11
-
12
-
13
-
14
-
15
-
16
-
17
-
18
-
19
-
20
-
21
-
22
-
23
-
24
-
25
-
26
-
27
-
28
-
29
-
30
-
31
-
32
-
33
-
34
-
35
-
36
-
37
-
38
-
 39
39 -
 40
40 -
 41
41 -
 42
42 -
 43
43 -
 44
44 -
 45
45 -
 46
46 -
 47
47 -
 48
48 -
 49
49 -
50
-
51
-
52
-
53
-
54
-
55
-
56
-
57
-
58
-
59
-
60
-
61
-
62
-
63
-
64
-
65
-
66
-
67
-
68
-
69
-
70
-
71
-
72
-
73
-
74
-
75
-
76
-
77
-
78
-
79
-
80
-
81
-
82
-
83
-
84
-
85
-
86
-
87
-
88
-
89
-
90
-
91
-
92
-
93
-
94
-
95
-
96
-
97
-
98
-
99
-
100
-
101
-
102
-
103
-
104
-
105
-
106
-
107
-
108
-
109
-
110
-
111
-
112
-
113
-
114
-
115
-
116
-
117
-
118
-
119
-
120
-
121
-
122
-
123
-
124
-
125
-
126
-
127
-
128
-
129
-
130
-
131
-
132
-
133
-
134
-
135
-
136
-
137
-
138
-
139
-
140
-
141
-
142
-
143
-
144
-
145
-
146
-
147
-
148
-
149
-
150
-
151
-
152
-
153
-
154
-
155
-
156
-
157
-
158
-
159
-
160
-
161
-
162
-
163
-
164
-
165
-
166
-
167
-
168
-
169
-
170
-
171
-
172
-
173
-
174
-
175
-
176
-
177
-
178
-
179
-
180
-
181
-
182
-
183
-
184
-
185
-
186
-
187
-
188
-
189
-
190
-
191
-
192
-
193
-
194
-
195
-
196
-
197
-
198
-
199
-
200
-
201
-
202
-
203
-
204
-
205
-
206
-
207
-
208
-
209
-
210
-
211
-
212
 |
 |
