HP Visualize J5000 hp Visualize J5000, J7000 workstations service handbook (a4 - Page 138
The Flex Cable Disconnected from the I/O Board Side, Ultra2 Wide LVD SCSI cable
 |
View all HP Visualize J5000 manuals
Add to My Manuals
Save this manual to your list of manuals |
Page 138 highlights
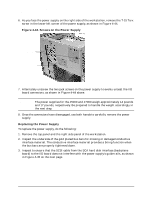
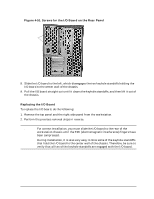
Field Replaceable Units (FRUs) FRU Removal and Replacement CAUTION Do not pull on the center of the flex cable's ejector handle, as this may bend or break the ejector handle. Only pull on the two outer corners of the ejector handle, as indicated by the arrows on the flex cable. Figure 4-50. The Flex Cable Disconnected from the I/O Board Side 6. Disconnect all cables from the I/O board, including: • Ultra2 Wide LVD SCSI cable • NSE SCSI-2 cable • DDS-3 tape drive/floppy disk drive cable • Speaker cable • Fan cable • Power cable • CD drive power cable and audio cable 7. Remove the two T-15 Torx screws that secure the I/O board to the rear panel of the workstation, as shown in Figure 4-51 on the next page. 134 Chapter 4
-
 1
1 -
2
-
3
-
4
-
5
-
6
-
7
-
8
-
9
-
10
-
11
-
12
-
13
-
14
-
15
-
16
-
17
-
18
-
19
-
20
-
21
-
22
-
23
-
24
-
25
-
26
-
27
-
28
-
29
-
30
-
31
-
32
-
33
-
34
-
35
-
36
-
37
-
38
-
39
-
40
-
41
-
42
-
43
-
44
-
45
-
46
-
47
-
48
-
49
-
50
-
51
-
52
-
53
-
54
-
55
-
56
-
57
-
58
-
59
-
60
-
61
-
62
-
63
-
64
-
65
-
66
-
67
-
68
-
69
-
70
-
71
-
72
-
73
-
74
-
75
-
76
-
77
-
78
-
79
-
80
-
81
-
82
-
83
-
84
-
85
-
86
-
87
-
88
-
89
-
90
-
91
-
92
-
93
-
94
-
95
-
96
-
97
-
98
-
99
-
100
-
101
-
102
-
103
-
104
-
105
-
106
-
107
-
108
-
109
-
110
-
111
-
112
-
113
-
114
-
115
-
116
-
117
-
118
-
119
-
120
-
121
-
122
-
123
-
124
-
125
-
126
-
127
-
128
-
129
-
130
-
131
-
132
-
 133
133 -
 134
134 -
 135
135 -
 136
136 -
 137
137 -
 138
138 -
 139
139 -
 140
140 -
 141
141 -
 142
142 -
 143
143 -
144
-
145
-
146
-
147
-
148
-
149
-
150
-
151
-
152
-
153
-
154
-
155
-
156
-
157
-
158
-
159
-
160
-
161
-
162
-
163
-
164
-
165
-
166
-
167
-
168
-
169
-
170
-
171
-
172
-
173
-
174
-
175
-
176
-
177
-
178
-
179
-
180
-
181
-
182
-
183
-
184
-
185
-
186
-
187
-
188
-
189
-
190
-
191
-
192
-
193
-
194
-
195
-
196
-
197
-
198
-
199
-
200
-
201
-
202
-
203
-
204
-
205
-
206
-
207
-
208
-
209
-
210
-
211
-
212
 |
 |
134
Chapter 4
Field Replaceable Units (FRUs)
FRU Removal and Replacement
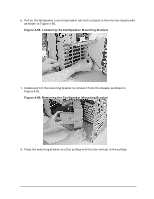
CAUTION
Do
not
pull on the center of the flex cable’s ejector handle, as this may bend or
break the ejector handle.
Only
pull on the two outer corners of the ejector
handle, as indicated by the arrows on the flex cable.
Figure 4-50. The Flex Cable Disconnected from the I/O Board Side
6.
Disconnect all cables from the I/O board, including:
•
Ultra2 Wide LVD SCSI cable
•
NSE SCSI-2 cable
•
DDS-3 tape drive/floppy disk drive cable
•
Speaker cable
•
Fan cable
•
Power cable
•
CD drive power cable and audio cable
7.
Remove the two T-15 Torx screws that secure the I/O board to the rear panel of the
workstation, as shown in Figure 4-51 on the next page.